PingOne Platform APIs

Getting Started

This guide uses fundamental workflows to walk you through the steps to get an access token, and begin using the PingOne APIs.

You’ll need to understand these PingOne terms used in the workflows:

  • Environment

    Although an environment is automatically created for you when you first sign on to PingOne, for the purposes of these workflows, you’ll create an additional, new environment.

  • Worker app

    A Worker app is an admin-level application connection to PingOne that interacts with the PingOne APIs on your behalf. When you obtain an access token from a Worker app, the Worker app has admin-level access to all of the PingOne APIs. A Worker app’s authorized access to PingOne API resources is determined by the roles and associated permissions that you assign to the Worker app.

  • Access Token

    An access token is a JSON Web Token (JWT) required to authorize any calls to the PingOne Platform APIs. An access token is valid for 1 hour. You’ll then need to request a new access token.

  • Population

    A population is a collection of users within a PingOne environment, similar to an organizational unit (OU) in a traditional LDAP implementation. This gives you a way to manage and apply operations to a large set of users.

Refer to PingOne for Developers Foundations for more background and conceptual information.

Authentication and authorization

We’re using OpenID Connect or OAuth 2 for the API requests using in the workflows. The authorization requests are identified by an {{authPath}} variable. The PingOne top-level domain is https://auth.pingone.com/ for the U.S. Refer to PingOne API domains for the top-level domains for other regions.

The authorization requests to get an access token use Basic authentication with an authorization code grant type. Requests to the {{authPath}} endpoint are used to obtain a Bearer token. This token is required for use by calls to the {{apiPath}} endpoint, the endpoint for the majority of the PingOne APIs.

What you’ll do

There are three inter-related workflows you’ll use to:

  1. Sign on to the admin console for your PingOne environment, create an admin-level Worker app, and assign roles to the Worker app. This is the only workflow for which you’ll use the admin console. The remaining workflows use only the PingOne APIs.

  2. Create and initially configure a new test environment.

  3. As part of the workflow to create a new environment, you’ll get an admin access token (a JSON Web Token) for the Worker app you created. This access token gives the Worker app the necessary permissions to call any of the PingOne APIs.

  4. Create a web application for users to sign-on (SSO) to PingOne through a Web application.

How the workflows interact

Workflows

The Postman choice

We use Postman to create our PingOne API docs, and have done so in this Getting Started guide as well. We highly recommend you use Postman to complete the workflows using the PingOne APIs (Task 2: Create a test environment and Task 3: Create an SSO workflow). We’ve configured a Postman collection for you to download in each of these workflows, so you can call these requests in your own Postman installation. There’s also an accompanying Postman Environment template already populated with the necessary variables.

Postman offers a free version. Refer to Download Postman.

If you’d rather not install Postman, this guide doesn’t limit or constrain you in that respect. Each Postman request in this guide is well-documented, and has a dropdown list to show the coding language to use for the request. (This is also true for our Platform Reference API docs.)

RequestLanguage

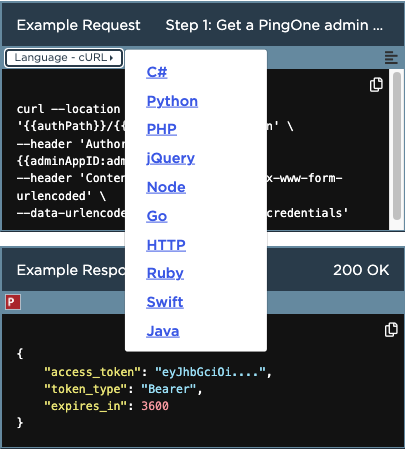
You can use cURL (the default) and call the request from your command line, or select one of the other coding languages in the dropdown list, copy the request into your IDE, and call it from there.