Configuring iOS apps for Pushed Authorization Requests
PingOne PingOne Advanced Identity Cloud PingAM iOS
You can configure iOS apps built with the Orchestration SDK to use Pushed Authorization Requests (PAR, RFC 9126) for OIDC sign-on.
When PAR is enabled, the Orchestration SDK sends the OIDC authorization parameters to the server’s /par endpoint before the browser redirect.
The server returns a short-lived request_uri.
The browser is then redirected to the /authorize endpoint using only that reference, keeping authorization parameters out of browser history and proxy logs.
Before you begin
You need to prepare your authorization server to support PAR.
Select your server from the options below and complete the tasks before proceeding to configure your application.
-
PingOne
-
PingOne Advanced Identity Cloud
-
PingAM
Ensure your PingOne OAuth 2.0 application is already configured for OIDC sign-on before enabling PAR.
Task 1. Configure a public OAuth 2.0 client for PAR
PingOne supports PAR for OIDC sign-on without any additional server configuration.
By default, PingOne accepts both standard and PAR authorization requests.
Optionally, you can require all authorization requests to use PAR by enabling Require Pushed Authorization Request on the Configuration tab of your PingOne application.
To register a public OAuth 2.0 client application in PingOne for use with the Orchestration SDKs for Android and iOS, follow these steps:
-
Log in to your PingOne administration console.
-
In the left panel, navigate to Applications > Applications.
-
Next to the Applications label, click the plus icon ().
PingOne displays the Add Application panel.
-
In Application Name, enter a name for the profile, for example
sdkNativeClient -
Select Native as the Application Type, and then click Save.
-
On the Configuration tab, click the pencil icon ().
-
In Grant Type, select the following values:
Authorization CodeRefresh Token -
In Redirect URIs, enter the following values:
com.example.demo://oauth2redirect -
In Token Endpoint Authentication Method, select
None. -
Click Save.
-
-
On the Resources tab, next to Allowed Scopes, click the pencil icon ().
-
In Scopes, select the following values:
emailphoneprofileThe openidscope is selected by default.
-
-
Optionally, on the Policies tab, click the pencil icon () to select the authentication policies for the application.
Applications that have no authentication policy assignments use the environment’s default authentication policy to authenticate users.
If you have a DaVinci license, you can select PingOne policies or DaVinci Flow policies, but not both. If you do not have a DaVinci license, the page only displays PingOne policies.
To use a PingOne policy:
-
Click Add policies and then select the policies that you want to apply to the application.
-
Click Save.
PingOne applies the policies in the order in which they appear in the list. PingOne evaluates the first policy in the list first. If the requirements are not met, PingOne moves to the next one.
For more information, see Authentication policies for applications.
To use a DaVinci Flow policy:
-
You must clear all PingOne policies. Click Deselect all PingOne Policies.
-
In the confirmation message, click Continue.
-
On the DaVinci Policies tab, select the policies that you want to apply to the application.
-
Click Save.
PingOne applies the first policy in the list.
-
-
Click Save.
-
Enable the OAuth 2.0 client application by using the toggle next to its name:
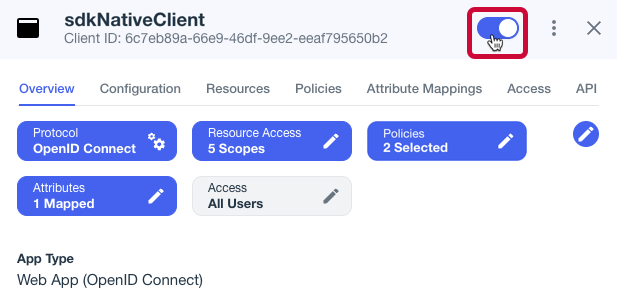 Figure 1. Enable the application using the toggle.
The application is now configured to accept client connections from and issue OAuth 2.0 tokens to the Android and iOS PingOne example applications and tutorials covered by this documentation.
Complete the following tasks to prepare your PingOne Advanced Identity Cloud tenant for PAR:
Task 1. Create a demo user
The samples and tutorials in this documentation often require that you have an identity set up so that you can test authentication.
To create a demo user in PingOne Advanced Identity Cloud, follow these steps:
-
Log in to your PingOne Advanced Identity Cloud tenant.
-
In the left panel, click Identities > Manage.
-
Click New Alpha realm - User.
-
Enter the following details:
-
Username =
demo -
First Name =
Demo -
Last Name =
User -
Email Address =
demo.user@example.com -
Password =
Ch4ng3it!
-
-
Click Save.
Task 2. Register a public OAuth 2.0 client
Public clients do not use a client secret to obtain tokens because they are unable to keep them hidden. The Orchestration SDKs commonly use this type of client to obtain tokens, as they cannot guarantee safekeeping of the client credentials in a browser or on a mobile device.
To register a public OAuth 2.0 client application for use with the SDKs in PingOne Advanced Identity Cloud, follow these steps:
-
Log in to your PingOne Advanced Identity Cloud tenant.
-
In the left panel, click Applications.
-
Click Custom Application.
-
Select OIDC - OpenId Connect as the sign-in method, and then click Next.
-
Select Native / SPA as the application type, and then click Next.
-
In Name, enter a name for the application, such as
Public SDK Client. -
In Owners, select a user that is responsible for maintaining the application, and then click Next.
When trying out the SDKs, you could select the demouser you created previously. -
In Client ID, enter
sdkPublicClient -
Select Configure for SDK Sample Apps.
-
Click Create Application.
PingOne Advanced Identity Cloud creates the application and displays the details screen.
-
On the Sign On tab:
-
In Sign-In URLs, ensure the following values appear, or add them if they don’t:
com.example.demo://oauth2redirectAlso add any other domains where you host SDK applications. -
In Grant Types, ensure the following values appear:
Authorization CodeRefresh Token -
In Scopes, ensure the following values appear:
openid profile email address
-
-
Click Show advanced settings, and on the Authentication tab, confirm the following properties:
-
In Token Endpoint Authentication Method, select
none. -
In Client Type, select
Public. -
Enable the Implied Consent property.
-
-
Click Save.
The application is now configured to accept client connections from and issue OAuth 2.0 tokens to the example applications and tutorials covered by this documentation.
Task 3. Configure the OAuth 2.0 provider
The provider specifies the supported OAuth 2.0 configuration options for a realm.
To configure the PingOne Advanced Identity Cloud OAuth 2.0 provider for use with the Orchestration SDKs and enable PAR:
-
In your PingOne Advanced Identity Cloud tenant, navigate to Native Consoles > Access Management.
-
In the left panel, click Services.
-
In the list of services, click OAuth2 Provider.
-
On the Core tab, ensure Issue Refresh Tokens is enabled.
-
On the Consent tab, ensure Allow Clients to Skip Consent is enabled.
-
On the Advanced tab, enable Pushed Authorization Requests.
-
Click Save Changes.
Complete the following tasks to prepare your PingAM server for PAR:
Task 1. Create a demo user
The samples and tutorials in this documentation often require that you have an identity set up so that you can test authentication.
To create a demo user in PingAM, follow these steps:
-
Log in to the PingAM admin UI as an administrator.
-
Navigate to Identities, and then click Add Identity.
-
Enter the following details:
-
User ID =
demo -
Password =
Ch4ng3it! -
Email Address =
demo.user@example.com
-
-
Click Create.
Task 2. Register a public OAuth 2.0 client
Public clients do not use a client secret to obtain tokens because they are unable to keep them hidden. The Orchestration SDKs commonly use this type of client to obtain tokens, as they cannot guarantee safekeeping of the client credentials in a browser or on a mobile device.
To register a public OAuth 2.0 client application for use with the SDKs in AM, follow these steps:
-
Log in to the PingAM admin UI as an administrator.
-
Navigate to Applications > OAuth 2.0 > Clients, and then click Add Client.
-
In Client ID, enter
sdkPublicClient. -
Leave Client secret empty.
-
In Redirection URIs, enter the following values:
com.example.demo://oauth2redirectAlso add any other domains where you will be hosting SDK applications. -
In Scopes, enter the following values:
openid profile email address -
Click Create.
PingAM creates the new OAuth 2.0 client, and displays the properties for further configuration.
-
On the Core tab:
-
In Client type, select
Public. -
Disable Allow wildcard ports in redirect URIs.
-
Click Save Changes.
-
-
On the Advanced tab:
-
In Grant Types, enter the following values:
Authorization Code Refresh Token -
In Token Endpoint Authentication Method, select
None. -
Enable the Implied consent property.
-
-
Click Save Changes.
Task 3. Configure the OAuth 2.0 provider
The provider specifies the supported OAuth 2.0 configuration options for a realm.
To configure the PingAM OAuth 2.0 provider for use with the Orchestration SDKs and enable PAR:
-
Log in to the PingAM admin UI as an administrator.
-
In the left panel, click Services.
-
In the list of services, click OAuth2 Provider.
-
On the Core tab, ensure Issue Refresh Tokens is enabled.
-
On the Consent tab, ensure Allow Clients to Skip Consent is enabled.
-
On the Advanced tab, enable Pushed Authorization Requests.
-
Click Save Changes.
Configuring an OIDC client for PAR on iOS
To enable PAR, set par = true in the OidcWebClient configuration block.
When par = true, the Orchestration SDK performs the following steps during each OIDC sign-on:
-
Collects all authorization parameters (client ID, scopes, redirect URI, PKCE challenge, and any additional parameters).
-
Sends them as a
POSTrequest to the server’spushed_authorization_request_endpoint.The
pushed_authorization_request_endpointURL is read automatically from the server’s.well-known/openid-configurationdocument when the Orchestration SDK initializes. -
Receives a short-lived
request_urifrom the server. -
Redirects the browser to the
/authorizeendpoint using onlyclient_idandrequest_uri. No other parameters are required.Additional parameters can appear on this redirect when passed to the
authorizeclosure.Learn more in Adding data to PAR requests.
let oidcLogin = OidcWebClient.createOidcWebClient { config in
    config.module(PingOidc.OidcModule.config) { oidcValue in
        oidcValue.clientId = "6c7eb89a-66e9-ab12-cd34-eeaf795650b2"
        oidcValue.discoveryEndpoint =
            "https://auth.pingone.ca/3072206d-c6ce-ch15-m0nd-f87e972c7cc3/as/.well-known/openid-configuration"
        oidcValue.scopes = ["openid", "email", "profile"]
        oidcValue.redirectUri = "com.example.demo://oauth2redirect"
        oidcValue.par = true
    }
}
Starting the browser, handling the redirect, and exchanging the code for tokens all work identically to a standard OIDC flow.
|
If To verify, fetch the |
Adding data to PAR requests
To include extra parameters in the PAR POST body, set them in the OIDC module configuration.
When PAR is enabled, the OIDC module automatically folds the acrValues and additionalParameters configuration properties into the PAR request body.
let oidcLogin = OidcWebClient.createOidcWebClient { config in
    config.module(PingOidc.OidcModule.config) { oidcValue in
        oidcValue.clientId = "6c7eb89a-66e9-ab12-cd34-eeaf795650b2"
        oidcValue.discoveryEndpoint =
            "https://auth.pingone.ca/3072206d-c6ce-ch15-m0nd-f87e972c7cc3/as/.well-known/openid-configuration"
        oidcValue.scopes = ["openid", "email", "profile"]
        oidcValue.redirectUri = "com.example.demo://oauth2redirect"
        oidcValue.acrValues = "urn:acr:example"
        oidcValue.additionalParameters = ["custom_param": "custom_value"]
        oidcValue.par = true
    }
}
For per-request parameters that do not need to be PAR-protected, pass them in the authorize closure.
The SDK applies these parameters after the PAR POST completes.
Therefore, when PAR is enabled, the Orchestration SDK appends these parameters to the slim /authorize redirect URL and does not include them in the PAR POST body.
authorize closurelet result = try await oidcLogin.authorize { options in
options.additionalParameters = ["login_hint": "user@example.com"]
}