Configuring social sign-on in Advanced Identity Cloud or PingAM
PingOne Advanced Identity Cloud PingAM Android iOS JavaScript React Native
This page walks you through configuring your identity providers (IdP) to work with your apps through PingOne Advanced Identity Cloud and PingAM authentication journeys.
Step 1. Configuring external identity providers
Configuring Apple as an external identity provider
Signing up for an Apple developer account
You must enroll in the Apple Developer program.
| Apple Developer Enterprise Program accounts are not able to configure Sign in with Apple. |
Setting up application redirection
After Apple processes the initial authorization request and the user is successfully authenticated, Sign in with Apple sends an HTTP POST request to PingOne Advanced Identity Cloud or PingAM containing the authorization results.
For a web application (SPA) or an Android device, the POST request is sent to a dynamically created endpoint, specified in the Apple Sign In configuration as the redirect URL.
The redirect URL
To complete Apple client set up, you need the full redirect URL. This URL is not made available until you fully set up the provider in PingAM. If you have already set up your Apple provider, the redirect URL resembles the following:
https://<tenant-env-fqdn>/am/oauth2/<realm>/client/form_post/<secondary-configuration-name>Setting up Apple sign in
Creating an app ID
-
Log in to your Apple developer account.
-
In the Program resources category, under Certificates, Identifiers & Profiles, click Identifiers.
-
Click the plus button () next to the Identifiers header.
-
Select App IDs, and click Continue.
-
Select App type, and click Continue.
-
Type a description of your app, and provide a
Bundle IDusingreverse-domain name style.For example
com.forgerock.ios.sdk.example. -
Select
Sign in with Apple, and click Continue. -
Review your entry, and click Register.
Creating a service ID
-
On the Identifiers page, click the plus button () next to the Identifier header.
-
Select Service IDs, and click Continue.
-
Enter a description of your service.
-
Enter an
Identifierthat is similar to your app ID.For example,
<app-id>.service. -
Click Continue.
-
Review your entry, and click Register.
Configuring the Apple sign in service
-
On the Identifiers page, click the dropdown next to the magnifying glass icon, and then select Services IDs.
-
Select the service ID you created.
-
Next to
Sign in with Apple, click Configure. -
Click the plus button next to the Website URLs header.
-
In Domains and Subdomains:
-
For JavaScript apps, enter the domains that host your app.
For example,
sdkapp.example.orgDuring testing, do not use the
example.comdomain to host your application. Apple treats this domain differently than other domains, which can cause unexpected issues.Using
example.orgor any other domain does not present these same difficulties. -
For native Android and iOS apps, enter the domain of your PingOne Advanced Identity Cloud or PingAM instance.
For example,
openam-forgerock-sdks.forgeblocks.com
-
-
In Return URLs, enter the URL that Apple redirects users to after authentication.
Users must be redirected back to PingOne Advanced Identity Cloud or PingAM to continue their authentication journey.
The URL to use is dynamically created by PingOne Advanced Identity Cloud or PingAM when you configure identity providers, and uses the following syntax:
- Advanced Identity Cloud
-
https://<tenant-env-fqdn>/am/oauth2/<realm>/client/form_post/<secondary-configuration-name> - PingAM
-
https://<am-fqdn>/openam/oauth2/client/form_post/<secondary-configuration-name>
-
Click Next.
-
Review, and click Done.
Creating a key
Store your key in a safe location. You cannot download keys more than once.
-
On the developer account page, in the left navigation panel, click Keys.
-
Click the plus button next to the Keys header.
-
Enter your key name, and select Sign in with Apple.
-
Click Configure, select your primary app ID, and click Save.
-
Click Continue.
-
Review, and click Register.
Generating a client secret
The client secret for Apple sign is a JSON Web token (JWT). The JWT is more complex than a simple string. A common way of generating the JWT is to use the jwt/ruby-jwt library.
Before you create the JWT, you need to understand certain requirements. To learn about these requirements, see Apple’s documentation about generating and validating tokens.
Configuring the client ID
-
For Native iOS: The
client_idshould be theAppID(bundle identifier) from the Apple Development portal. -
For Web or Android: The
client_idshould be theServiceIDfrom the Apple Development portal.
Example signing script:
require "jwt"

key_file = [Key file name]
team_id = [Team ID]
client_id = [AppID or Service ID]
key_id = [Key ID]
validity_period = 180 # In days. Max 180 (6 months) according to Apple docs.

private_key = OpenSSL::PKey::EC.new IO.read key_file

token = JWT.encode(
    {
        iss: team_id,
        iat: Time.now.to_i,
        exp: Time.now.to_i + 86400 * validity_period,
        aud: "https://appleid.apple.com",
        sub: client_id
    },
    private_key,
    "ES256",
    header_fields=
    {
        kid: key_id
    }
)
puts token
Configuring Facebook as an external identity provider
To use Facebook as an Identity Provider, visit the Facebook for Developers page, and follow these steps:
-
Click the Create App button.
-
Select Consumer for app type, and click Next.
-
Enter your app’s display name and contact email.
-
Click the Create app button.
-
On the Add products to your app page, under Facebook Login, click Set up.
-
In the left navigation panel, click Settings > Basic.
-
Take note of the App ID and App secret values.
Generating a hash of your signing key
The default keystore password for Android Studio is android.
-
To generate a key hash value, in a terminal window, enter the following command:
keytool -exportcert -alias androiddebugkey -keystore ~/.android/debug.keystore | openssl sha1 -binary | openssl base64
-
Note the key hash value for later use.
Configuring Facebook for an Android app
-
On the developer apps page, double-click an Android app.
-
In the left navigation panel, select Settings > Basic.
-
At the bottom of the page, click Add platform, select Android, and click Next.
-
In the Select Android Store dialog, select a store.
For example, Google Play.
-
Click Next.
-
Scroll down to the Android section.
-
In the Key hashes field, enter the key hash value you generated earlier.
-
In the Package Names field, enter your app’s Google Play Package Name.
The name is often a reverse domain name, such as
com.example.app. -
In the Class Name field, enter your app’s class name.
-
Click Save changes.
Configuring Facebook for an iOS app
-
On the developer apps page, select iOS.
-
Click Next.
-
Enter your Bundle ID.
The name is often a reverse domain name, such as
com.example.app. -
Click Save changes.
-
In the left navigation panel, under Facebook Login, select Quickstart.
-
Click iOS.
-
Read the information, and select your package manager.
-
Click Next.
-
Enter your Bundle ID.
-
Click Save.
-
Click Continue.
-
Select your single sign-on settings.
-
When you get to Configure Your info.plist, configure your
info.plistfile with the XML snippet that contains data for your app.
Configuring Google as an external identity provider
To use Google as an IdP, visit Google’s API Dashboard, and follow these steps:
-
In the left navigation, click Credentials.
-
Click CREATE CREDENTIALS > OAuth client ID.
- For an Android app
-
-
Select
Androidas the value for Application Type. -
In the Name field, type a name for this application.
-
Enter the package name from the
AndroidManifest.xmlfile. -
Enter the SHA-1 certificate fingerprint.
Use the following command to get the fingerprint:
keytool -keystore path-to-debug-or-production-keystore -list -v
-
Click Create.
-
- For an iOS app
-
-
Select
iOSas the value for Application Type. -
In the Name field, type a name for this application.
-
Enter the bundle id as listed in the app’s
Info.plistfile. -
If the app is listed in the Apple App Store, enter the Apple ID of the app.
-
Enter the Team ID that Apple assigned to your team.
-
Click Create.
-
- For a JavaScript app
-
-
Select
Web applicationas the value for Application Type. -
In the Name field, type a name for this application.
-
Under Authorized JavaScript Origins, add the origins of the apps that use Google as an IdP.
Origins include scheme, domain, and port.
-
Under Authorized redirect URIs, add the full redirect URLs of your apps that handle the redirection from Google after user login.
-
Click Create.
-
Enabling native Android social authentication
To enable native Android social authentication, you must create two OAuth 2.0 clients in the Google API console:
-
Create an OAuth 2.0 client for the Android application itself.
See the step for an Android app above.
-
Create a separate OAuth 2.0 client to allow Advanced Identity Cloud or PingAM to communicate with the Google APIs.
See the step for a JavaScript app above.
Step 2. Configuring Advanced Identity Cloud or PingAM for social sign-on
Enabling identity providers
If you are using Advanced Identity Cloud:
-
Log in to the PingOne Advanced Identity Cloud tenant as an administrator.
-
Click Native Consoles.
-
Click Access Management.
If you are using PingAM:
-
Log in to the Access Management administrative console.
For both servers:
-
Click Services.
-
Click Social Identity Providers Service, or create it by clicking Add a Service.
Once in the service, ensure it is enabled.
-
To manage your IdPs, click the Secondary Configurations tab.
Setting up your configuration for providers is mostly the same, but there are a few differences with Apple that are described below.
You will likely need a configuration for each platform that you develop.
Use a naming scheme that’s easy to remember, such as google_web, google_ios, google_android.
Configure Google and Facebook
-
Under Secondary Configuration, click Add a Secondary Configuration, and choose the provider to configure.
The following fields are required:
- Client ID
-
This is the ID for the client registered with the IdP. For native Android, set up the client with the second OAuth set of credentials generated using the web configuration.
- Client Secret
-
This is the secret for the client registered with the IdP.
-
Facebook provides a client secret.
- Android
-
You must set up the secret with the second OAuth set of credentials generated using the Web configuration.
- iOS
-
The Google Credentials do not provide a client secret.
- Redirect URL
-
The redirect URL/URI for your application after the user authenticates with the provider.
- Scope Delimiter
-
" "(a literal space character)
-
For native iOS and Android apps, set Enable Native Nonce to
OFF.The option is
ONby default. -
Click Create.
-
Ensure that the configuration is enabled, and the
Transform Scriptis set toGoogle Profile Normalization, orFacebook Profile Normalization.
Configure Apple
-
Under Secondary Configuration, click Add a Secondary Configuration, and choose the Apple Provider Configuration.
The following fields are required:
- Client ID
-
For native iOS, use the app ID created in the Apple developer page.
For Android or Web, use the service ID.
- Client Secret
-
The JWT client secret you generated.
- Redirect URL
-
- Native iOS
-
Use the
<application-uri>of your app.The
<application-uri>can vary as it does not impact the flow. - Android or Web
-
For PingAM, use
<forgerock-url>/am/oauth2/client/form_post/<configuration-name>. For example, the configuration name here isapple_web.You can also add the redirect URI from the OAuth2.0 client settings.
For Advanced Identity Cloud, use
<tenant-url>/am/oauth2/<realmName>/client/form_post/<configuration-name>.
- (Optional) Redirect after form post URL
-
This is only needed for configurations that use an PingOne Advanced Identity Cloud or PingAM endpoint for handling the POST redirection from Apple. The value of this field is the URL/URI of the Android or web app handling the remainder of the login flow.
- Scope Delimiter
-
" "(a literal space character) - OAuth Scopes
-
Include the value
emailin this field to include the user’s Apple ID email in the JWT response and the identity token.If you add the email scope after a user agrees to provide scopes, the JWT response and the identity token will not include the user’s Apple ID email.
To troubleshoot when the JWT response does not include the user’s Apple ID email.
-
Sign in with your Apple ID used for authentication at the Apple ID page.
-
Under Security > Sign in with Apple, click Manage apps & websites > Apps & websites using Apple ID.
-
Select the application you are developing using Sign in with Apple.
-
Click Stop using Apple ID.
-
Attempt to re-authenticate in your app.
For more information, read Sign in with Apple - Updated Scope Not Reflected in JWT Claims.
-
- Well Known Endpoint
-
https://appleid.apple.com/.well-known/openid-configuration - Issuer
-
https://appleid.apple.com
-
Click Create to save your configuration.
-
Add these values to complete the configuration:
- Response Mode
-
- Native iOS
-
Use
Default. - Android or Web
-
Use
FORM_POST.
- Transform Script
-
Ensure
Apple Profile Normalizationis selected.
Creating social sign-on authentication journeys
After configuring the provider services, the next step is to build your authentication journey. There are countless ways to compose authentication journeys. This page covers the basics.
We have two different sets of authentication nodes that provide social login capabilities. This page focuses on the node sets supported by the Orchestration SDKs:
- The Select Identity Provider node
-
The Select Identity Provider node has the following important settings.
- Include local authentication
-
When enabled, this includes an additional "provider" in the
SelectIdPCallbackcalledlocalAuthentication. This also enables a different outcome of the node that you can connect to a local authentication path. The node will now have two outcomes:Social Authentication, andLocal Authentication. - Filter enabled providers
-
This setting further reduces the number of providers passed to your application. This is often used when you have providers configured for different platforms, and you only want the platform specific providers sent to the application.
For more information, see the Select Identity Provider node reference.
- Social Provider Handler node
-
The Social Provider Handler node has the following important settings:
- Transformation Script
-
Set
Normalized Profile to Managed User. - Client Type
-
Use
BROWSERwhen authentication goes through a browser redirect — this is always the case for JavaScript, and also applies to mobile providers that don’t have a native SDK available on a given platform.Use
NATIVEwhen using a provider’s native SDK on mobile.
For more information, see the Social Provider Handler node reference.
Example social sign-on authentication journeys
Use the following sample journeys as guidance for your own.
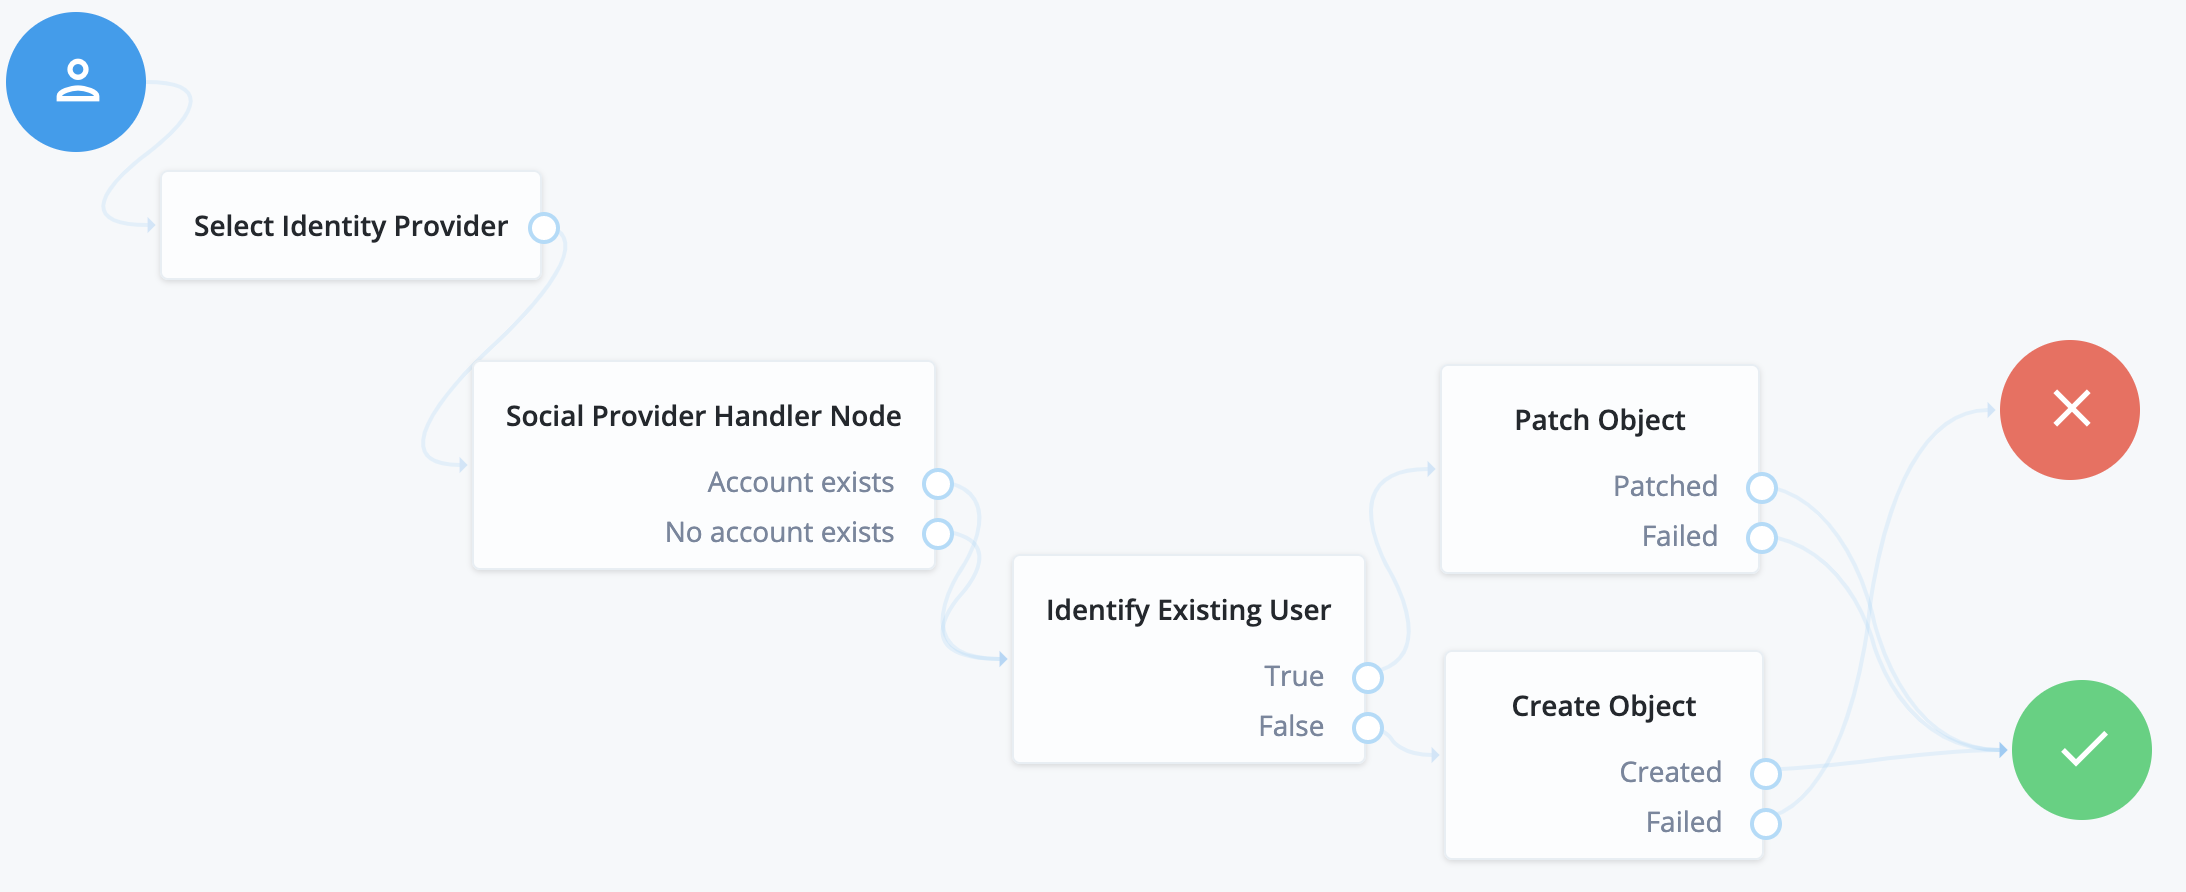
Social authentication only journey
A user is presented with a choice of providers, the choice is made, and the user is taken to the IdP to authenticate.
Upon the user’s return, the user management capabilities read the identity information from the provider to verify, allow, or deny access to the system.
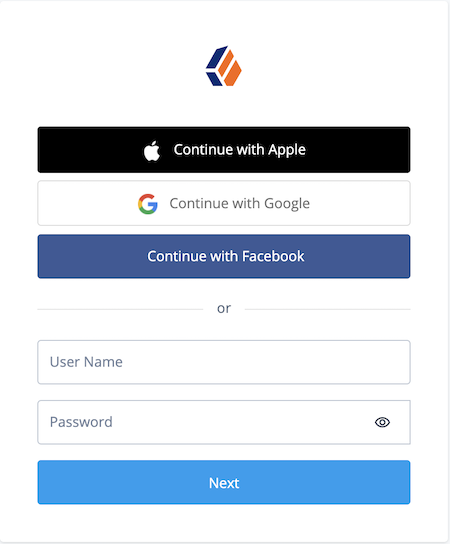
Social authentication and local username-password journey
This is one of the more common authentication journeys seen across the web.
This is a choice between using a third-party identity provider, or using first-party credentials with username and password directly.
The UI for this combination might resemble the following:
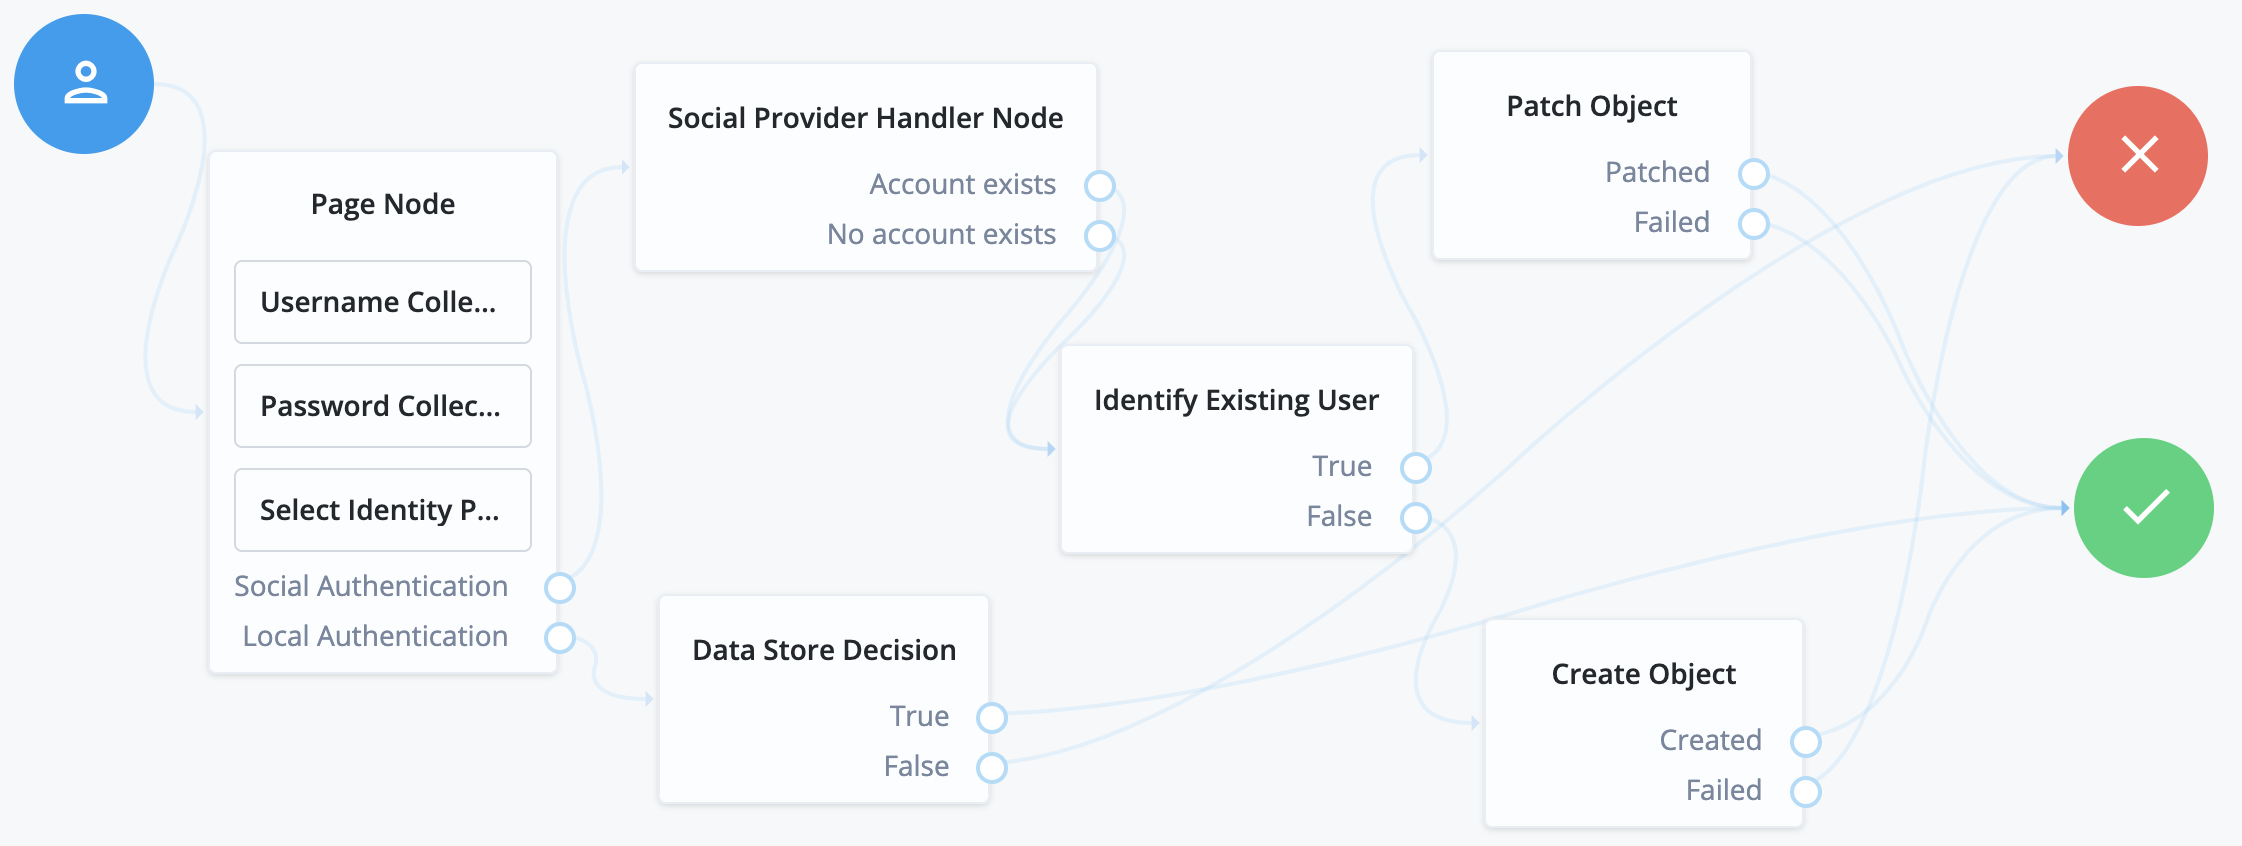
To compose this type of journey, use a Page node to combine the following nodes:
-
Username Collector/Platform Username
-
Password Collector/Platform Password
-
Select Identity Provider (enable
Include local authentication)
Creating users in a specific realm
To create users in a specific realm, link the Create node and the Patch node to the IDM users and their realm.
For example, for users in the alpha realm, set the Create node and the Patch node as follows:
- Create Object node
-
Set Identity Resource to
managed/alpha_user. - Patch Object node
-
Set Identity Resource to
managed/alpha_user.
For more information, see the Create Object node, and Patch Object node references.
Next Steps
In this section you completed the following tasks:
-
Added client credentials in your IdPs so that your app and server can connect
-
Configured your server with the details of the client credentials you created in the IdPs
You can now proceed to configuring your client apps to step through the auth journeys and perform social sign-on: