Preparing PingOne for FIDO on iOS
PingOne iOS
To use FIDO authentication in your iOS apps when using PingOne you must complete the following tasks:
Step 1. Associating your iOS app with your PingOne server
You can create an apple-app-site-association file that creates a secure association between your domain and your app. This allows you to share credentials, and use universal links to open your app from your website.
To create the secure association, you upload the apple-app-site-association file to your domain.
Preparing a site association file
-
Prepare a JSON-formatted file named
apple-app-site-association, as shown below.Ensure you include the
webcredentialsentitlement{ "applinks": { "details": [ { "appIDs": [ "XXXXXXXXXX.com.example.AppName" ], "components": [ { "/": "/reset/*", "comment": "Success after reset password journey" } ] } ] }, "webcredentials": { "apps": [ "XXXXXXXXXX.com.example.AppName" ] } } -
Replace XXXXXXXXXX.com.example.AppName with the app ID of your client iOS application.
Learn more in Supporting associated domains in the Apple Developer documentation.
Hosting apple-app-site-association files when using PingOne
For your FIDO implementation on iOS, you must host the apple-app-site-association JSON file at a specific location on the web server that corresponds to your Relying Party (RP) ID.
You don’t add a .json extension to this filename.
Your server can host the file at one of two locations:
-
At the root of your domain:
https://<your-RP-domain>/apple-app-site-association -
In the
.well-knowndirectory:https://<your-RP-domain>/.well-known/apple-app-site-association
When you configure your server, follow these key requirements:
-
Ensure
<your-RP-domain>in the URL exactly matches the domain associated with your FIDO Relying Party (RP) ID. -
Serve the file exclusively over an HTTPS connection.
-
Set the
Content-TypeHTTP header toapplication/jsonwhen serving the file. -
Serve the file directly from the URL without any redirects. iOS won’t follow redirects when it fetches the file.
|
Make a note of the domain where you uploaded the file, as you’ll need to add matching Associated Domains Entitlement keys to your iOS project. |
Step 2. Configuring a FIDO policy in PingOne
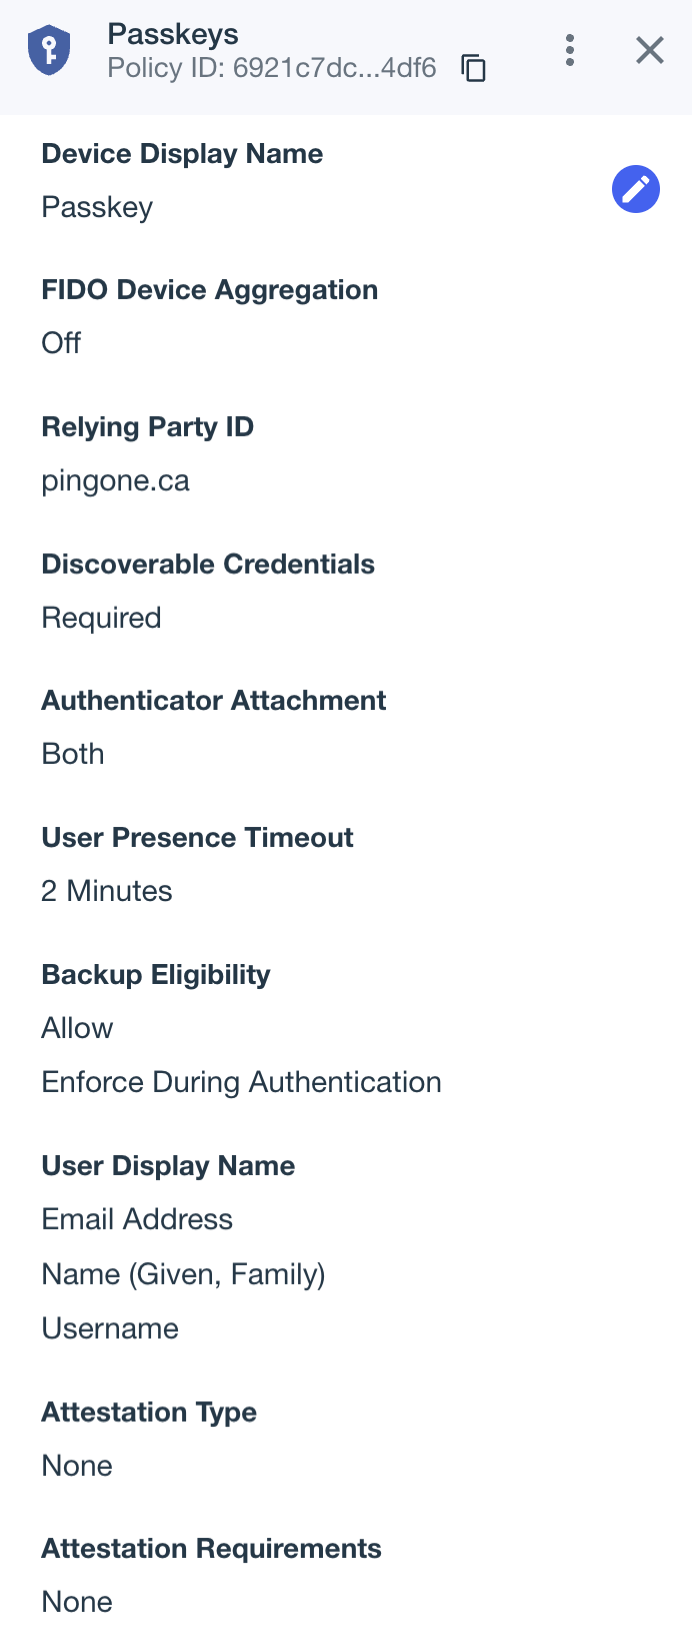
A FIDO policy defines which FIDO devices are permitted and the desired behavior when registering and authenticating your users.
You can create a new FIDO policy, or update an existing FIDO policy to suit your requirements. The default Passkeys FIDO policy is a great starting point for use with the FIDO module:
To create or edit a FIDO policy:
-
In the PingOne admin console, go to Authentication > FIDO.
-
Click the Plus icon () to create a new FIDO policy, or select an existing policy and then click the Pencil icon () to edit it.
-
Configure the FIDO policy as required. Learn more about Adding a FIDO policy in the PingOne documentation.
-
Optionally, use the Authenticator Attachment property to control the type of authenticators available for registration:
- Platform
-
Only allow authenticators built into the user’s device, such as Face ID or Touch ID.
- Cross-platform
-
Only allow external authenticators, such as security keys.
- Both
-
Allow either type (default).
-
Save your changes.
-
To set the policy as the default, click the More Options icon (), and then click Make Default.
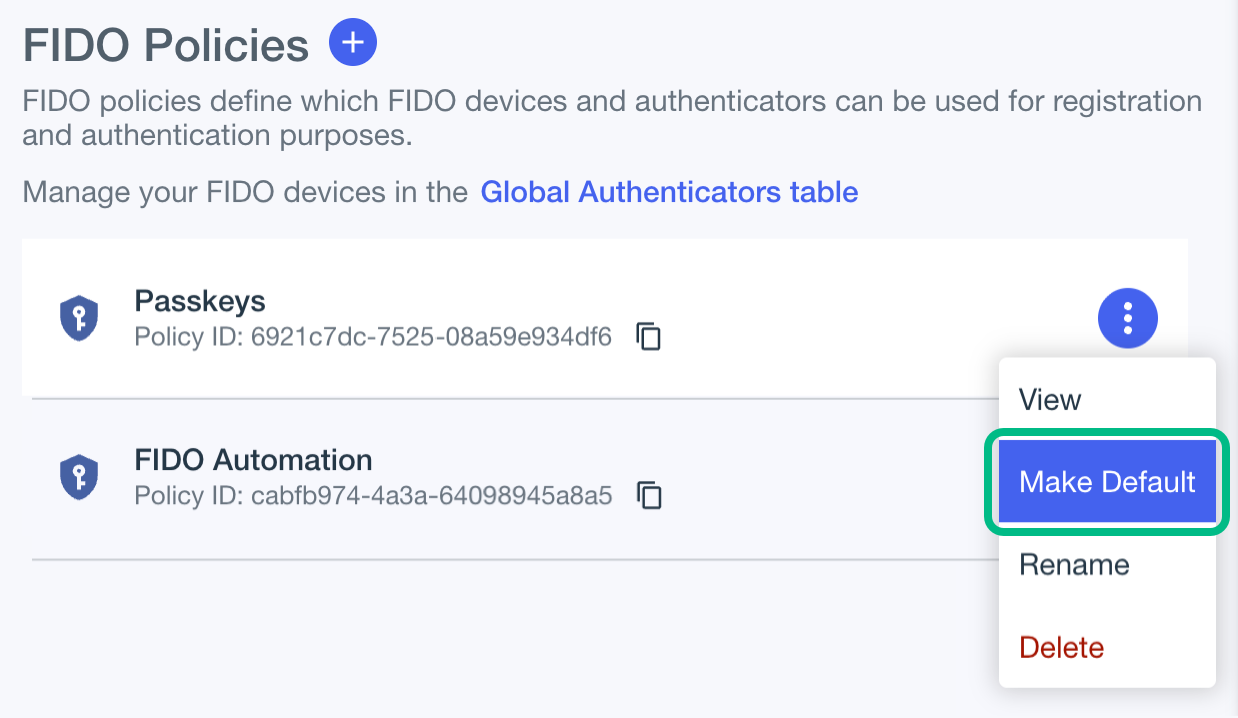 Figure 2. Setting the default FIDO policy in PingOne
Make a note of your FIDO policy name, you’ll need it in Step 3. Adding a FIDO policy to an MFA policy in PingOne.
Step 3. Adding a FIDO policy to an MFA policy in PingOne
After configuring a FIDO policy you must include it in an MFA policy, alongside any other MFA methods you want to enable.
-
In the PingOne admin console, go to Authentication > MFA.
-
Click the Plus icon () to create a new MFA policy, or select an existing policy and then click the Pencil icon () to edit it.
-
In Allowed Authentication Methods, enable FIDO2.
Learn more about Configuring an MFA policy for strong authentication in the PingOne documentation.
-
In FIDO Policy, select the name of the FIDO policy you created earlier. For example,
Passkeys. -
Save your changes.
The result resembles the following:
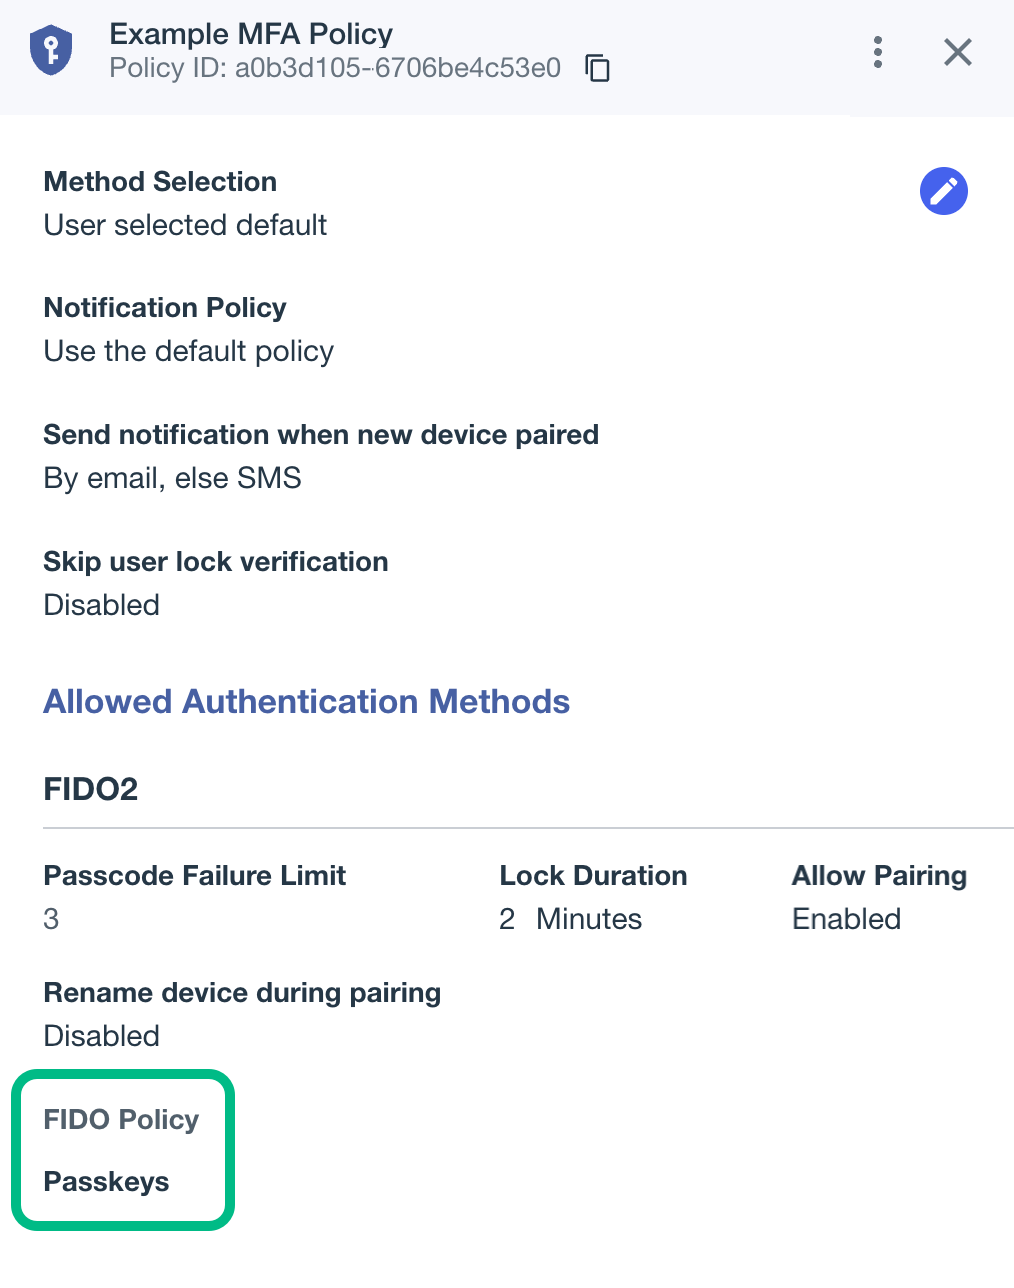 Figure 3. An example MFA policy with selected Passkeys FIDO policy in PingOne
Make a note of your MFA policy name, and the policy ID. You will need these in Step 5. Configuring DaVinci flows for FIDO.
Step 4. Creating FIDO forms in PingOne
You need to create two sets of PingOne forms—one set for FIDO registration, and one set for FIDO authentication.
Each set requires a form to list the device types available for the operation, and another form to handle the actual FIDO operation.
Creating forms to list MFA devices in PingOne
To configure a form to list the methods available for FIDO registration:
-
In the PingOne admin console, go to User Experience > Forms.
-
Click the Plus icon (), enter a Form Name and optionally a Form Description, and then click Add Form.
A dialog containing a list of starter templates appears.
-
In the list of templates, select MFA Device Selection - Registration.
-
(Optional) Customize the form in the form builder.
-
Click Save.
The result resembles the following:
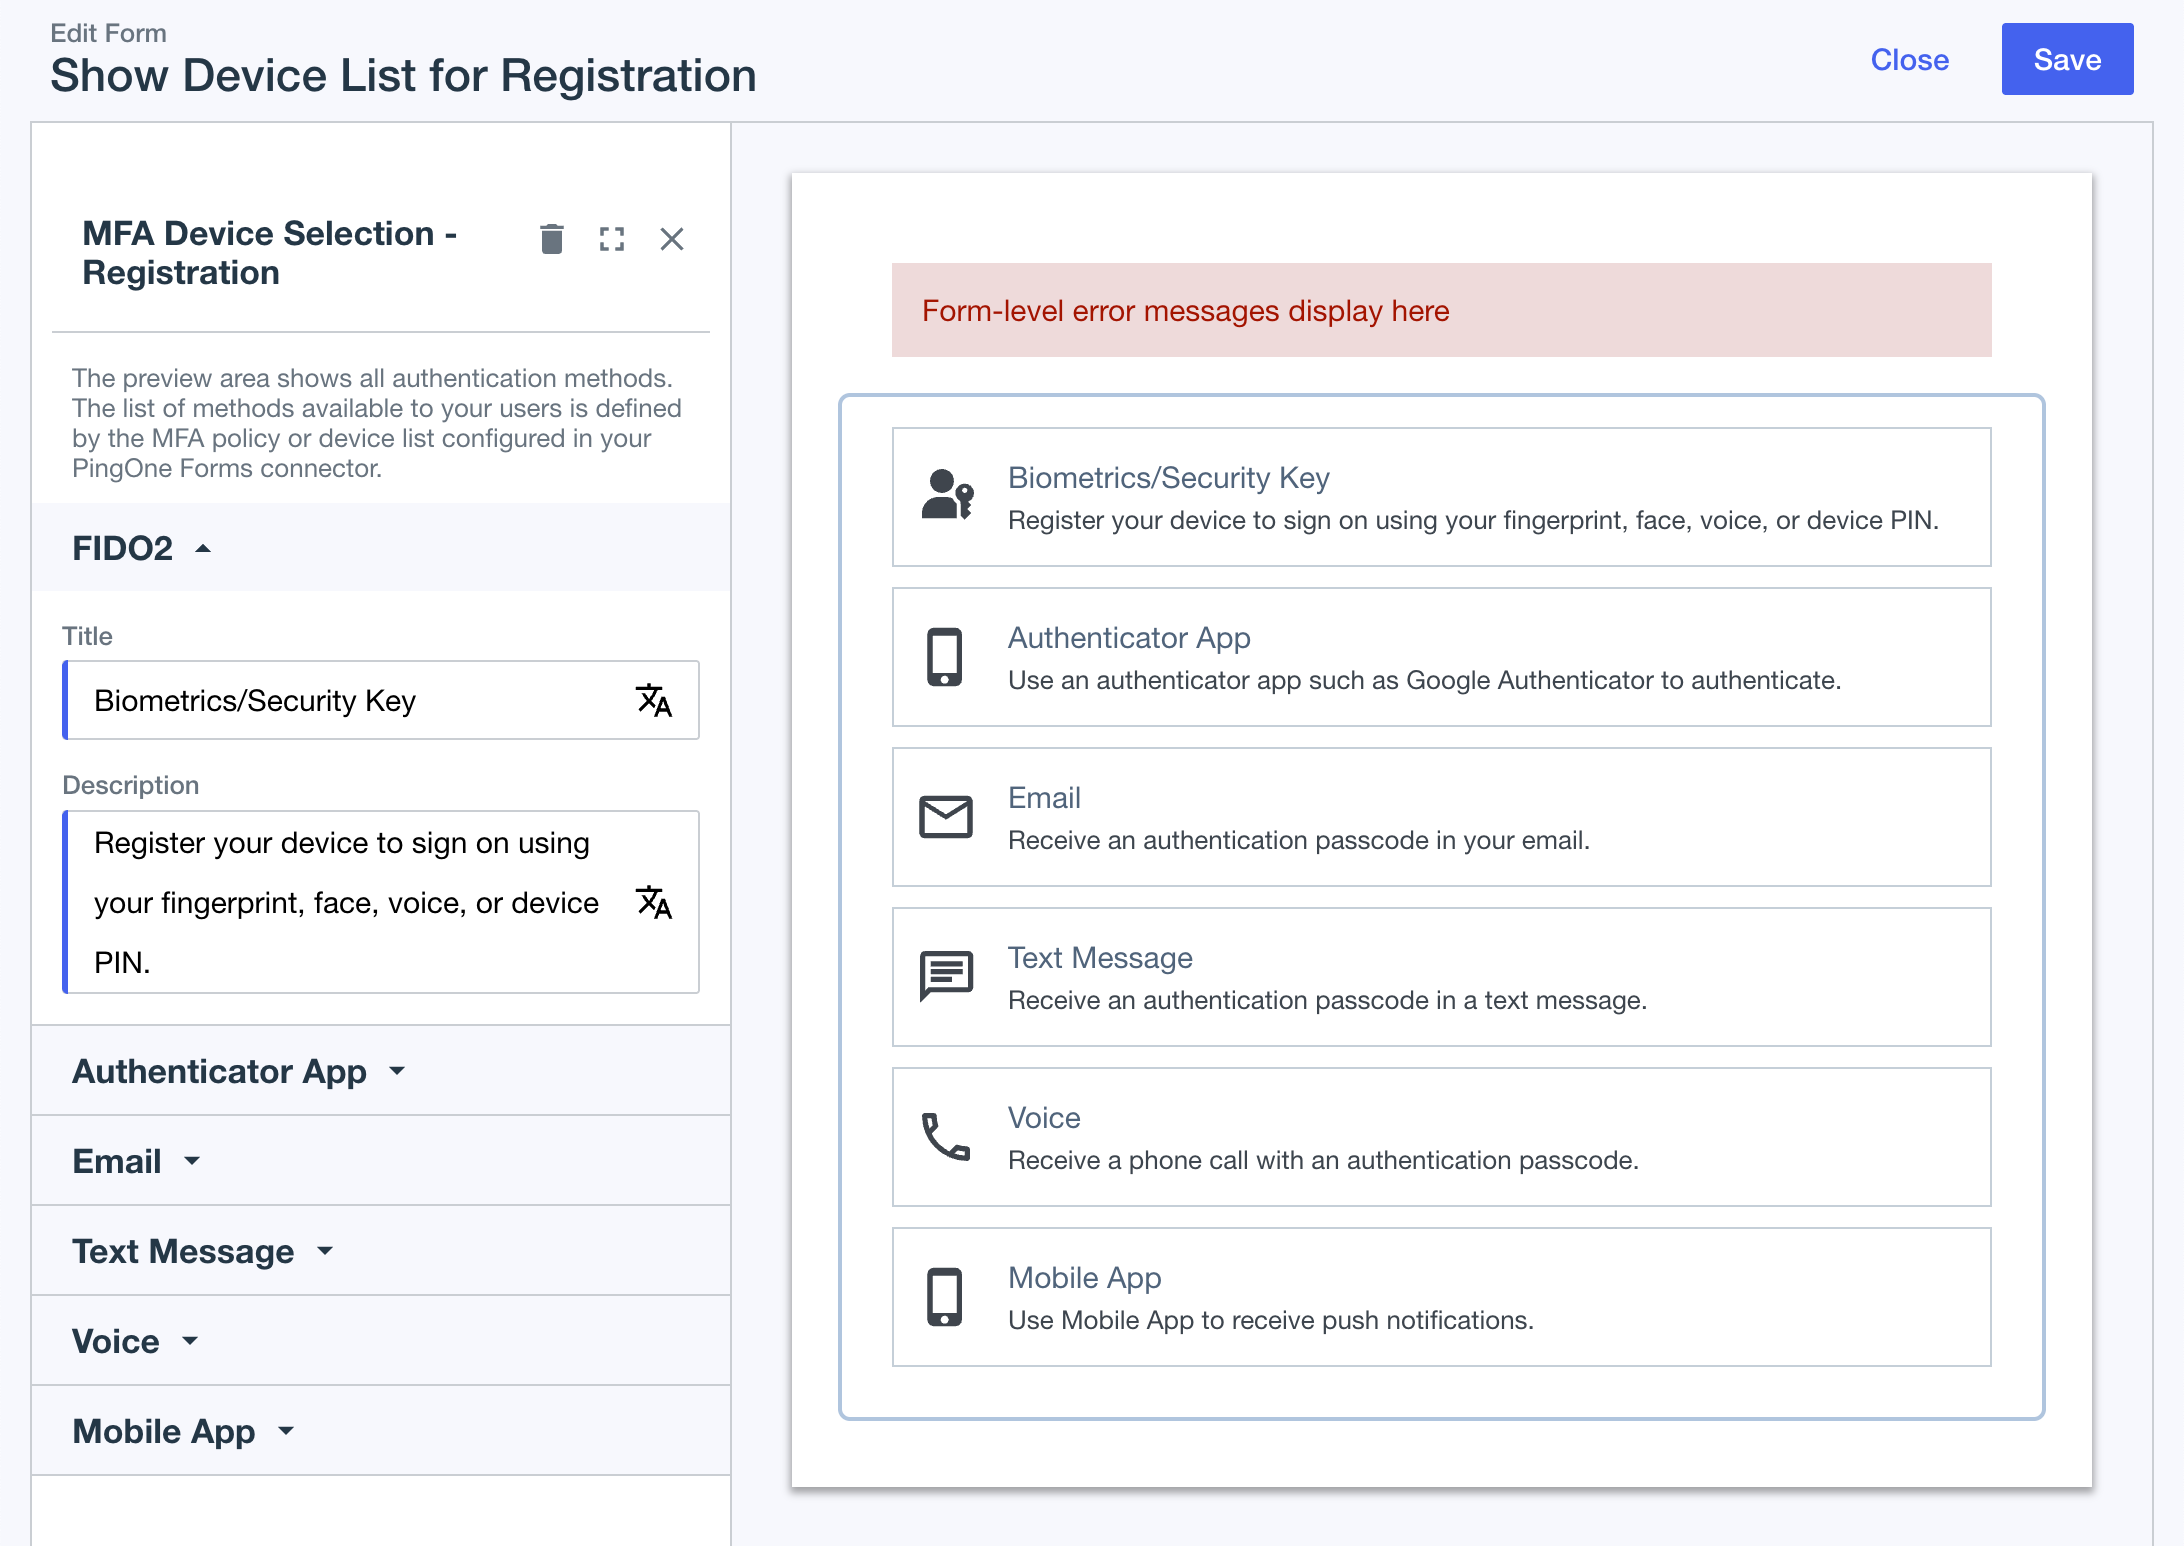 Figure 4. PingOne form to list MFA devices for registration
To configure a form to list the methods available for FIDO authentication:
-
In the PingOne admin console, go to User Experience > Forms.
-
Click the icon and select the MFA Device Selection - - Authentication template.
-
(Optional) Customize the templated form in the form builder.
-
Click Save.
The result resembles the following:
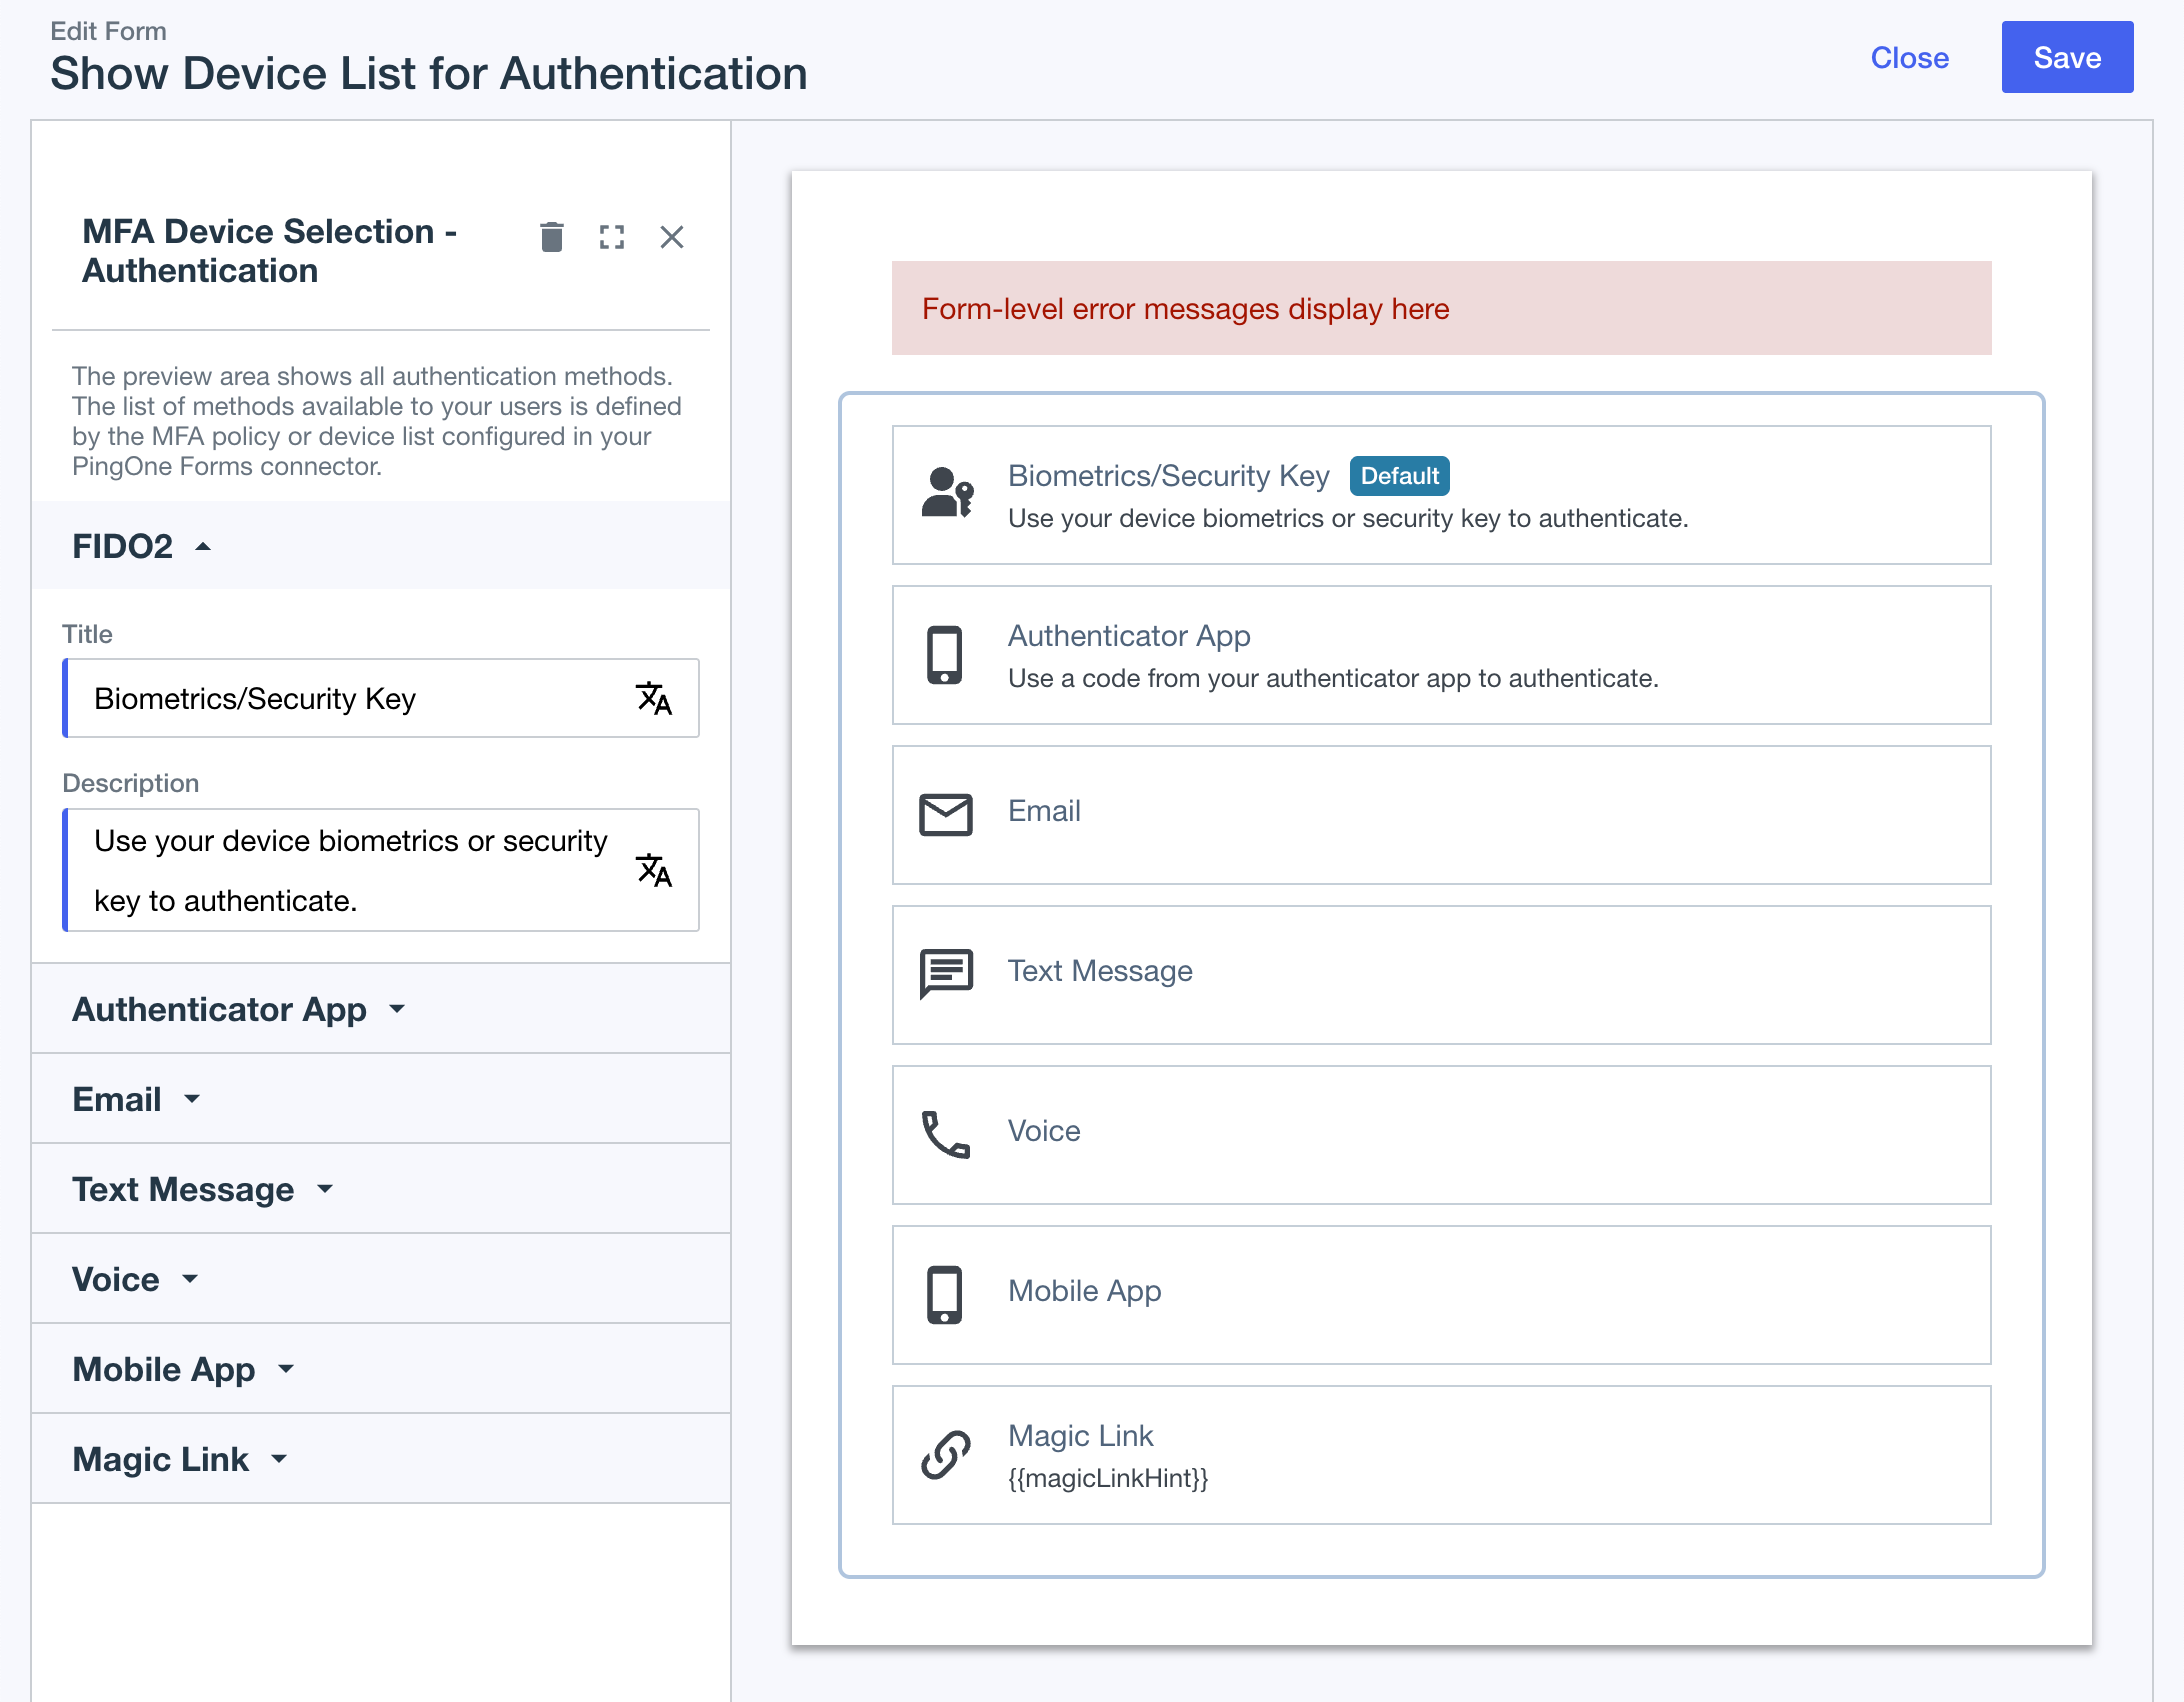 Figure 5. PingOne form to list MFA devices for authentication
Creating forms to initiate FIDO operations in PingOne
To create a form in PingOne to initiate FIDO operations for registration, complete the following steps:
-
In the PingOne admin console, go to User Experience > Forms.
-
Click the icon and select the FIDO2 - Registration template.
-
(Optional) Customize the templated form in the form builder.
-
Click Save.
The result resembles the following:
 Figure 6. PingOne form to initialize FIDO for registration
To create a form in PingOne to initiate FIDO operations for authentication, complete the following steps:
-
In the PingOne admin console, go to User Experience > Forms.
-
Click the icon and select the FIDO2 - Authentication template.
-
(Optional) Customize the templated form in the form builder.
-
Click Save.
The result resembles the following:
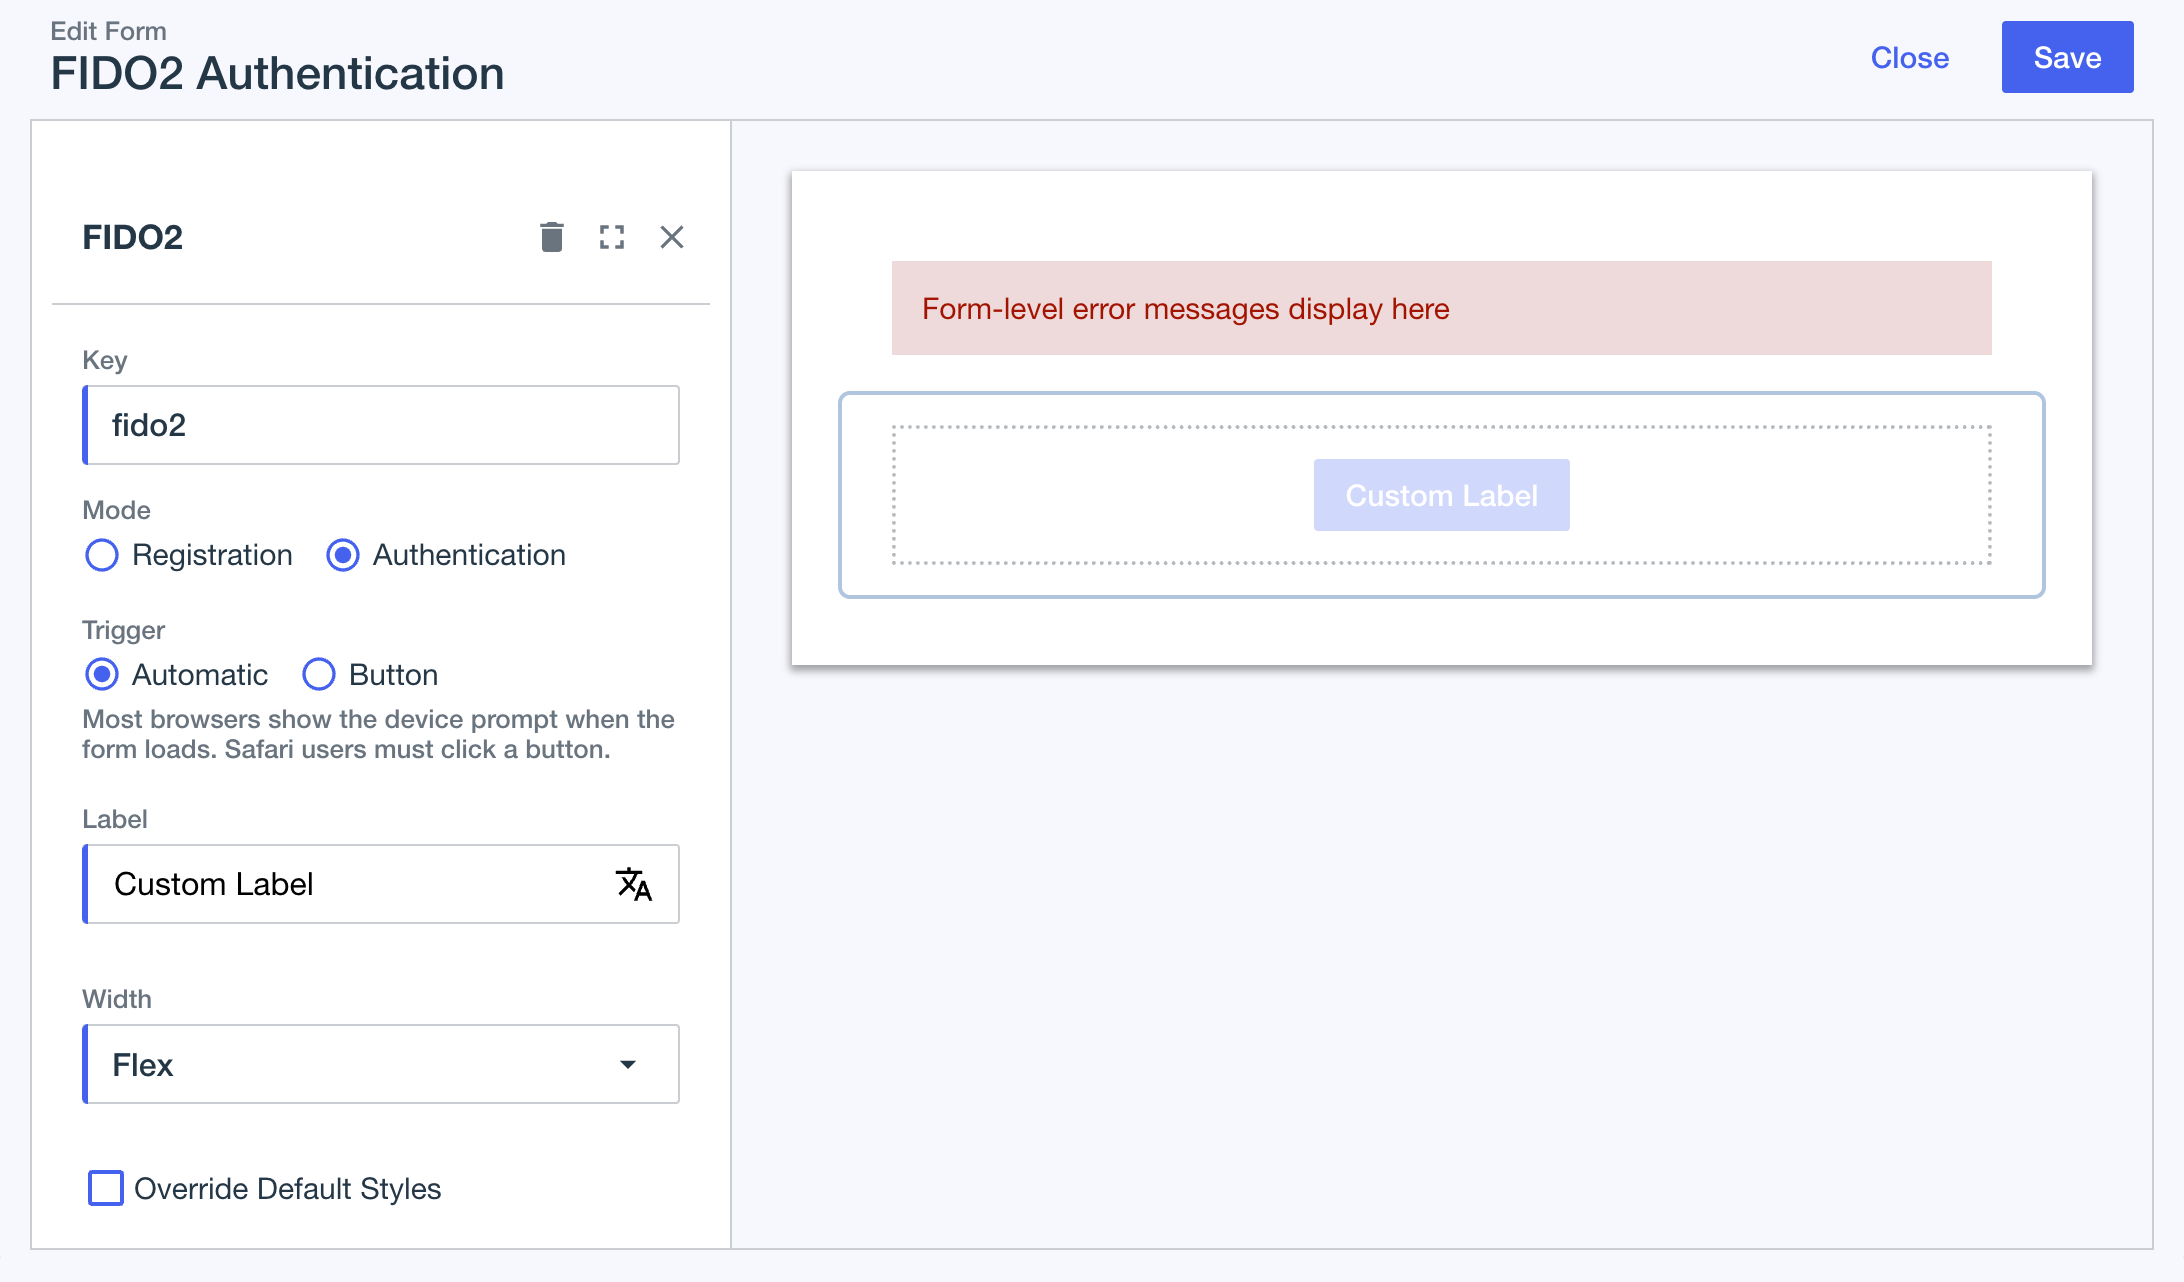 Figure 7. PingOne form to initialize FIDO for authentication
Step 5. Configuring DaVinci flows for FIDO
You’ll need a DaVinci flow for both registering a FIDO device, and authenticating with a FIDO device.
Each flow will need to display the appropriate device selection form you created earlier, as well as the FIDO initiation form.
Configuring a FIDO registration DaVinci flow
In DaVinci, create or edit a FIDO registration flow, and configure it as follows:
-
In the DaVinci flow, add connectors to allow the user to select the MFA device type to register:
-
Add a Form Connector, and configure it to display the form that lists MFA devices for registration as follows:
-
Using the Show Form capability, in the Form field, select the form that lists MFA devices for registration that you created in a previous step.
-
In Authentication Method Source, select the MFA policy that you added your FIDO2 policy to in a previous step.
The result should resemble the following:
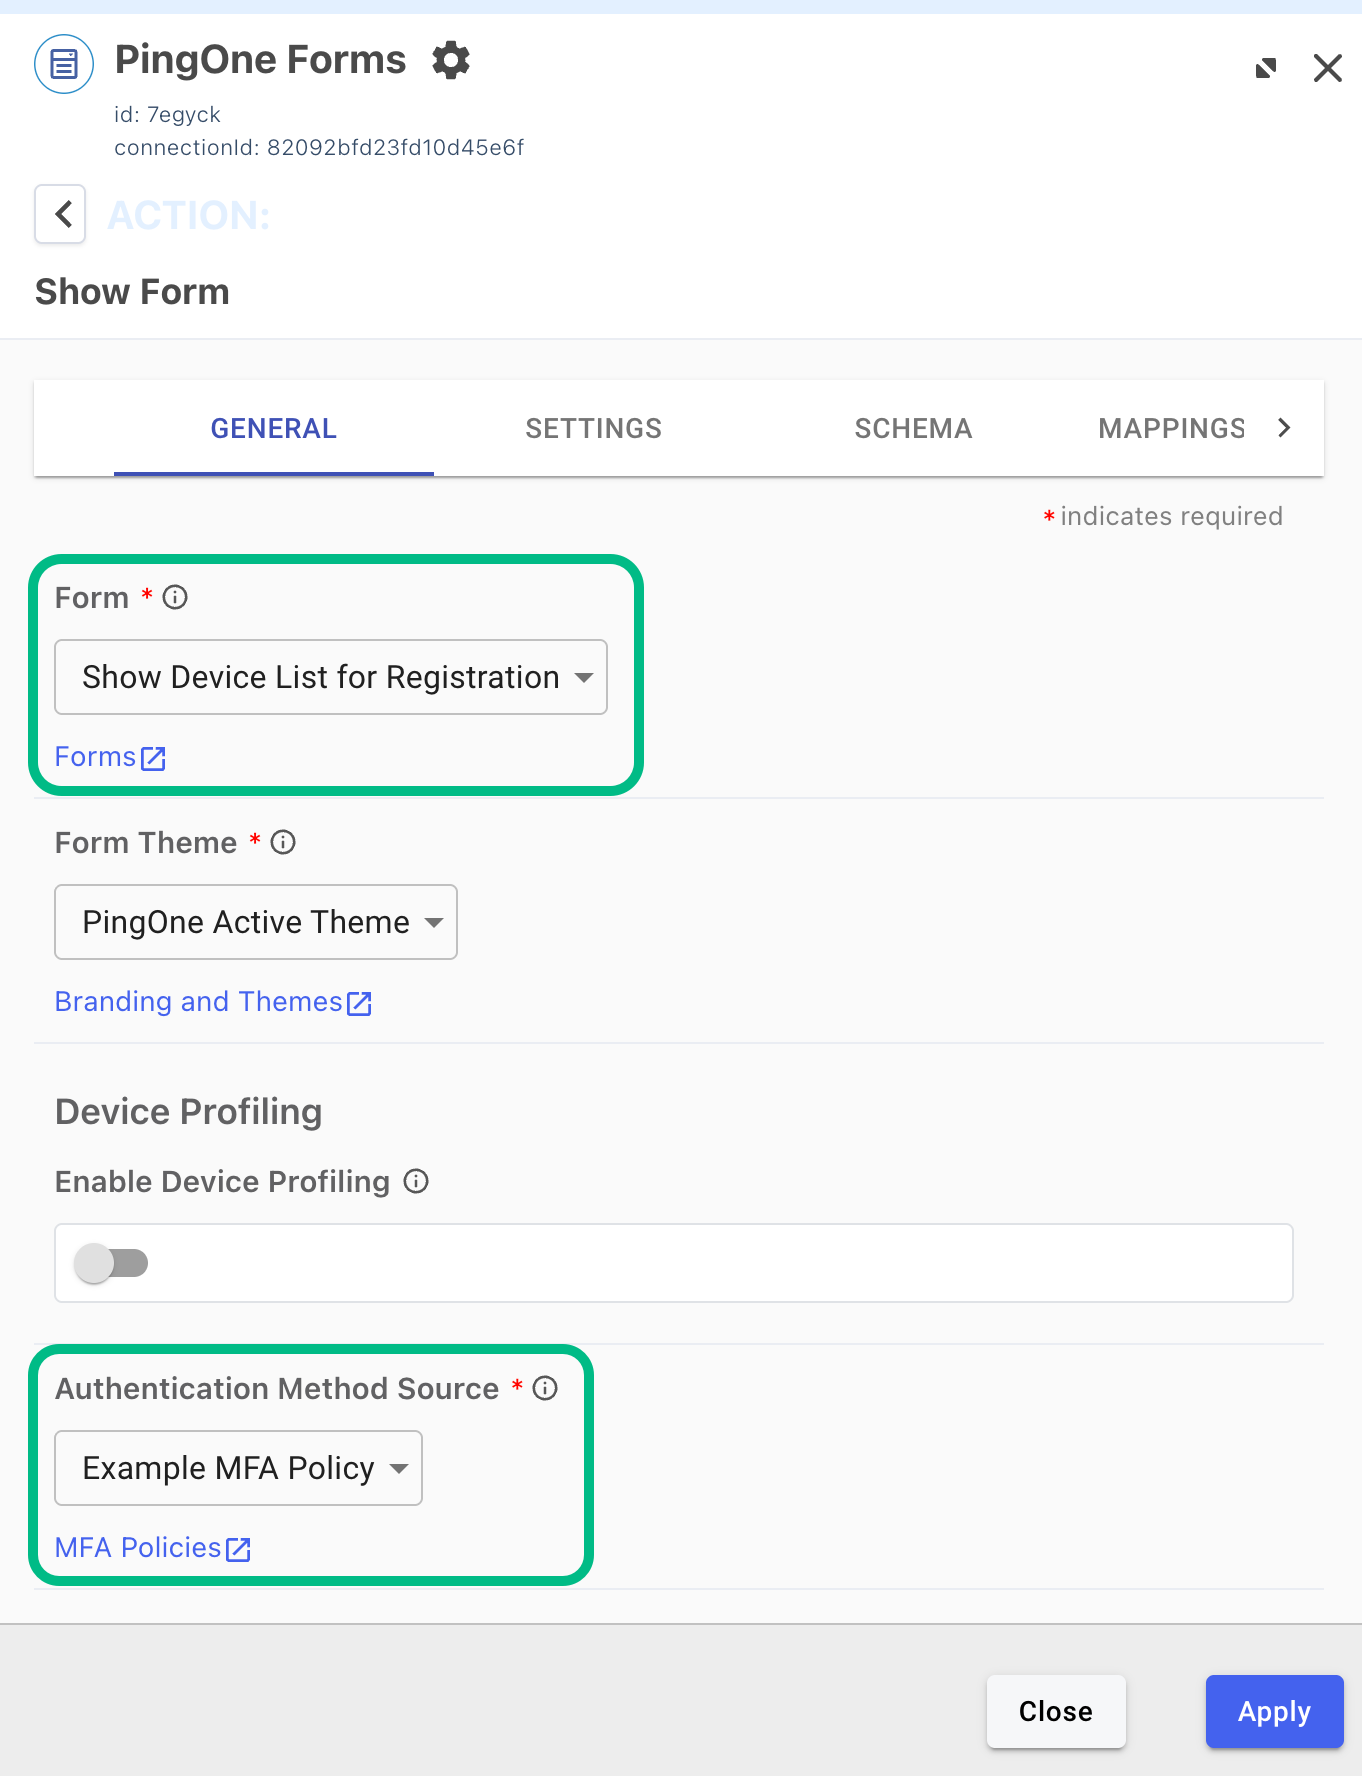 Figure 8. Configuring a PingOne Forms connector for FIDO
 -
-
Add a Functions connector to handle the device selection, including a
FIDO2condition.The result should resemble the following:
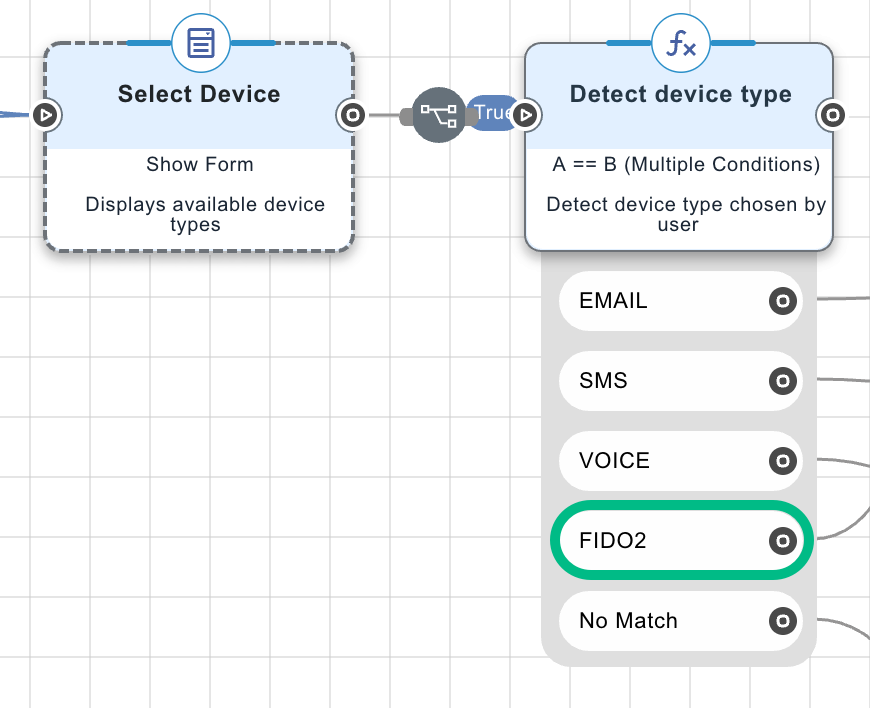 Figure 9. Example connectors for selecting the FIDO device to register
-
-
Connect the
FIDO2condition to a section of the flow with connectors to register a FIDO2 device:-
Add a PingOne MFA connector node and select the Create Device capability. (1)
This connector supplies the Public Key Credential Creation field to the following Form connector.
-
In a subsequent node, add a Form connector and select the Show Form capability, then select the FIDO2 registration form you created in a previous step. (2)
Select the FIDO registration initiation form, not the form you created to list the MFA devices available for registration.
-
In a subsequent node, add another PingOne MFA node and select the Activate Device capability. (3)
The result should resemble the following:
 Figure 10. Example FIDO registration DaVinci flow connectors.
-
-
Add the base domain URL where you uploaded the
apple-app-association-filefile earlier in the Origin property of the Activate Device capability:-
Select the PingOne MFA node with the Activate Device capability.
-
On the General tab, in the Origin field, add the base domain URL, including the protocol, where you uploaded the
apple-app-association-filefileFor example,
https://my-rp-domain.com
-
-
Save and deploy your changes.
Configuring a FIDO authentication DaVinci flow
In DaVinci, create or edit a FIDO authentication flow, and configure it as follows:
-
In the DaVinci flow, add connectors to allow the user to select the MFA device type to authenticate with:
-
Add a Form Connector, and configure it to display the form that lists MFA devices for registration as follows:
-
Using the Show Form capability, in the Form field, select the form that lists MFA devices for authentication that you created in a previous step.
-
In Authentication Method Source, select the MFA policy that you added your FIDO2 policy to in a previous step.
The result should resemble the following:
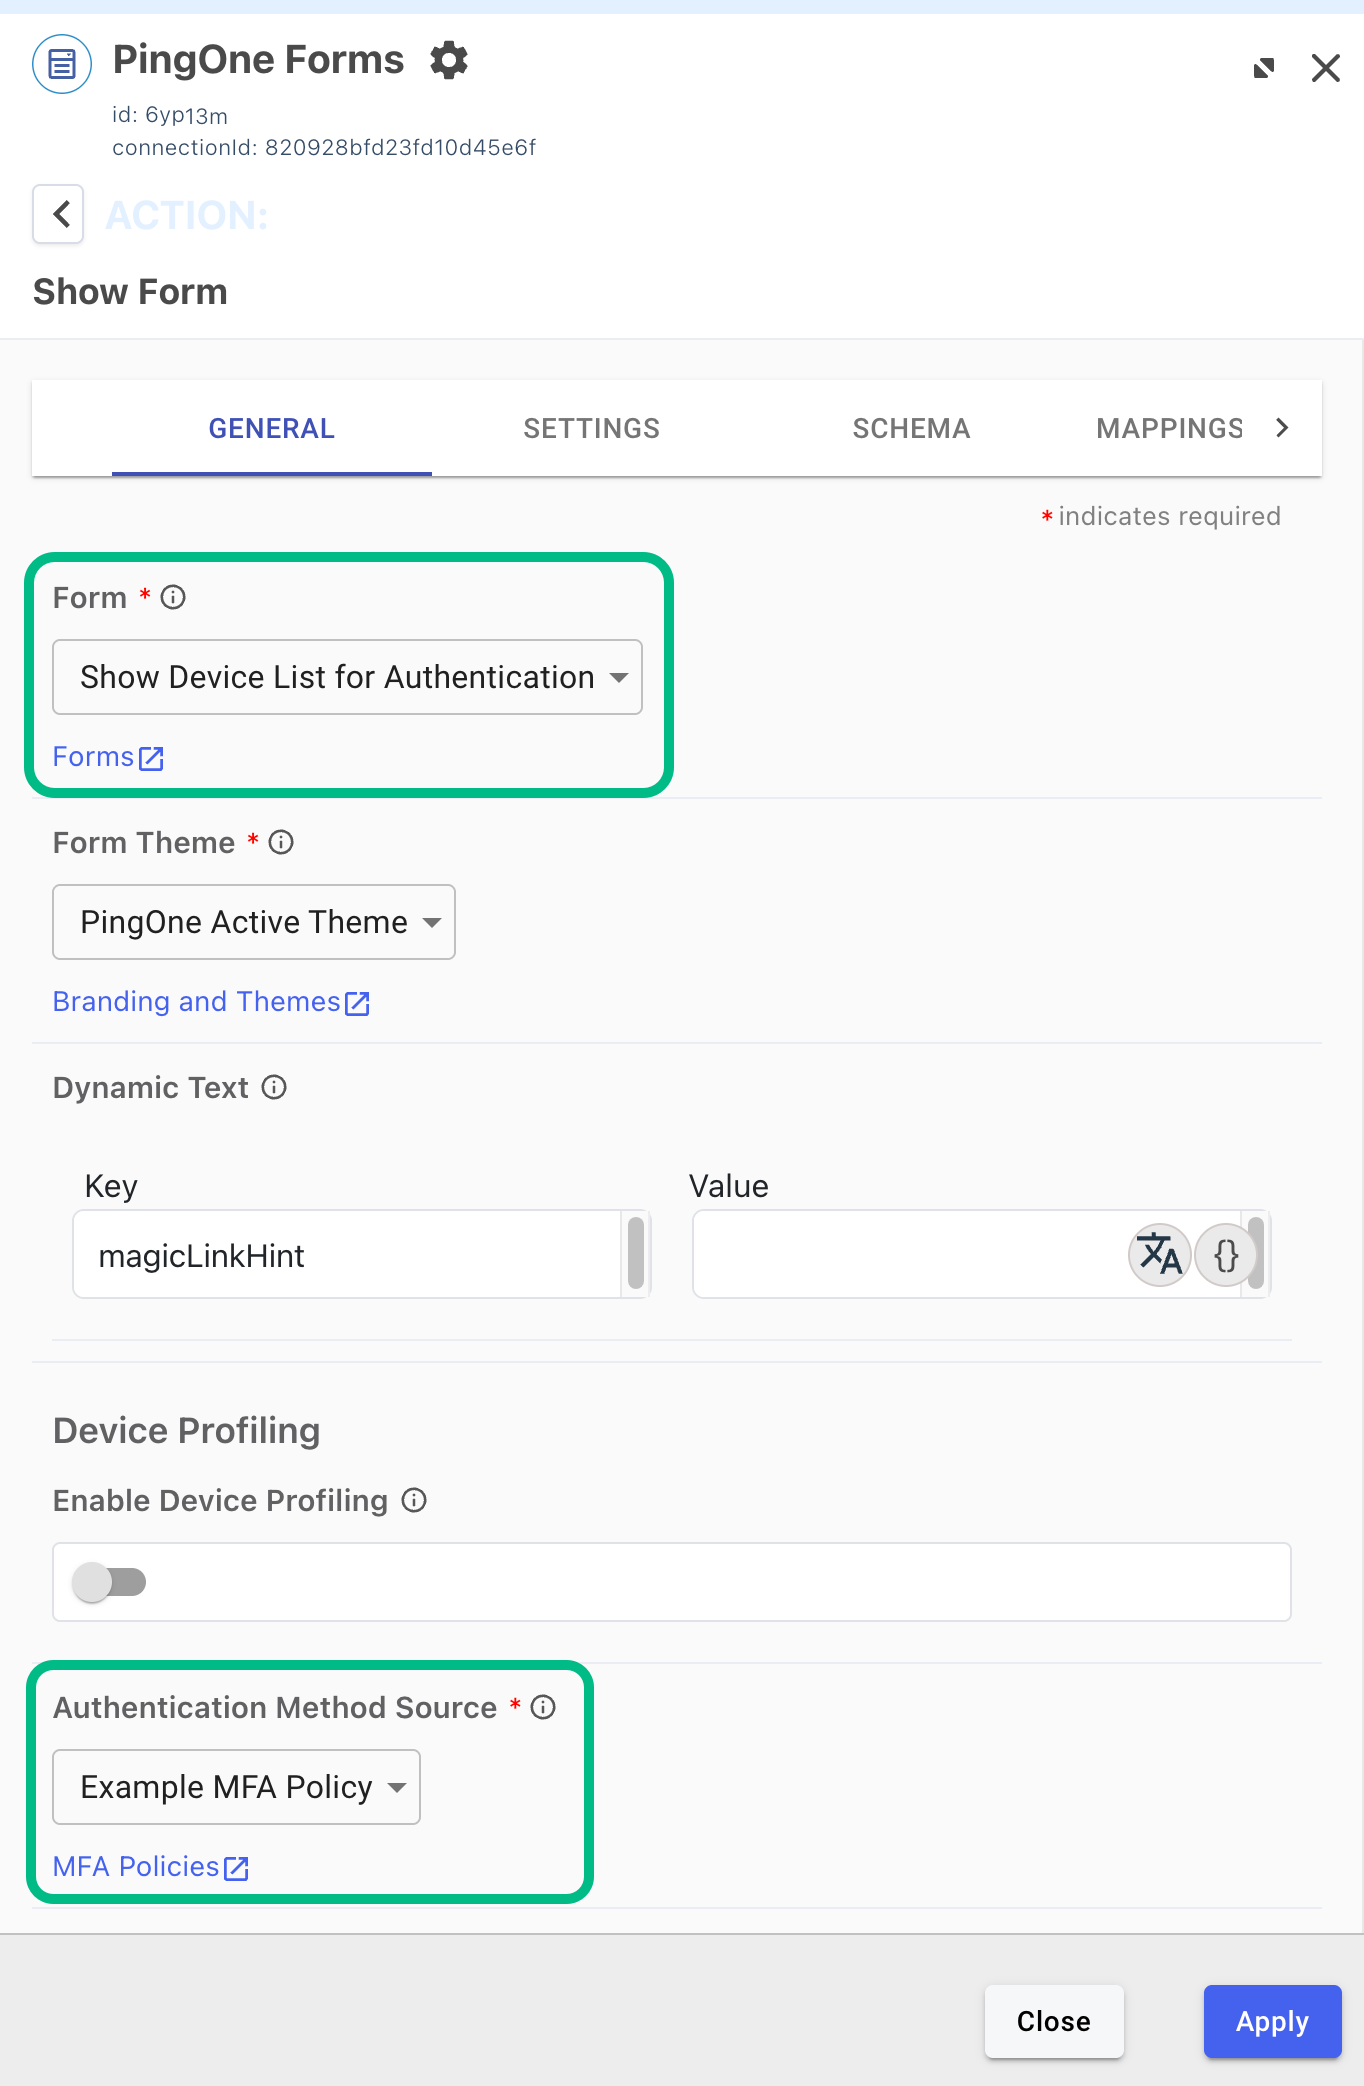 Figure 11. Configuring a PingOne Forms connector for FIDO
 -
-
Add a Functions connector to handle the device selection, including a
FIDO2condition.The result should resemble the following:
Figure 12. Example connectors for selecting the FIDO device to authenticate with
-
-
Connect the
FIDO2condition to a section of the flow with connectors to authenticate with a FIDO2 device:-
Add a PingOne MFA connector node and select the Create Device Authentication capability. (1)
This connector supplies the Public Key Credential Request field to the following Form connector.
-
Select the PingOne MFA connector node, and on the General tab, in the MFA Policy ID field, enter the ID of the MFA policy you added your FIDO2 policy to in a previous step.
You must enter the ID of the MFA policy, for example
9db73f8f-eb79-0e60-032e-7ec026262af3, not the name of the policy.The result should resemble the following:
 Figure 13. Adding the MFA Policy ID to a PingOne MFA node, with the Create Device Authentication capability.
-
-
In a subsequent node, add a Form connector and select the Show Form capability, then select the FIDO2 authentication form you created in a previous step. (2)
Select the FIDO authentication initiation form, not the form you created to list the MFA devices available for authentication.
-
In a subsequent node, add another PingOne MFA connector node and select the FIDO Assertion capability. (3)
The result should resemble the following:
 Figure 14. Example FIDO authentication DaVinci flow connectors.
-
-
Add the base domain URL where you uploaded the
apple-app-association-filefile earlier in the Origin property of the FIDO Assertion capability:-
Select the PingOne MFA node with the FIDO Assertion capability.
-
On the General tab, in the Origin field, add the base domain URL, including the protocol, where you uploaded the
apple-app-association-filefileFor example,
https://my-rp-domain.com
-
-
Save and deploy your changes.
Step 6. Configuring a DaVinci flow to be launched by your app
After configuring a DaVinci flow for use with the Orchestration SDKs you must configure PingOne so that you can launch the flow from the DaVinci module.
This involves performing the following high-level steps:
-
Checking that your DaVinci flow uses only compatible connectors and fields.
-
Creating an application in DaVinci to connect PingOne to the DaVinci flow.
-
Creating an application in PingOne that the DaVinci module can connect to and access the DaVinci application and its PingOne Flow Policy.
To learn how to complete the steps, refer to Launching a flow with a Ping SDK in the DaVinci documentation.
Next steps
You can now proceed to Integrating FIDO DaVinci flows into iOS apps.