Before you begin
PingOne Advanced Identity Cloud JavaScript
To successfully complete this tutorial refer to the prerequisites in this section.
The tutorial also requires a configured PingOne Advanced Identity Cloud tenant.
- Node and NPM
-
This sample requires a minimum Node.js version of
18, and is tested on versions18and20. To get a supported version of Node.js, refer to the Node.js download page.You will also need
npmto build the code and run the samples.
Server configuration
This tutorial requires you to configure your PingOne Advanced Identity Cloud tenant as follows:
Task 1. Create a demo user
The samples and tutorials in this documentation often require that you have an identity set up so that you can test authentication.
To create a demo user in PingOne Advanced Identity Cloud, follow these steps:
-
Log in to your PingOne Advanced Identity Cloud tenant.
-
In the left panel, click Identities > Manage.
-
Click New Alpha realm - User.
-
Enter the following details:
-
Username =
demo -
First Name =
Demo -
Last Name =
User -
Email Address =
demo.user@example.com -
Password =
Ch4ng3it!
-
-
Click Save.
Task 2. Create an authentication journey
Authentication journeys provide fine-grained authentication by allowing multiple paths and decision points throughout the flow. Authentication journeys are made up of nodes that define actions taken during authentication.
Each node performs a single task, such as collecting a username or making a simple decision. Nodes can have multiple outcomes rather than just success or failure.
You’ll need an authentication journey configured on your server to try out the Journey module. That journey must only use nodes, and therefore callbacks, that the Orchestration SDKs supports.
|
You can use the default Login journey that both Advanced Identity Cloud and PingAM include out-of-the-box. |
To create your own authentication journey for use when testing the Orchestration SDKs, follow these steps:
-
In your PingOne Advanced Identity Cloud tenant, navigate to Journeys, and click New Journey.
-
Enter a name, such as
sdkUsernamePasswordJourneyand click Save.The authentication journey designer appears.
-
Drag the following nodes into the designer area:
-
Page Node
-
Platform Username
-
Platform Password
-
Data Store Decision
-
-
Drag and drop the Platform Username and Platform Password nodes onto the Page Node, so that they both appear on the same page when logging in.
-
Connect the nodes as follows:
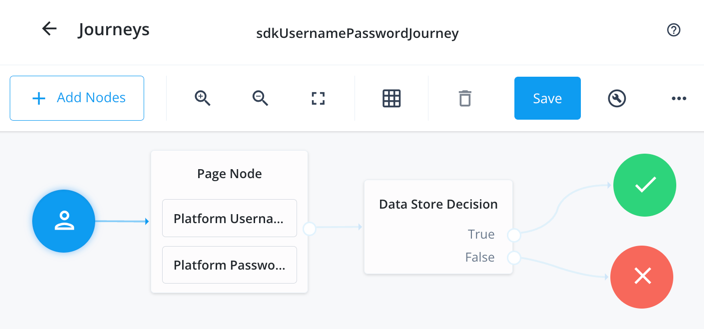 Figure 1. Example username and password authentication journey
 -
Click Save.
Task 3. Register a confidential OAuth 2.0 client
Confidential clients are able to securely store credentials and are commonly used for server-to-server communication. For example, the "Todo" API backend provided with the SDK samples uses a confidential client to obtain tokens.
To register a confidential OAuth 2.0 client application for use with the SDKs in PingOne Advanced Identity Cloud, follow these steps:
-
Log in to your PingOne Advanced Identity Cloud tenant.
-
In the left panel, click Applications.
-
Click Custom Application.
-
Select OIDC - OpenId Connect as the sign-in method, and then click Next.
-
Select Web as the application type, and then click Next.
-
In Name, enter a name for the application, such as
Confidential SDK Client. -
In Owners, select a user responsible for maintaining the application, and then click Next.
When trying out the SDKs, you could select the demouser you created previously. -
On the Web Settings page:
-
In Client ID, enter
sdkConfidentialClient -
In Client Secret, enter a strong password and make a note of it for later use.
For example,
5tr0ngP@S5w0rd!The client secret is not available to view after this step.
If you forget it, you must reset the secret and reconfigure any connected clients.
-
Click Create Application.
PingOne Advanced Identity Cloud creates the application and displays the details screen.
-
-
On the Sign On tab, click Show advanced settings, and on the Access tab:
-
In Default Scopes, enter
am-introspect-all-tokens.
-
-
Click Save.
Task 4. Register a public OAuth 2.0 client
Public clients do not use a client secret to obtain tokens because they are unable to keep them hidden. The Orchestration SDKs commonly use this type of client to obtain tokens, as they cannot guarantee safekeeping of the client credentials in a browser or on a mobile device.
To register a public OAuth 2.0 client application for use with the SDKs in PingOne Advanced Identity Cloud, follow these steps:
-
Log in to your PingOne Advanced Identity Cloud tenant.
-
In the left panel, click Applications.
-
Click Custom Application.
-
Select OIDC - OpenId Connect as the sign-in method, and then click Next.
-
Select Native / SPA as the application type, and then click Next.
-
In Name, enter a name for the application, such as
Public SDK Client. -
In Owners, select a user that is responsible for maintaining the application, and then click Next.
When trying out the SDKs, you could select the demouser you created previously. -
In Client ID, enter
sdkPublicClient -
Select Configure for SDK Sample Apps.
-
Click Create Application.
PingOne Advanced Identity Cloud creates the application and displays the details screen.
-
On the Sign On tab:
-
In Sign-In URLs, ensure the following values appear, or add them if they don’t:
https://localhost:8443/callback.htmlAlso add any other domains where you host SDK applications. -
In Grant Types, ensure the following values appear:
Authorization CodeRefresh Token -
In Scopes, ensure the following values appear:
openid profile email address
-
-
Click Show advanced settings, and on the Authentication tab, confirm the following properties:
-
In Token Endpoint Authentication Method, select
none. -
In Client Type, select
Public. -
Enable the Implied Consent property.
-
-
Click Save.
The application is now configured to accept client connections from and issue OAuth 2.0 tokens to the example applications and tutorials covered by this documentation.
Task 5. Configure the OAuth 2.0 provider
The provider specifies the supported OAuth 2.0 configuration options for a realm.
To ensure the PingOne Advanced Identity Cloud OAuth 2.0 provider service is configured for use with the Orchestration SDKs, follow these steps:
-
In your PingOne Advanced Identity Cloud tenant, navigate to Native Consoles > Access Management.
-
In the left panel, click Services.
-
In the list of services, click OAuth2 Provider.
-
On the Core tab, ensure Issue Refresh Tokens is enabled.
-
On the Consent tab, ensure Allow Clients to Skip Consent is enabled.
-
Click Save Changes.
Task 6. Configure CORS
Cross-origin resource sharing (CORS) lets user agents make cross-domain server requests. In PingOne Advanced Identity Cloud, you can configure CORS to allow browsers from trusted domains to access PingOne Advanced Identity Cloud protected resources. For example, you might want a custom web application running on your own domain to get an end-user’s profile information using the PingOne Advanced Identity Cloud REST API.
The Orchestration SDK for JavaScript samples and tutorials use https://localhost:8443 as the host domain, which you should add to your CORS configuration.
If you are using a different domain for hosting SDK applications, ensure you add them to the CORS configuration as accepted origin domains.
To update the CORS configuration in PingOne Advanced Identity Cloud, follow these steps:
-
Log in to your PingOne Advanced Identity Cloud tenant.
-
At the top right of the screen, click your name, and then select Tenant settings.
-
On the Global Settings tab, click Cross-Origin Resource Sharing (CORS).
-
Perform one of the following actions:
-
If listed, click PingSDK.
-
If there isn’t an existing CORS configuration listed, click Add a CORS Configuration, select Ping SDK, and then click Next.
The Ping SDK template contains many of the default values used in these tutorials.
-
-
In Accepted Origins:
-
Ensure
https://localhost:8443is listed. -
Add any DNS aliases you use to host your Orchestration SDK for JavaScript applications.
-
-
Complete the remaining fields to suit your environment.
This documentation assumes the following configuration, required for the tutorials and sample applications:
Property Values Accepted Originshttps://localhost:8443http://localhost:9443Accepted MethodsGETPOSTAccepted HeadersExposed Headersauthorizationcontent-typeEnable CachingTrueMax Age600Allow CredentialsTrueClick Show advanced settings to be able to edit all available fields.
-
Click Save CORS Configuration.