Preparing Advanced Identity Cloud or PingAM for FIDO in iOS
PingOne Advanced Identity Cloud PingAM iOS
Before enabling FIDO authentication in your iOS apps you must complete the following tasks:
Step 1. Associating your iOS app with your Advanced Identity Cloud or PingAM server
You can create an apple-app-site-association file that creates a secure association between your domain and your app. This allows you to share credentials, and use universal links to open your app from your website.
To create the secure association, you upload the apple-app-site-association file to your domain, and add matching Associated Domains Entitlement keys to your app.
Preparing a site association file
-
Prepare a JSON-formatted file named
apple-app-site-association, as shown below.Ensure you include the
webcredentialsentitlement{ "applinks": { "details": [ { "appIDs": [ "XXXXXXXXXX.com.example.AppName" ], "components": [ { "/": "/reset/*", "comment": "Success after reset password journey" } ] } ] }, "webcredentials": { "apps": [ "XXXXXXXXXX.com.example.AppName" ] } } -
Replace XXXXXXXXXX.com.example.AppName with the app ID of your client iOS application.
Learn more in Supporting associated domains in the Apple Developer documentation.
Hosting apple-app-site-association files in Advanced Identity Cloud or PingAM
-
For PingOne Advanced Identity Cloud deployments, refer to Upload an iOS apple-app-site-association file.
-
For self-managed PingAM deployments, host the file at
https://<your domain>/.well-known/apple-app-site-association.
|
Make a note of the domain where you uploaded the file, as you’ll need to add matching Associated Domains Entitlement keys to your iOS project. |
Configure authentication journeys for FIDO2 on iOS
Authentication journeys for FIDO primarily use these nodes:
- WebAuthn Registration Node
-
Handles the creation and storage of new passkeys.
- WebAuthn Authentication Node
-
Manages the sign-in process by issuing and verifying challenges.
Here’s a sample journey that supports passkeys end-to-end. It tries a passkey sign-in first, and falls back to a username and password for users who haven’t registered a passkey yet. Because registering a passkey requires an authenticated session, the journey only offers to register one after a successful sign-in.
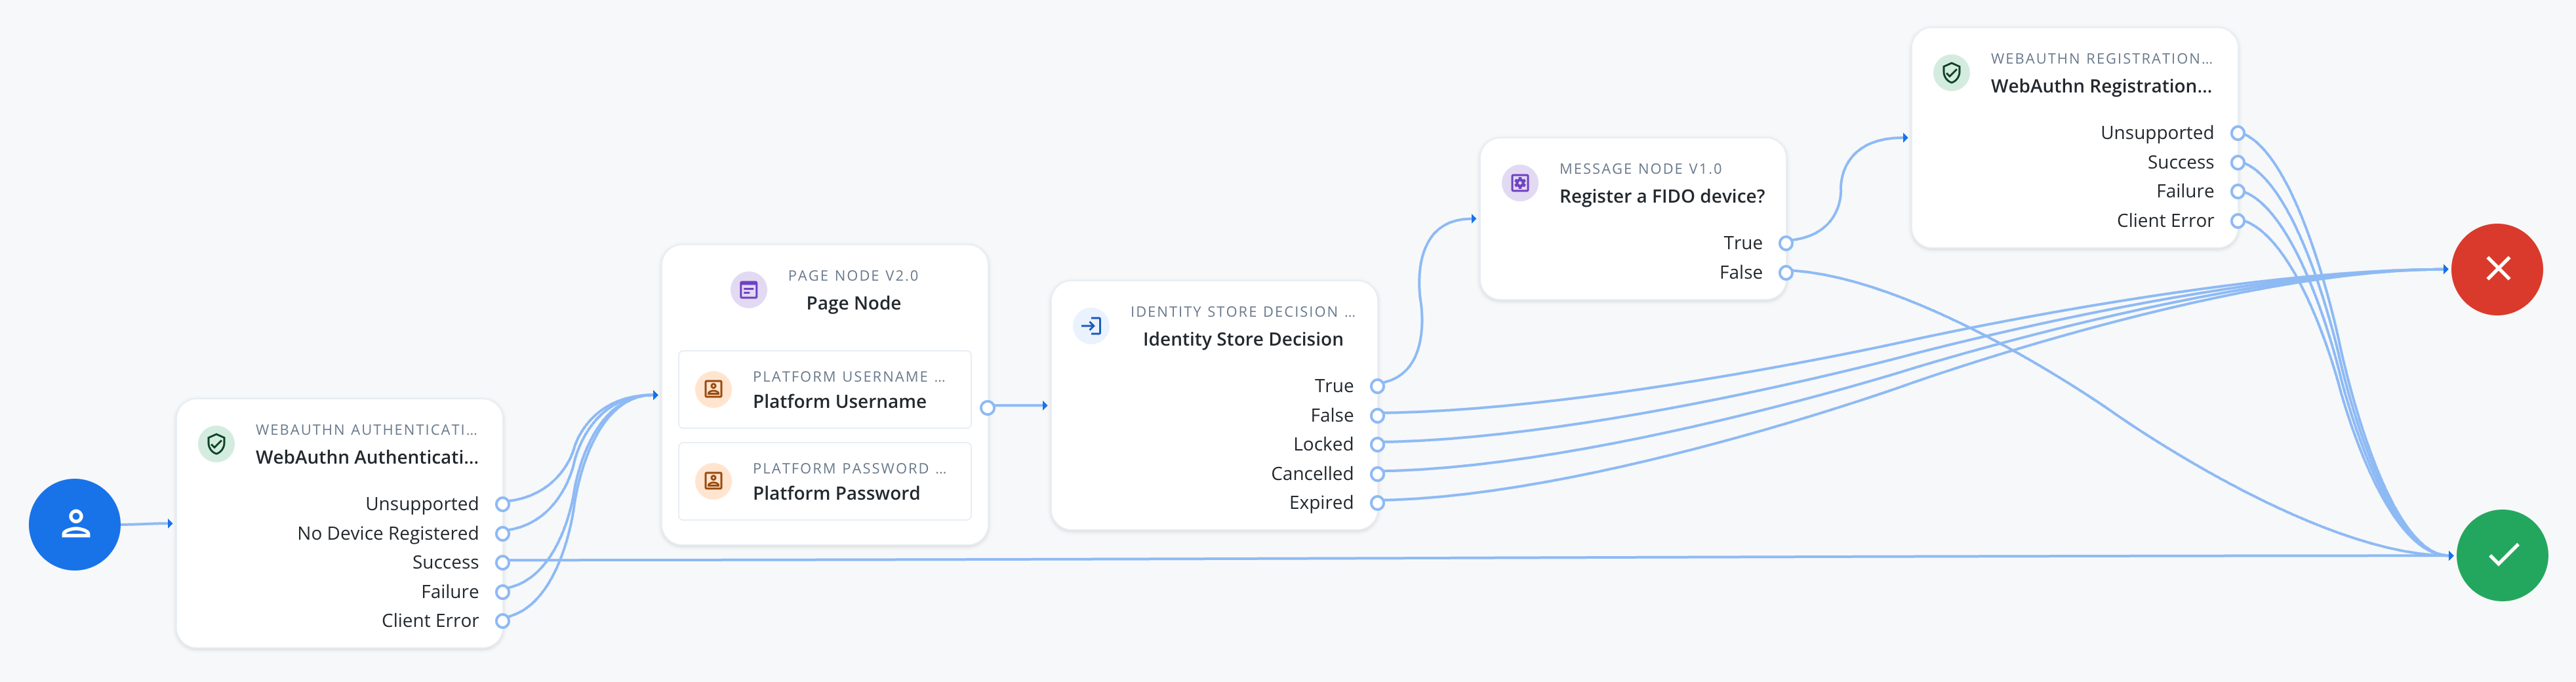
To use FIDO with an iOS application, configure each WebAuthn Registration node and WebAuthn Authentication node in your authentication journey.
|
Use the same configuration values in each WebAuthn Registration node and WebAuthn Authentication node in the journey. Configuration mismatches between these nodes cause authentication to fail. |
- Each WebAuthn Registration node and WebAuthn Authentication node
-
-
In Origin domains:
-
To enable Passkey support, add the fully-qualified domain name of the Advanced Identity Cloud or PingAM instance as an origin domain. For example,
https://openam-docs.forgeblocks.com.
-
-
Ensure the Return challenge as JavaScript option is not enabled.
The SDK expects a JSON response from these nodes, enabling this option would cause the journey to fail.
-
In Relying party identifier, enter the domain hosting the
apple-app-site-associationfile you create and uploaded.For example,
openam-docs.forgeblocks.comYou do not need the protocol or the path.
-
Optionally, to support usernameless sign-in, enable Username from device in the WebAuthn Authentication node, and Username to device in the WebAuthn Registration node.
-
- Every WebAuthn Registration node
-
-
In Accepted signing algorithms, include one or more of
ES256andRS256. -
Ensure the Limit registrations option is not enabled.
-
Optionally, use the Authentication attachment property to control the type of authenticators available for registration:
PLATFORM-
Only allow authenticators built into the user’s device, such as Face ID or Touch ID.
CROSS_PLATFORM-
Only allow external authenticators, such as security keys.
UNSPECIFIED-
Allow either type (default).
The result resembles the following:
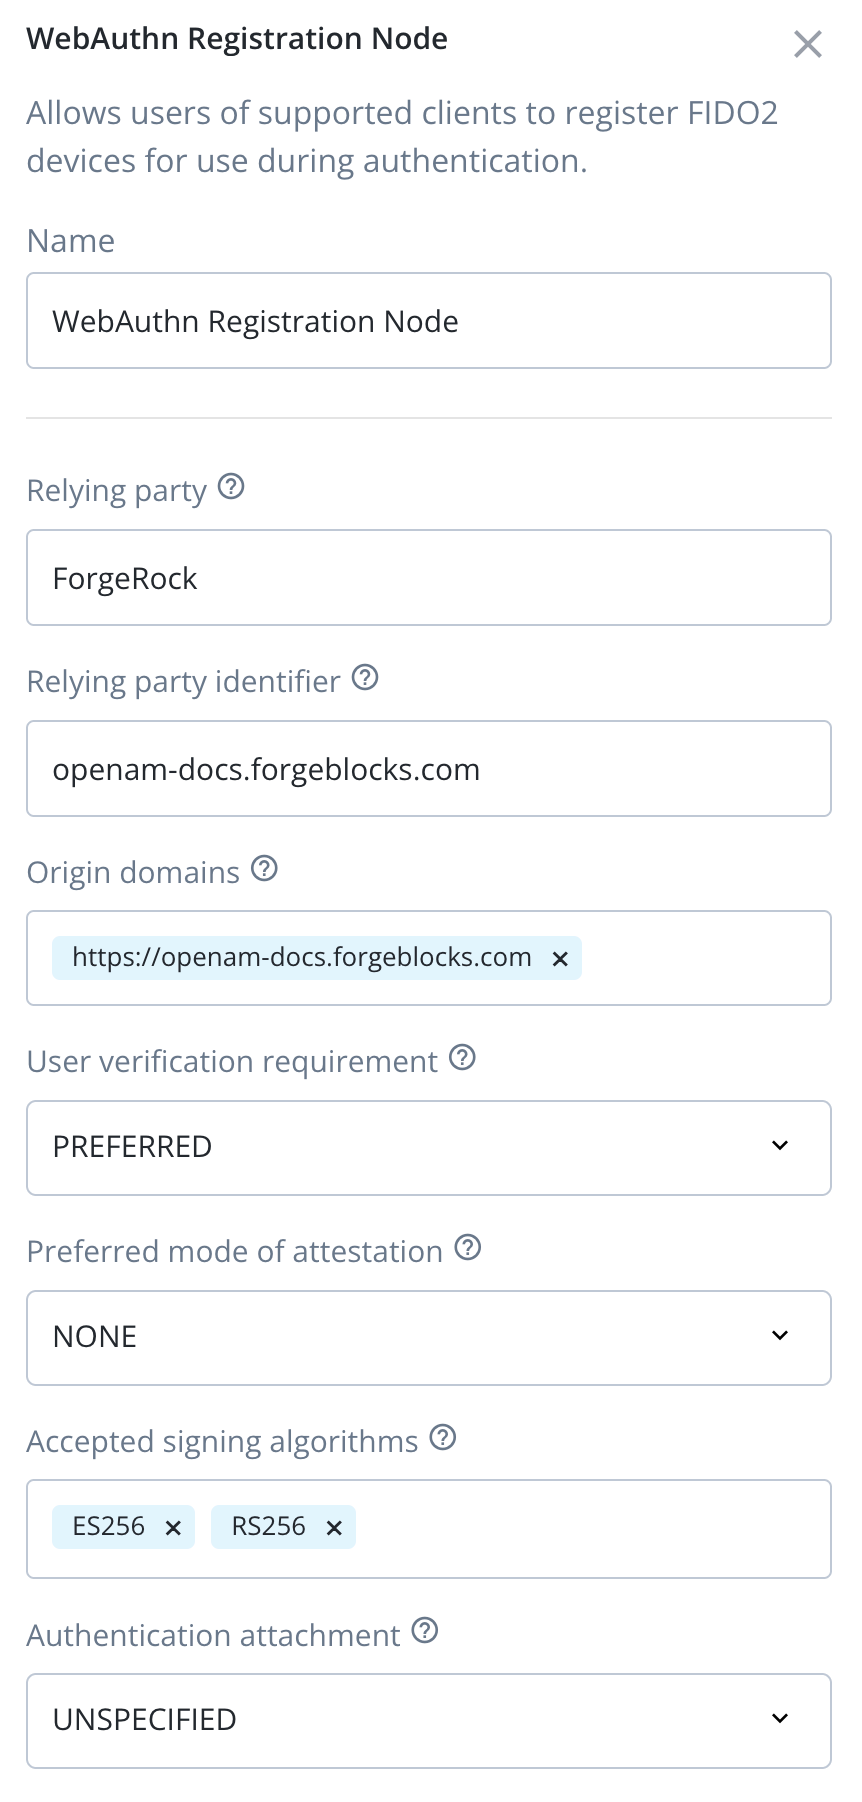 Figure 2. Example WebAuthn Registration node iOS configuration
-
Handling client errors
The WebAuthn Registration node and WebAuthn Authentication node each have a Client Error outcome. The SDK reaches this outcome when the underlying WebAuthn operation fails for a reason that isn’t a simple pass/fail, for example an unsupported authenticator, a timeout, a network problem, or a device in an unexpected state.
The outcome carries the error as a string in the ERROR::<name>:<message> format, where <name> is a standard DOMException error name, such as NotAllowedError or InvalidStateError.
To handle these errors individually rather than as a single generic outcome, add a Scripted Decision node after the Client Error outcome. Configure the script to read the error string from shared state, extract the error name, and map it to an outcome your journey can branch on:
// Error format: ERROR::<name>:<message>
// Example: ERROR::InvalidStateError:No Credential is registered
var error = sharedState.get("WebAuthenticationDOMException");
var result = error.match(/::([\w\s]{1,}):{0,}/);
outcome = result ? result[1] : "UnknownError";
The script above only extracts the error name, but a Scripted Decision node is a good place to add logic beyond simple routing, such as logging the full error message for troubleshooting, incrementing a counter to detect repeated failures from the same device, or recording metrics on which errors occur most often.
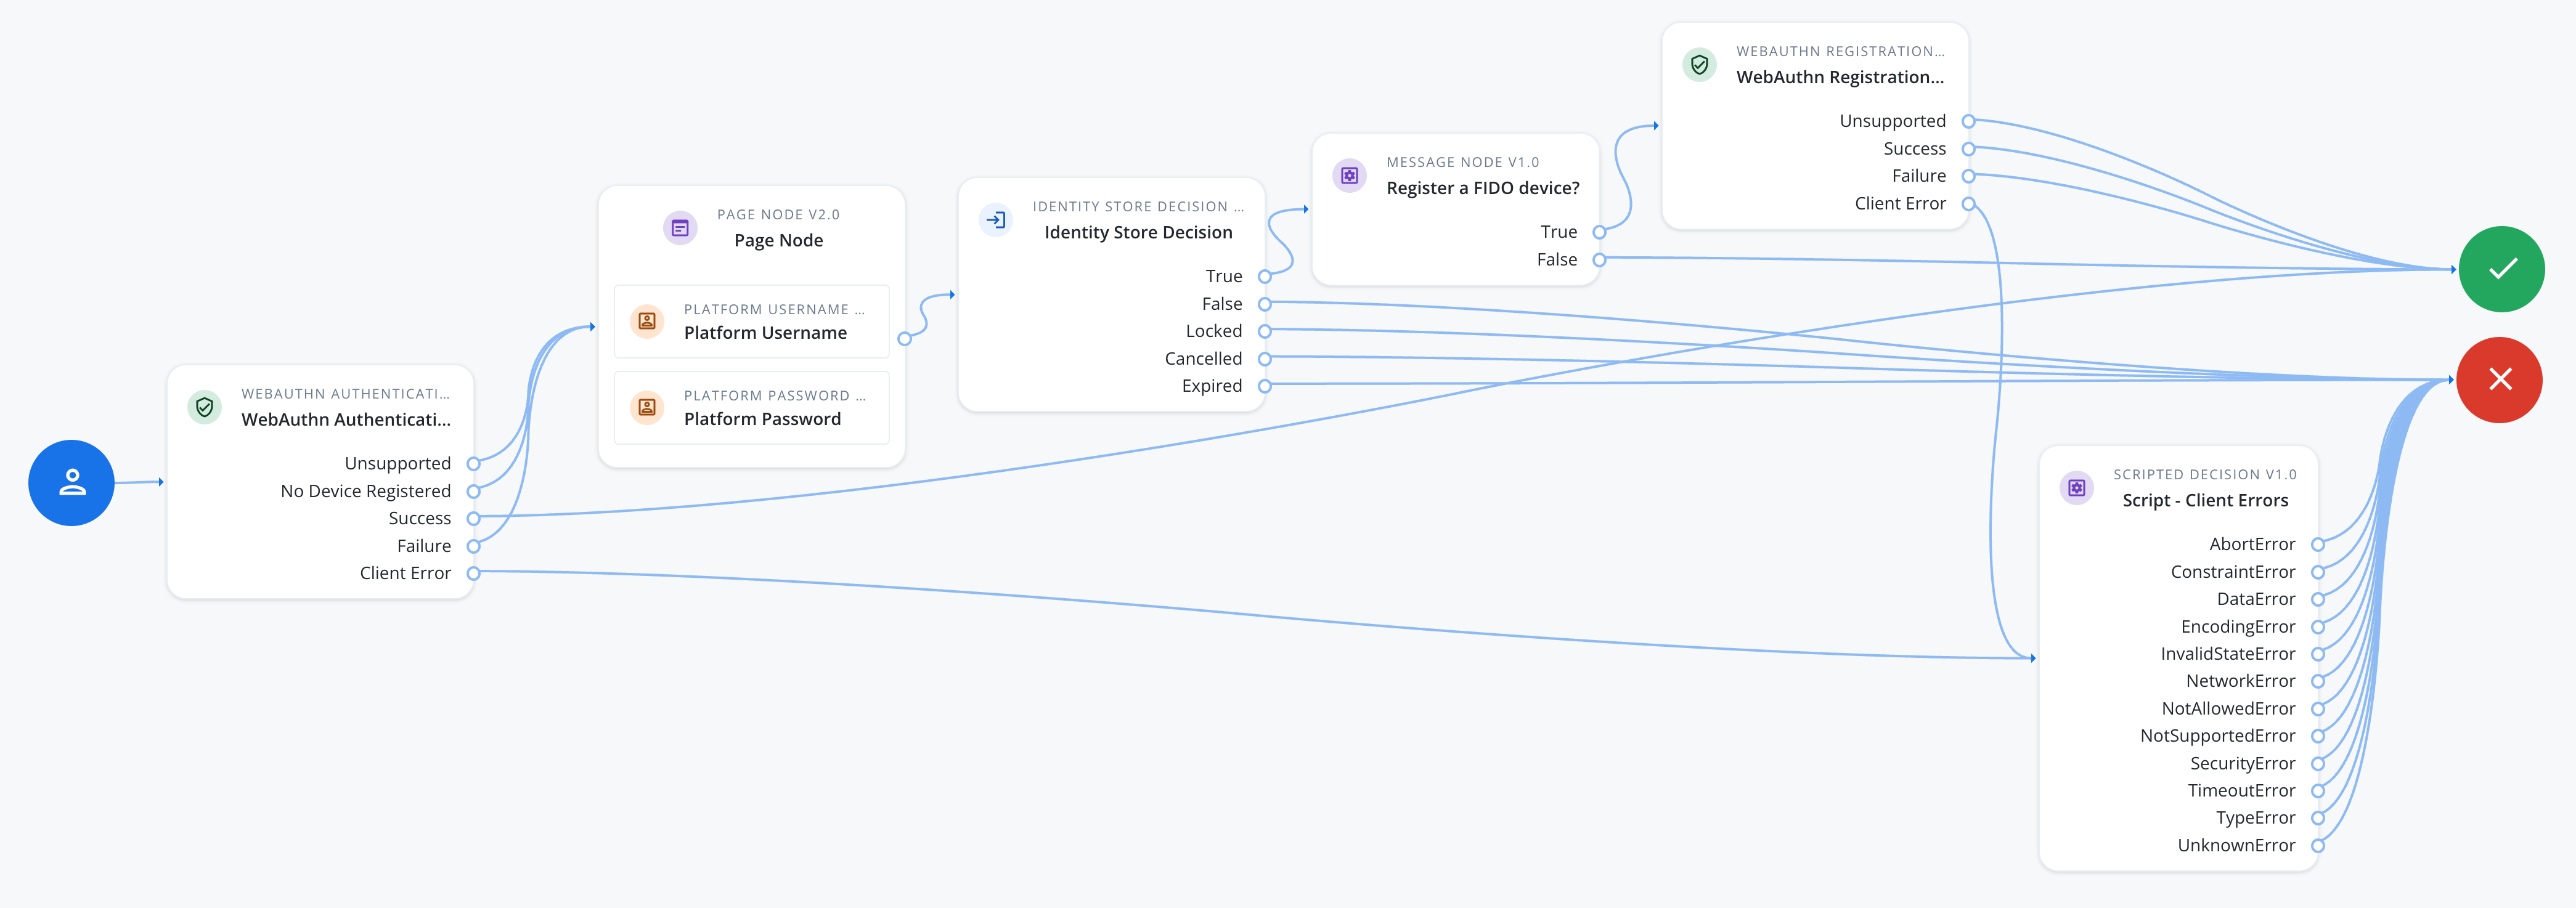
Configure an outcome for each error name your app’s iOS FIDO module can produce:
- InvalidStateError
-
The user tried to register a passkey that’s already registered.
Route to a message telling the user the passkey is already registered.
- NotAllowedError
-
The user cancelled the prompt.
Route back to the passkey sign-in step so the user can try again, or fall back to a password.
- NotSupportedError
-
The device doesn’t support the requested options.
Route to a password fallback instead of retrying WebAuthn.
- TimeoutError
-
The operation took longer than the node’s Timeout setting.
Route back to the passkey sign-in step so the user can retry.
- UnknownError
-
An error occurred that doesn’t map to a more specific outcome, including any error name not listed above.
Log for troubleshooting, and route to a generic failure message.
Next steps
You can now proceed to Integrating FIDO auth journeys in iOS.