Integrating FIDO auth journeys in iOS
PingOne Advanced Identity Cloud PingAM iOS
The FIDO module offers a streamlined API for handling FIDO interactions, including registering and authenticating with passkeys.
It abstracts away the complexities of the underlying FIDO protocols, allowing you to quickly add strong authentication to your applications.
For an example of the journeys you can build with this module, see the sample passkey journey.
Before you begin
To enable FIDO authentication in your app you must complete the following tasks:
Adding FIDO entitlements to an iOS app
-
In Xcode, in the Project Navigator, double-click your application to open the Project pane.
-
On the Signing & Capabilities tab, click Capability, type
Associated Domains, and then double click the result to add the capability. -
In Domains, click the Add () button, and enter the following entries:
-
webcredentials:, followed by the hostname where you uploaded theapple-app-site-associationfile earlier.For example,
webcredentials:openam-docs.forgeblocks.comThe result will resemble the following:
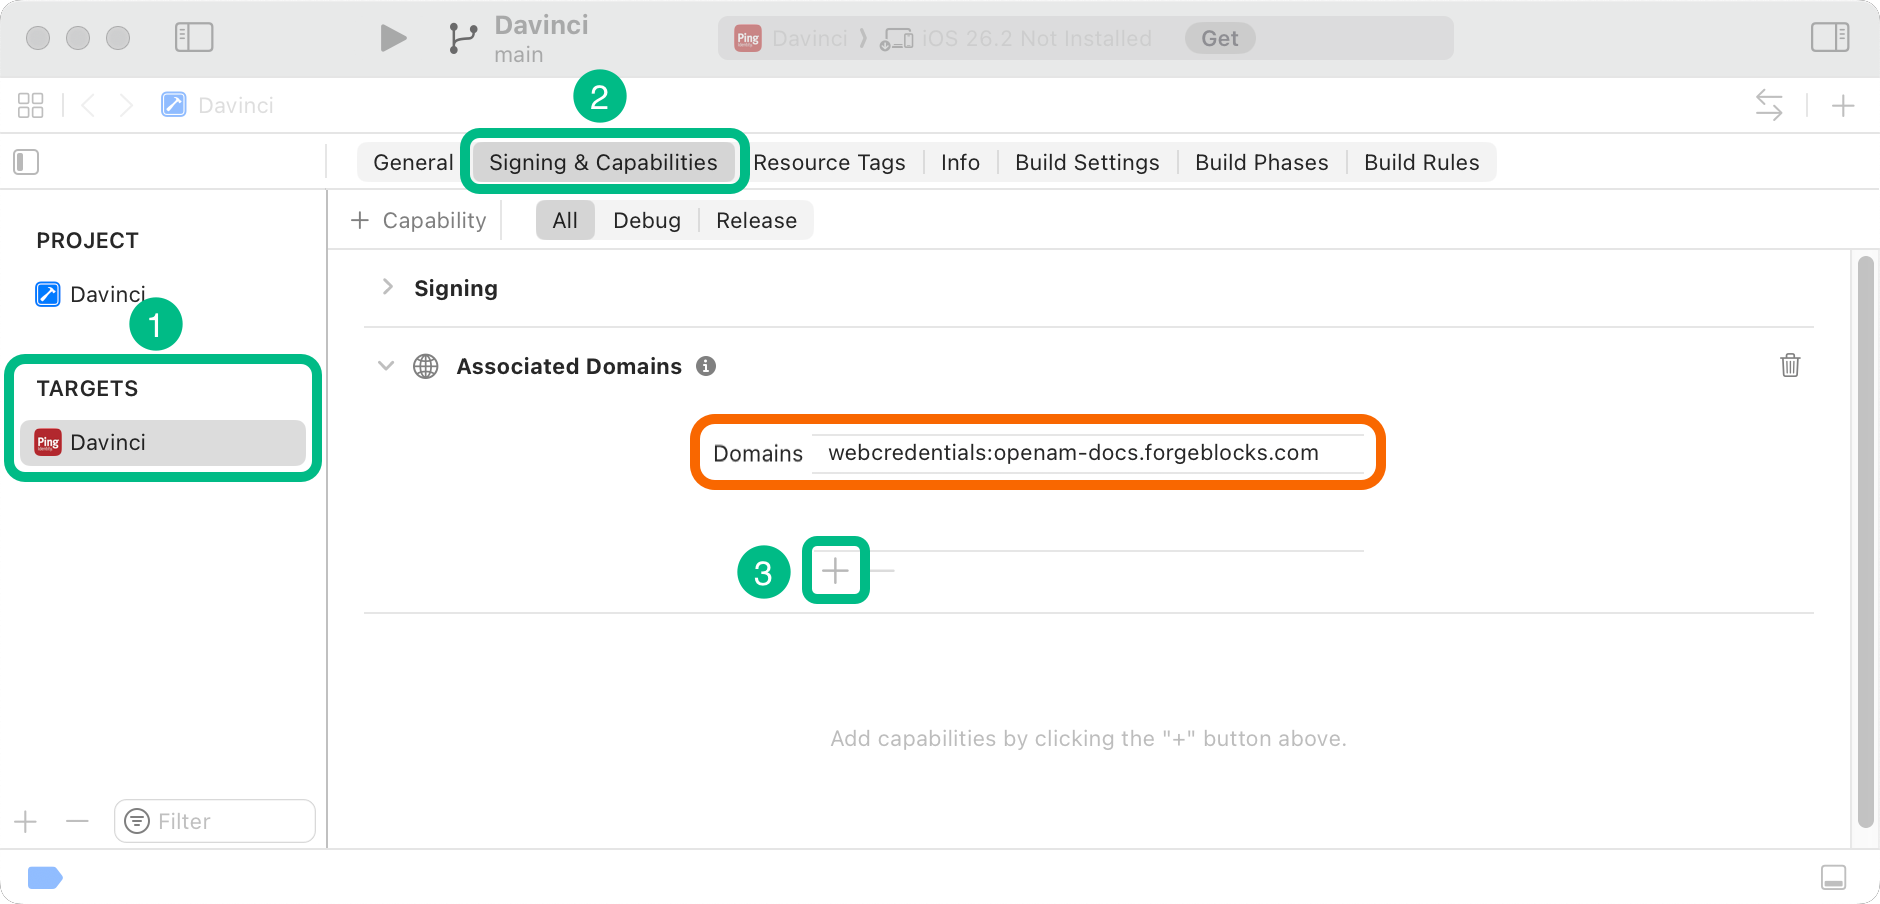 Figure 1. Configuring Advanced Identity Cloud entitlements in iOS.
-
Step 1. Installing modules
To install the FIDO module for iOS, use Swift Package Manager (SPM) or Cocoapods to add the dependency to your project.
-
SPM (Swift Package Manager)
-
CocoaPods
You can install packages by using SPM (Swift Package Manager) on the iOS project.
-
In Xcode, in the Project Navigator, right-click your project, and then click Add Package Dependencies….
-
In the Search or Enter Package URL field, enter the URL of the repo containing the Orchestration SDK for iOS,
https://github.com/ForgeRock/ping-ios-sdk.git. -
In Add to Project, select the name of your project, and then click Add Package.
Xcode shows a dialog containing the libraries available for iOS.
-
Select the
PingFidolibrary, and in the Add to Target column select the name of your project. -
Repeat the previous step for any other packages you want to use in your project.
-
Click Add Package.
Xcode displays the chosen packages and any prerequisites they might have in the Package Dependencies pane of the Project Navigator.
-
If you don’t already have CocoaPods, install the latest version.
-
If you don’t already have a Podfile, in a terminal window, run the following command to create a new Podfile:
pod init
-
Add the following lines to your Podfile:
pod 'PingFido'
-
Run the following command to install pods:
pod install
Step 2. Registering FIDO authenticators
To register a FIDO authenticator, use the register() function. The function returns either success or failure.
The Orchestration SDK provides the FidoRegistrationCallback class for handling the FIDO registration requests:
ForEach(Array(continueNode.callbacks.enumerated()), id: \.offset) { index, callback in
  switch callback {
    case let fidoRegistrationCallback as FidoRegistrationCallback:
      FidoRegistrationCallbackView(callback: fidoRegistrationCallback, onNext: onNext)
  }
}register in FidoRegistrationCallbackViewTask {
// Get the window
guard let windowScene = UIApplication.shared.connectedScenes.first as? UIWindowScene,
let window = windowScene.windows.first else {
print("Could not find active window scene.")
return // Exit if no window found
}
// Call the async function and await its Result
let result = await callback.register(window: window)
// Handle the Result
switch result {
case .success(let attestationValue):
// Optional: Use attestationValue if needed
print("FIDO Registration successful: \(attestationValue)")
// Call onNext
onNext()
case .failure(let error):
// Handle errors
print("FIDO Registration failed: \(error.localizedDescription)")
// Call onNext
onNext()
}
}Step 3. Authenticating using a FIDO authenticator
To authenticate using a registered FIDO authenticator, use the authenticate() function. The function returns either success or failure.
The Orchestration SDK provides the Fido2AuthenticationCallback class for handling the FIDO authentication requests:
ForEach(Array(continueNode.callbacks.enumerated()), id: \.offset) { index, callback in
  switch callback {
    case let fidoAuthenticationCallback as FidoAuthenticationCallback:
      FidoAuthenticationCallbackView(callback: fidoAuthenticationCallback, onNext: onNext)
  }
}authenticate in FidoAuthenticationCallbackViewTask {
// Get the window
guard let windowScene = UIApplication.shared.connectedScenes.first as? UIWindowScene,
let window = windowScene.windows.first else {
print("Could not find active window scene.")
return // Exit if no window found
}
// Call the async function and await its Result
let result = await callback.authenticate(window: window)
// Handle the Result
switch result {
case .success(let attestationValue):
// Optional: Use attestationValue if needed
print("FIDO Authentication successful: \(attestationValue)")
// Call onNext
onNext()
case .failure(let error):
// Handle errors
print("FIDO Authentication failed: \(error.localizedDescription)")
// Call onNext
onNext()
}
}Optionally, pass preferImmediatelyAvailableCredentials: true to authenticate() to fail immediately if no local passkey is already available on the device:
let result = await callback.authenticate(window: window, preferImmediatelyAvailableCredentials: true)Without the switch, the OS displays a dialog offering remote passkey options, rather than failing immediately:
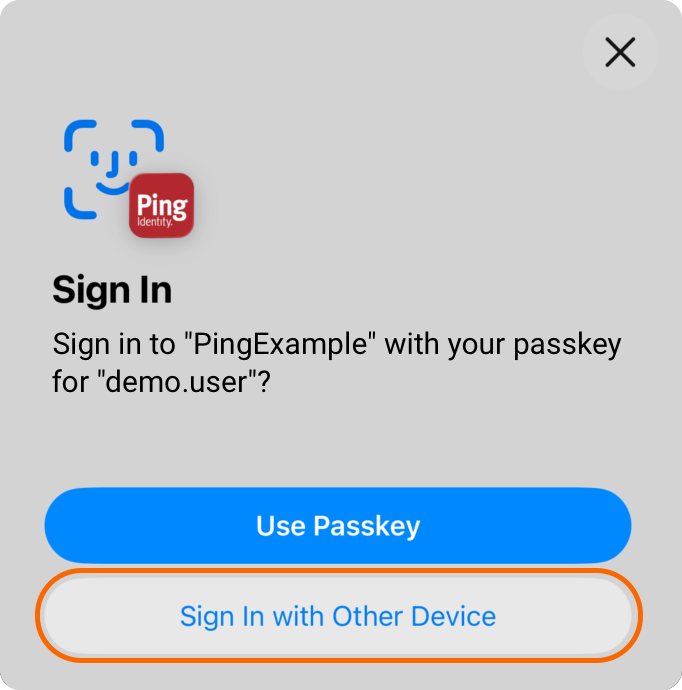
The switch does not prevent the iOS-supplied dialog if local passkeys do exist, and the dialog always offers remote passkeys as an option.
By default, preferImmediatelyAvailableCredentials is false.