Configuring Advanced Identity Cloud for PingOne Recognize
PingOne Advanced Identity Cloud Android
Before you configure your client application to use PingOne Recognize, you must complete two steps in your PingOne Advanced Identity Cloud tenant:
- Configure the PingOne Recognize services
-
Configure the PingOne Recognize service, which holds the details of your Recognize installation, and the PingOne Recognize device service, which stores each user’s Recognize profile.
- Create an authentication journey
-
Create a journey that includes the following PingOne Recognize nodes:
Step 1. Configure the Recognize services
Journeys that use PingOne Recognize require two services in your realm:
Configure the PingOne Recognize service
The PingOne Recognize service stores the details PingOne Advanced Identity Cloud needs to connect to your PingOne Recognize installation.
The Recognize nodes read this configuration and pass it to your app in the PingOneRecognizeCallback output fields, such as the Recognize host, API key, and customer name.
To configure the service:
-
In your PingOne Advanced Identity Cloud tenant, navigate to Native Consoles > Access Management.
-
In the left panel, select the realm, then go to Services > Add a Service.
-
Select PingOne Recognize service from the list of service types, then click Create, and enable the service.
-
On the Secondary Configurations tab, configure the settings for your Recognize installation.
- General
-
-
Settings that apply to the PingOne Advanced Identity Cloud connection to the Recognize server API.
General configuration properties Property Description Server API Key Secret Label Identifier
An identifier that PingOne Advanced Identity Cloud uses to build the secret label holding the API key that authenticates to the Recognize server API, for example
am.services.pingone.recognize.identifier.serverapikey.Server API URL
The URL of the Recognize server API endpoint.
-
- Web SDK
-
-
Settings used by web-based client integrations.
Web SDK configuration properties Property Description Authentication Service URL
The authentication service URL of the Recognize server, used by web-based client integrations.
Customer Name
The customer name registered on the Recognize server.
-
- Mobile SDK
-
-
Settings used by mobile app client integrations.
Mobile SDK configuration properties Property Description Host
The hostname of the Recognize server, used by mobile app client integrations.
Recognize API Key Secret Label Identifier
An identifier that PingOne Advanced Identity Cloud uses to build the secret label holding the API key that mobile app client integrations use to connect to the Recognize server, for example
am.services.pingone.recognize.identifier.recognizeapikey.
-
Configure the PingOne Recognize device service
The PingOne Recognize device service stores each user’s Recognize profile in the identity store, including their enrolled device profiles and account state. The nodes read and write these profiles during enrollment and authentication.
To configure the device service:
-
In your PingOne Advanced Identity Cloud tenant, navigate to Native Consoles > Access Management.
-
In the left panel, select the realm, then go to Services > Add a Service.
-
Select PingOne Recognize device service from the list of service types, then click Create.
-
Configure the settings for the device service:
User profile attributes Property Description PingOne Recognize Device Attribute
The user attribute in which to store enrolled device profiles.
The default is
pingOneRecognizeDeviceProfiles.PingOne Recognize User Profile Attribute
The user attribute in which to store per-user account state. The default is
pingOneRecognizeUserProfile.The default attributes are added to the user store schema when you prepare the user store. If you configure a different attribute, add it to your user store schema first, and make sure PingOne Advanced Identity Cloud can write to it.
Device profile encryption properties Property Description Device Profile Encryption Scheme
The scheme used to encrypt each device profile and the per-user account state.
Encryption Key Store
Path to the keystore from which to load encryption keys.
Key Store Type
The type of the keystore.
Key Store Password
Password to unlock the keystore. PingOne Advanced Identity Cloud encrypts this password when you save it in the configuration.
Key-Pair Alias
Alias of the certificate and private key in the keystore. The private key encrypts and decrypts device profiles and per-user account state.
Private Key Password
Password to unlock the private key.
|
For greater security, store the encryption key information in a secret store instead of in the configuration, using the |
Step 2. Create journeys for Recognize
The server provides two nodes to integrate PingOne Recognize into your journeys:
- PingOne Recognize Enrollment node
-
Enrolls a user’s biometric data with PingOne Recognize.
- PingOne Recognize Authentication node
-
Authenticates a user with PingOne Recognize using biometric facial recognition.
Create a journey using these nodes to integrate PingOne Recognize into your authentication flow.
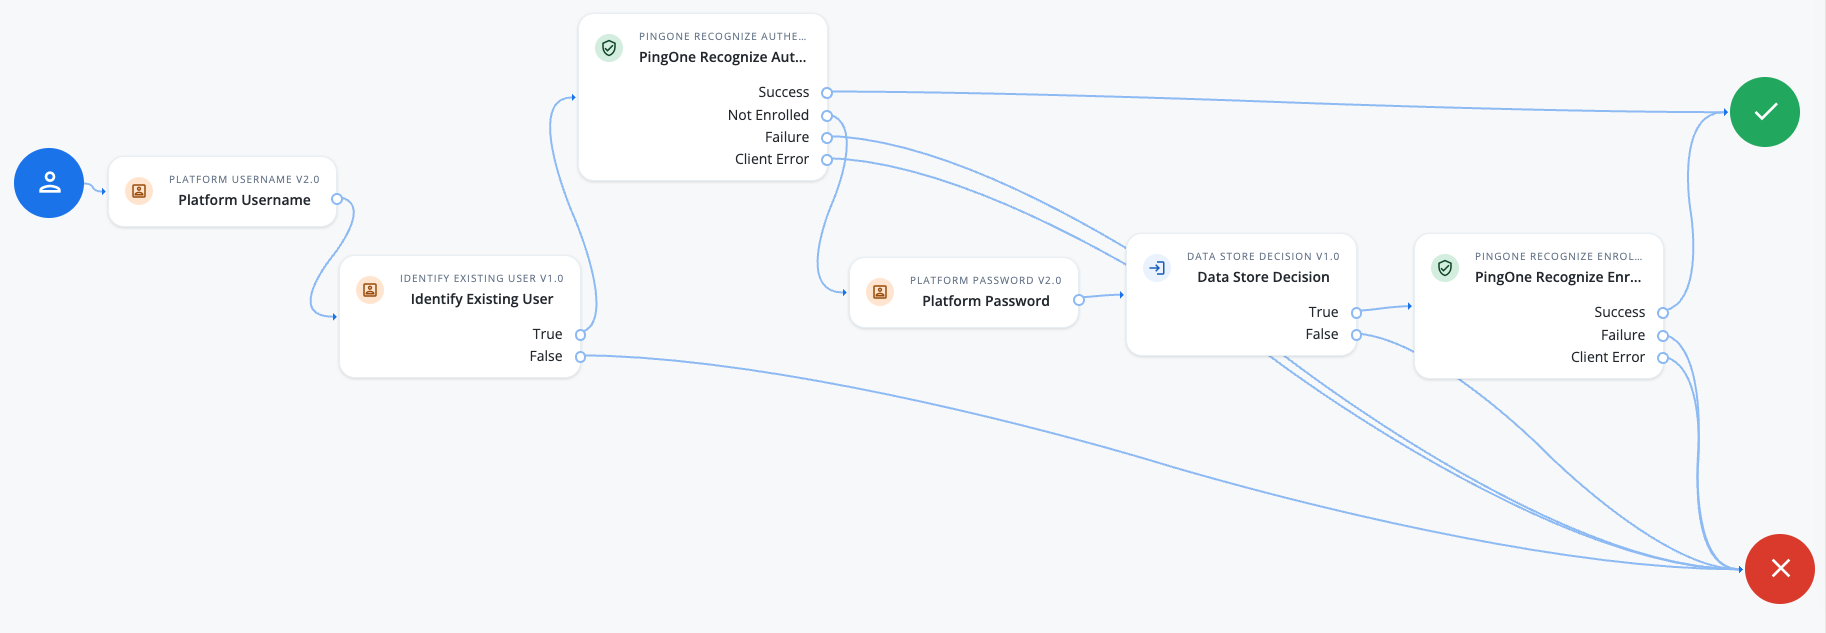
For example, the following passwordless journey authenticates a user with PingOne Recognize. If they have not previously enrolled, the journey collects their password and verifies their identity before letting them enroll their biometric data:
-
Platform Username node prompts the user for their username.
-
Identify Existing User node checks that the user exists in the identity store.
-
PingOne Recognize Authentication node sends a
PingOneRecognizeCallbackto your app to trigger the authentication flow on the client device. The journey continues on the following outcomes:-
Success: authentication succeeded, so the journey completes.
-
Not Enrolled: the user is not enrolled with PingOne Recognize, so the journey collects their password and verifies them before enrollment.
-
Client Error: PingOne Recognize returned an error; the error message and code are written to shared state.
-
Failure: authentication failed for a reason other than a client error, for example a session timeout or camera permission denied.
-
-
Platform Password node prompts the user for their password.
-
Data Store Decision node validates the username-password credentials.
-
PingOne Recognize Enrollment node sends a
PingOneRecognizeCallbackto your app to trigger the enrollment flow on the client device. The journey continues on the following outcomes:-
Success: enrollment succeeded, so the journey completes.
-
Client Error: PingOne Recognize returned an error; the error message and code are written to shared state.
-
Failure: enrollment failed for a reason other than a client error, for example a session timeout or camera permission denied.
-
Configure the node properties to match your client integration:
-
PingOne Recognize Service: select the name of the PingOne Recognize service configuration you created in Step 1. Configure the Recognize services.
-
Generate Client State: when enabled, PingOne Recognize generates client state on success, which the journey can use later, for example to enroll a second device.
-
Liveness Configuration: the liveness detection level the app applies during the ceremony, from minimal checks for development to enhanced checks for high-security operations.
-
Camera Delay: how long, in seconds, the app waits before capturing an image.
Optionally, configure additional settings, such as custom Client Error Outcomes, and extra options to pass to the Recognize SDKs. Learn more in the PingOne Recognize Enrollment node and PingOne Recognize Authentication node documentation.