Before you begin
PingAM React Native
To successfully complete this tutorial refer to the prerequisites in this section.
The tutorial also requires a configured PingAM server.
Prerequisites
- React Native
-
This sample app requires React Native 0.80.1 or later.
- iOS
-
This sample app requires iOS 17.0 or later.
- Android
-
This sample app requires Android 11 (API level 30) or later.
The React Native development environment must be fully configured before you begin. Follow the official React Native environment setup guide and ensure the following tools are installed:
- Node.js and Yarn
-
Install Node.js version 20 or later.
This project uses Yarn. Install Yarn by running:
corepack enable - Xcode (iOS only)
-
Download and install Xcode from the Mac App Store.
Xcode 15 or later is recommended.
- Ruby and Bundler (iOS only)
-
Ruby 3.3.6 or later is required to manage CocoaPods.
macOS ships with an older version of Ruby that is not compatible with this project.
Install a current version using rbenv or a similar version manager before continuing.
Install Bundler with:
gem install bundler - CocoaPods (iOS only)
-
CocoaPods is installed locally during the tutorial. You do not need to install it globally.
- Android Studio (Android only)
-
Download and install Android Studio.
An Android emulator or physical device is required to run the app. To add a virtual device, refer to Create and manage virtual devices on the Android Developers website.
- Java (Android only)
-
Android Studio includes an embedded JDK.
Java 21 is recommended and is bundled with recent versions of Android Studio.
keytool(Android only)-
keytoolis part of the Java Development Kit (JDK) and is used to generate the debug signing keystore required for the Android build. It is included with Android Studio’s bundled JDK.
Server configuration
This tutorial requires you to configure your PingAM server as follows:
Task 1. Create a demo user
The samples and tutorials in this documentation often require that you have an identity set up so that you can test authentication.
To create a demo user in PingAM, follow these steps:
-
Log in to the PingAM admin UI as an administrator.
-
Navigate to Identities, and then click Add Identity.
-
Enter the following details:
-
User ID =
demo -
Password =
Ch4ng3it! -
Email Address =
demo.user@example.com
-
-
Click Create.
Task 2. Create an authentication tree
Authentication trees provide fine-grained authentication by allowing multiple paths and decision points throughout the authentication flow. Authentication trees are made up of nodes that define actions taken during authentication.
Each node performs a single task, such as collecting a username or making a simple decision. Nodes can have multiple outcomes rather than just success or failure.
To create a simple tree for use when testing the Orchestration SDKs, follow these steps:
-
Under Realm Overview, click Authentication Trees, then click Create Tree.
-
Enter a tree name, for example
sdkUsernamePasswordJourney, and then click Create.The authentication tree designer appears, showing the Start entry point connected to the Failure exit point.
-
Drag the following nodes from the Components panel on the left side into the designer area:
-
Page Node
-
Username Collector
-
Password Collector
-
Data Store Decision
-
-
Drag and drop the Username Collector and Password Collector nodes onto the Page Node, so that they both appear on the same page when logging in.
-
Connect the nodes as follows:
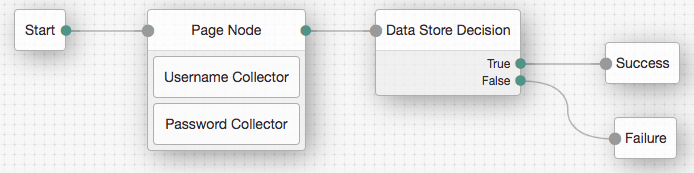 Figure 1. Example username and password authentication tree
 -
Select the Page Node, and in the Properties pane, set the Stage property to
UsernamePassword.You can configure the node properties by selecting a node and altering properties in the right-hand panel. One of the samples uses this specific value to determine the custom UI to display.
-
Click Save.
Task 3. Register a public OAuth 2.0 client
Public clients do not use a client secret to obtain tokens because they are unable to keep them hidden. The Orchestration SDKs commonly use this type of client to obtain tokens, as they cannot guarantee safekeeping of the client credentials in a browser or on a mobile device.
To register a public OAuth 2.0 client application for use with the SDKs in AM, follow these steps:
-
Log in to the PingAM admin UI as an administrator.
-
Navigate to Applications > OAuth 2.0 > Clients, and then click Add Client.
-
In Client ID, enter
sdkPublicClient. -
Leave Client secret empty.
-
In Redirection URIs, enter the following values:
org.forgerock.oidc://oauth2redirectAlso add any other domains where you will be hosting SDK applications. -
In Scopes, enter the following values:
openid profile email address -
Click Create.
PingAM creates the new OAuth 2.0 client, and displays the properties for further configuration.
-
On the Core tab:
-
In Client type, select
Public. -
Disable Allow wildcard ports in redirect URIs.
-
Click Save Changes.
-
-
On the Advanced tab:
-
In Grant Types, enter the following values:
Authorization Code Refresh Token -
In Token Endpoint Authentication Method, select
None. -
Enable the Implied consent property.
-
-
Click Save Changes.
Task 4. Configure the OAuth 2.0 provider
The provider specifies the supported OAuth 2.0 configuration options for a realm.
To ensure the PingAM OAuth 2.0 provider service is configured for use with the Orchestration SDKs, follow these steps:
-
Log in to the PingAM admin UI as an administrator.
-
In the left panel, click Services.
-
In the list of services, click OAuth2 Provider.
-
On the Core tab, ensure Issue Refresh Tokens is enabled.
-
On the Consent tab, ensure Allow Clients to Skip Consent is enabled.
-
Click Save Changes.