Preparing Advanced Identity Cloud or PingAM for FIDO in React Native
PingOne Advanced Identity Cloud PingAM React Native
Before enabling FIDO authentication in your React Native apps you must configure your server and, depending on the platforms you support, prepare your Android or iOS apps.
Preparing your Android app for FIDO
Complete the following steps to prepare your Android app for FIDO authentication:
Step 1. Generating Android signing key fingerprints
You need to generate signing key fingerprints so that you can create a secure, verifiable link between your server and your native Android app.
This prevents malicious apps from impersonating your official app to register or use FIDO credentials.
You need two different formats of fingerprint:
-
For example,
E6:5A:5D:37:22:FC...22:99:20:03:E6:47 -
Base64-encoded SHA-256 fingerprint
For example,
android:apk-key-hash:jEFEYh80...S5Pj-ZKHHjwi0k
Generating SHA-256 fingerprints of your Android signing certificates
You can use SHA-256 fingerprints of the certificates you use to sign your Android applications to ensure that FIDO only works with apps you’ve signed.
The steps for obtaining the fingerprint depend on the method you use to distribute your application.
-
Android App Bundles
-
Local debug keys
If you are using Android App Bundles to distribute your apps, then the hashes of the certificate used to sign your application are available in the Android Developer console.
Follow these steps to obtain the SHA-256 hash of your signing certificate:
-
Configure your Android App Bundle for signing. Google has a number of methods for managing the signing certificates, including uploading your own or having Google manage them for you.
For information on how to set up signing, refer to Sign your app in the Google Developer Documentation.
-
In the Google Play Console:
-
Select the app that will be supporting mobile biometrics.
-
Navigate to Setup > App integrity > App signing.
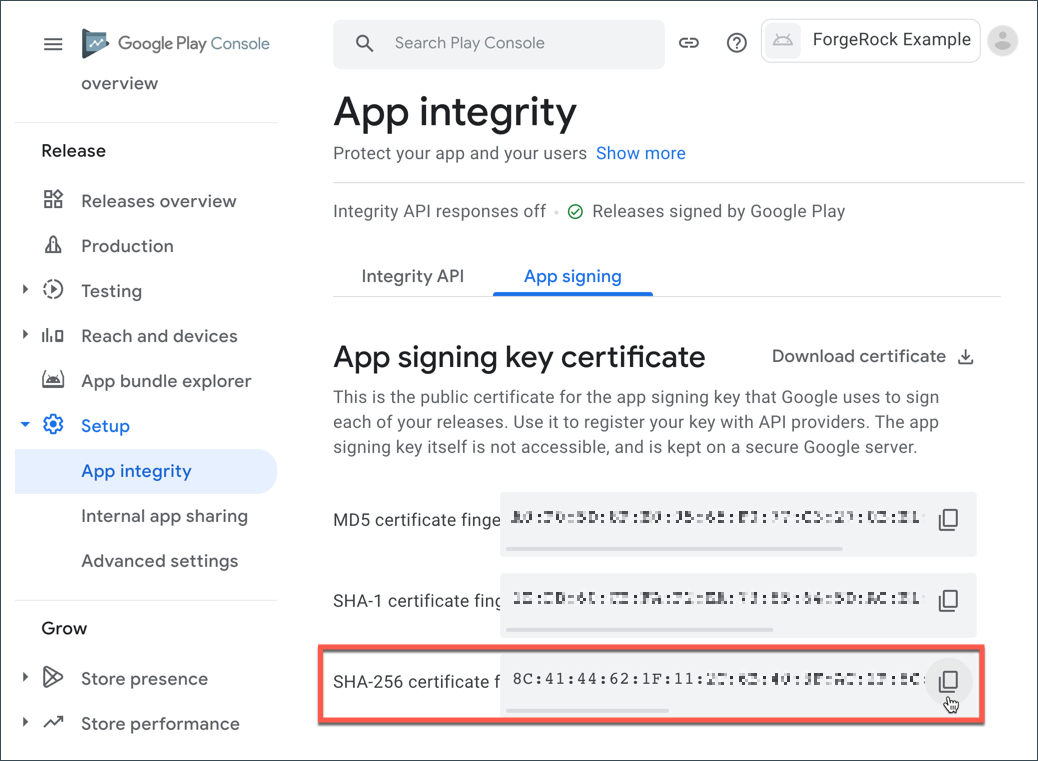 Figure 1. App signing keys in the Google Play Console
 -
In the App signing key certificate section, copy the SHA-256 certificate fingerprint value.
In the Digital Asset Links JSON section is a file that you can copy with the SHA-256 fingerprint already in place.
-
You must manually generate a SHA-256 fingerprint of your signing key in the following scenarios:
-
You are signing your APK with the default debug.jks that Android Studio created for the project
-
You are signing your APK with your own keys that you have generated that have not been uploaded to the Google Play Console
Follow these steps to obtain the SHA-256 hash of your signing certificate:
-
In the
build.gradlefile for your application, check the settings defined in thesigningConfigsproperty:Example signingConfigs when using the default debug.jkssigningConfigs { debug { storeFile file('../debug.jks') storePassword 'android' keyAlias 'androiddebugkey' keyPassword 'android' } } -
In a terminal window, navigate to the location of the JKS file, and then run the following command:
keytool -list -v -alias <keyAlias> -keystore <storeFile> | grep SHA256Swap the <keyAlias> and <storeFile> placeholders with the values you obtained from your project. For example:
keytool -list -v -alias "androiddebugkey" -keystore "./debug.jks" | grep SHA256 -
When requested, enter the keystore password, as specified in the
keyPasswordproperty in thebuild.gradlefile.The default keystore password for certificates in the local debug JKS file is
android.The command prints the SHA-256 fingerprint of the signing key:
Enter keystore password:  android
SHA256: E6:5A:5D:37:22:FC...22:99:20:03:E6:47
Signature algorithm name: SHA256withRSA
Generating base64-encoded SHA-256 fingerprints of your Android signing certificates
The steps for obtaining the base64-encoded SHA-256 hash depend on the method you use to distribute your application.
-
Android App Bundles
-
Local debug keys
Follow these steps to download the app signing certificate, and then generate a base64-encoded SHA-256 hash:
-
In the Google Play Console:
-
Select the app that will be supporting mobile biometrics.
-
Navigate to Setup > App integrity > App signing.
-
In the App signing key certificate section, click Download certificate.
This downloads a local copy of the signing certificate, named
deployment_cert.der.
-
-
In a terminal window, navigate to the location of the
deployment_cert.derfile, and then run the following command:cat deployment_cert.der | openssl sha256 -binary | openssl base64 | tr '/+' '_-' | tr -d '='The command prints the base64-encoded SHA-256 fingerprint of the signing key:
jEFEYh80K55iHYkxsBRLGtAP6wvjOS5Pj-ZKHHjwi0k -
Add a prefix of
android:apk-key-hash:to the base64-encode SHA-256 fingerprint. For example:android:apk-key-hash:jEFEYh80K55iHYkxsBRLGtAP6wvjOS5Pj-ZKHHjwi0k
Follow these steps to extract the app signing certificate from the JKS and generate a base64-encoded SHA-256 hash:
-
In the
build.gradlefile for your application, check the settings defined in thesigningConfigsproperty:Example signingConfigs when using the default debug.jkssigningConfigs { debug { storeFile file('../debug.jks') storePassword 'android' keyAlias 'androiddebugkey' keyPassword 'android' } } -
In a terminal window, navigate to the location of the JKS file, and then run the following command:
keytool -exportcert -alias <keyAlias> -keystore <storeFile> | openssl sha256 -binary | openssl base64 | tr '/+' '_-' | tr -d '='Swap the <keyAlias> and <storeFile> placeholders with the values you obtained from your project. For example:
keytool -exportcert -alias "androiddebugkey" -keystore "./debug.jks" | openssl sha256 -binary | openssl base64 | tr '/+' '_-' | tr -d '=' -
When requested, enter the keystore password, as specified in the
keyPasswordproperty in thebuild.gradlefile.The default keystore password for certificates in the local debug JKS file is
android.The command prints the base64-encoded SHA-256 fingerprint of the signing key:
Enter keystore password: android jEFEYh80K55iHYkxsBRLGtAP6wvjOS5Pj-ZKHHjwi0k -
Add a prefix of
android:apk-key-hash:to the base64-encode SHA-256 fingerprint. For example:android:apk-key-hash:jEFEYh80K55iHYkxsBRLGtAP6wvjOS5Pj-ZKHHjwi0k
Step 2. Associating your Android app with your Advanced Identity Cloud or PingAM server
In this step you create a Digital Asset Links JSON file that allows your website to make a public, verifiable statement about its relationship with other assets, such as your Android app.
Creating a Digital Asset Links JSON file
To associate your server with your Android app you need to make public, verifiable statements by using a Digital Asset Links JSON file (assetlinks.json).
Create or update an assetlinks.json with the SHA-256 fingerprint value you generated in the previous step:
assetlinks.json file[
{
"relation": [
"delegate_permission/common.handle_all_urls",
"delegate_permission/common.get_login_creds"
],
"target": {
"namespace": "android_app",
"package_name": "com.example.app",
"sha256_cert_fingerprints": [
"E6:5A:5D:37:22:FC...22:99:20:03:E6:47"
]
}
}
]For more information on creating an assetlinks.json file, refer to Google Digital Asset Links.
Hosting assetlinks.json in Advanced Identity Cloud or PingAM
-
For PingOne Advanced Identity Cloud deployments, refer to Upload an Android assetlinks.json file.
-
For self-managed PingAM deployments, host the file at
https://<your domain>/.well-known/assetlinks.json.
Preparing your iOS app for FIDO
Complete the following step to prepare your iOS app for FIDO authentication:
Step 1. Associating your iOS app with your Advanced Identity Cloud or PingAM server
Create an apple-app-site-association file that establishes a secure association between your domain and your iOS app.
This allows you to share credentials and use universal links to open your app from your website.
To create the secure association, upload the apple-app-site-association file to your domain, and add matching Associated Domains Entitlement keys to your app.
Preparing a site association file
-
Prepare a JSON-formatted file named
apple-app-site-association, as shown below.Ensure you include the
webcredentialsentitlement{ "applinks": { "details": [ { "appIDs": [ "XXXXXXXXXX.com.example.AppName" ], "components": [ { "/": "/reset/*", "comment": "Success after reset password journey" } ] } ] }, "webcredentials": { "apps": [ "XXXXXXXXXX.com.example.AppName" ] } } -
Replace XXXXXXXXXX.com.example.AppName with the app ID of your client iOS application.
Learn more in Supporting associated domains in the Apple Developer documentation.
Hosting apple-app-site-association files in Advanced Identity Cloud or PingAM
-
For PingOne Advanced Identity Cloud deployments, refer to Upload an iOS apple-app-site-association file.
-
For self-managed PingAM deployments, host the file at
https://<your domain>/.well-known/apple-app-site-association.
Configuring authentication journeys for FIDO
This step applies to both Android and iOS.
Authentication journeys for FIDO primarily use these nodes:
- WebAuthn Registration Node
-
Handles the creation and storage of new passkeys.
- WebAuthn Authentication Node
-
Manages the sign-in process by issuing and verifying challenges.
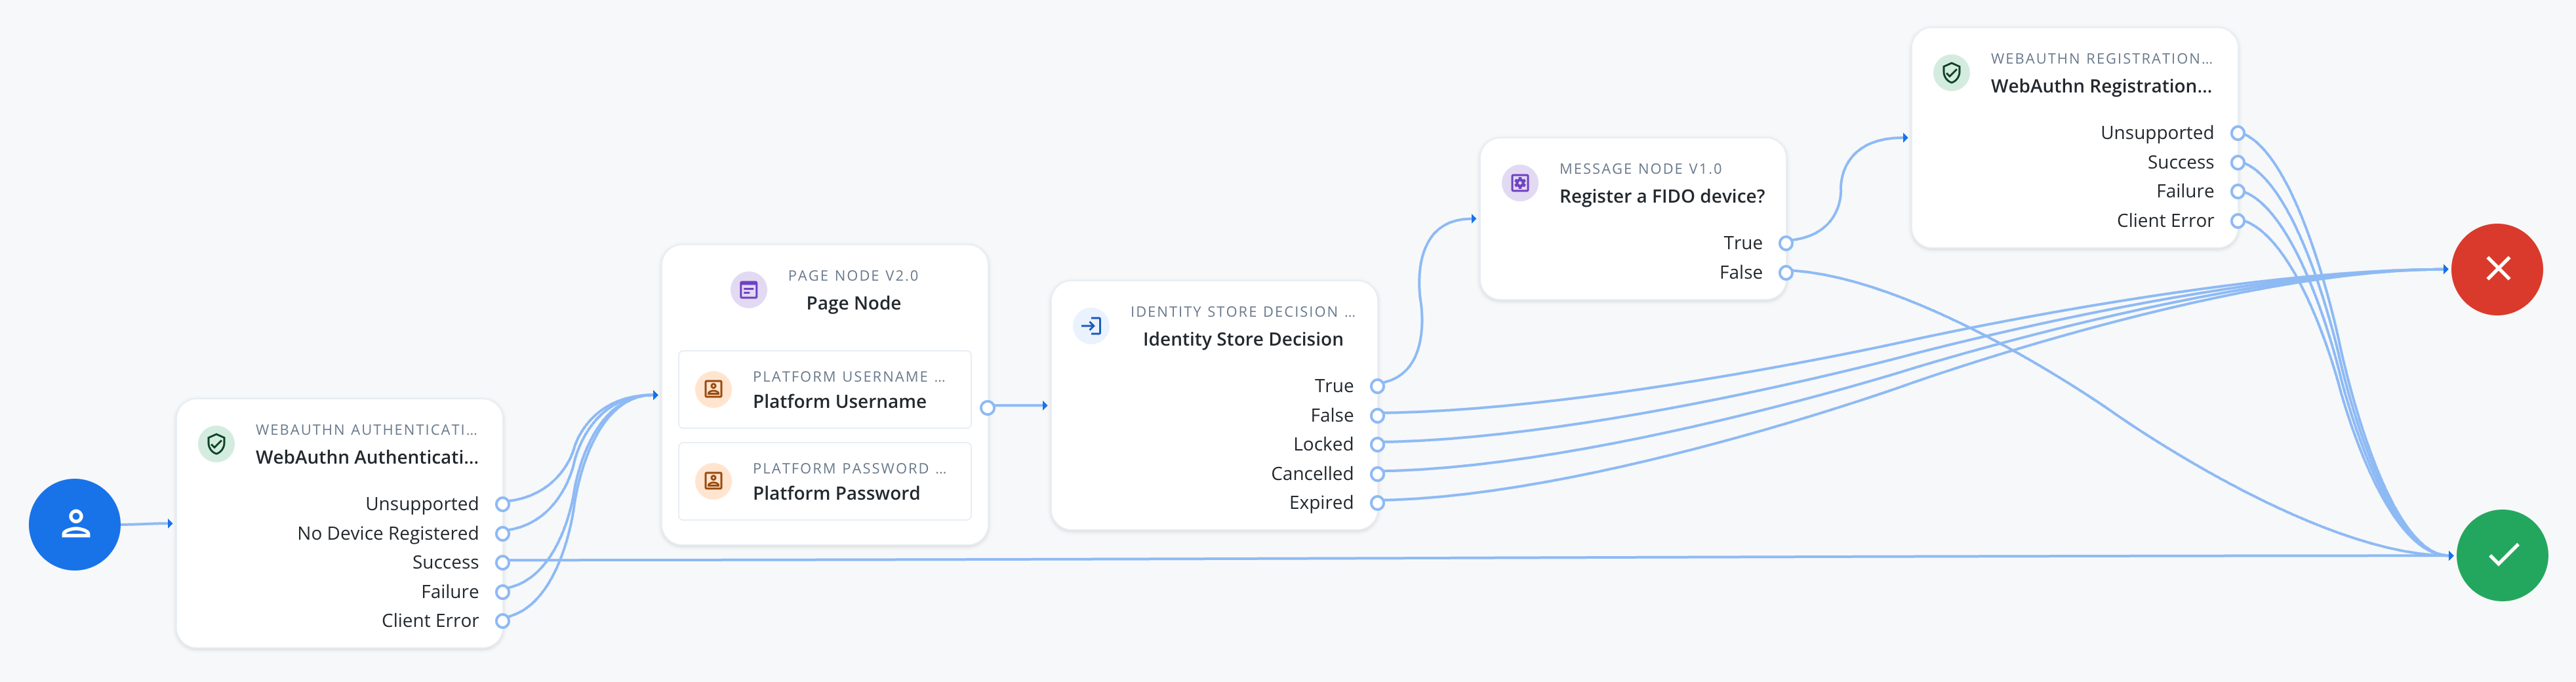
Here’s a sample journey that supports passkeys end-to-end. It tries a passkey sign-in first, and falls back to a username and password for users who haven’t registered a passkey yet. Because registering a passkey requires an authenticated session, the journey only offers to register one after a successful sign-in.
To use FIDO with a React Native application, configure each WebAuthn Registration node and WebAuthn Authentication node in your authentication journey.
|
Use the same configuration values in each WebAuthn Registration node and WebAuthn Authentication node in the journey. Configuration mismatches between these nodes cause authentication to fail. |
- Each WebAuthn Registration node and WebAuthn Authentication node
-
-
In Origin domains, enter the URL where you host your React Native app.
For example,
https://app.example.com.If you leave Origin domains empty, the server uses the origin of incoming requests as an accepted origin.
-
Optionally, to support usernameless sign-in, enable Username from device in the WebAuthn Authentication node, and Username to device in the WebAuthn Registration node.
-
- Each WebAuthn Registration node
-
-
In Accepted signing algorithms, include one or more of
ES256andRS256. -
Ensure the Limit registrations option is not enabled.
-
Optionally, use the Authentication attachment property to control the type of authenticators available for registration:
PLATFORM-
Only allow authenticators built into the user’s device, such as Face ID or Touch ID.
CROSS_PLATFORM-
Only allow external authenticators, such as security keys.
UNSPECIFIED-
Allow either type (default).
-
Handling client errors
The WebAuthn Registration node and WebAuthn Authentication node each have a Client Error outcome. The SDK reaches this outcome when the underlying WebAuthn operation fails for a reason that isn’t a simple pass/fail, for example an unsupported authenticator, a timeout, a network problem, or a device in an unexpected state.
The outcome carries the error as a string in the ERROR::<name>:<message> format, where <name> is a standard DOMException error name, such as NotAllowedError or InvalidStateError.
To handle these errors individually rather than as a single generic outcome, add a Scripted Decision node after the Client Error outcome. Configure the script to read the error string from shared state, extract the error name, and map it to an outcome your journey can branch on:
// Error format: ERROR::<name>:<message>
// Example: ERROR::InvalidStateError:No Credential is registered
var error = sharedState.get("WebAuthenticationDOMException");
var result = error.match(/::([\w\s]{1,}):{0,}/);
outcome = result ? result[1] : "UnknownError";
The script above only extracts the error name, but a Scripted Decision node is a good place to add logic beyond simple routing, such as logging the full error message for troubleshooting, incrementing a counter to detect repeated failures from the same device, or recording metrics on which errors occur most often.
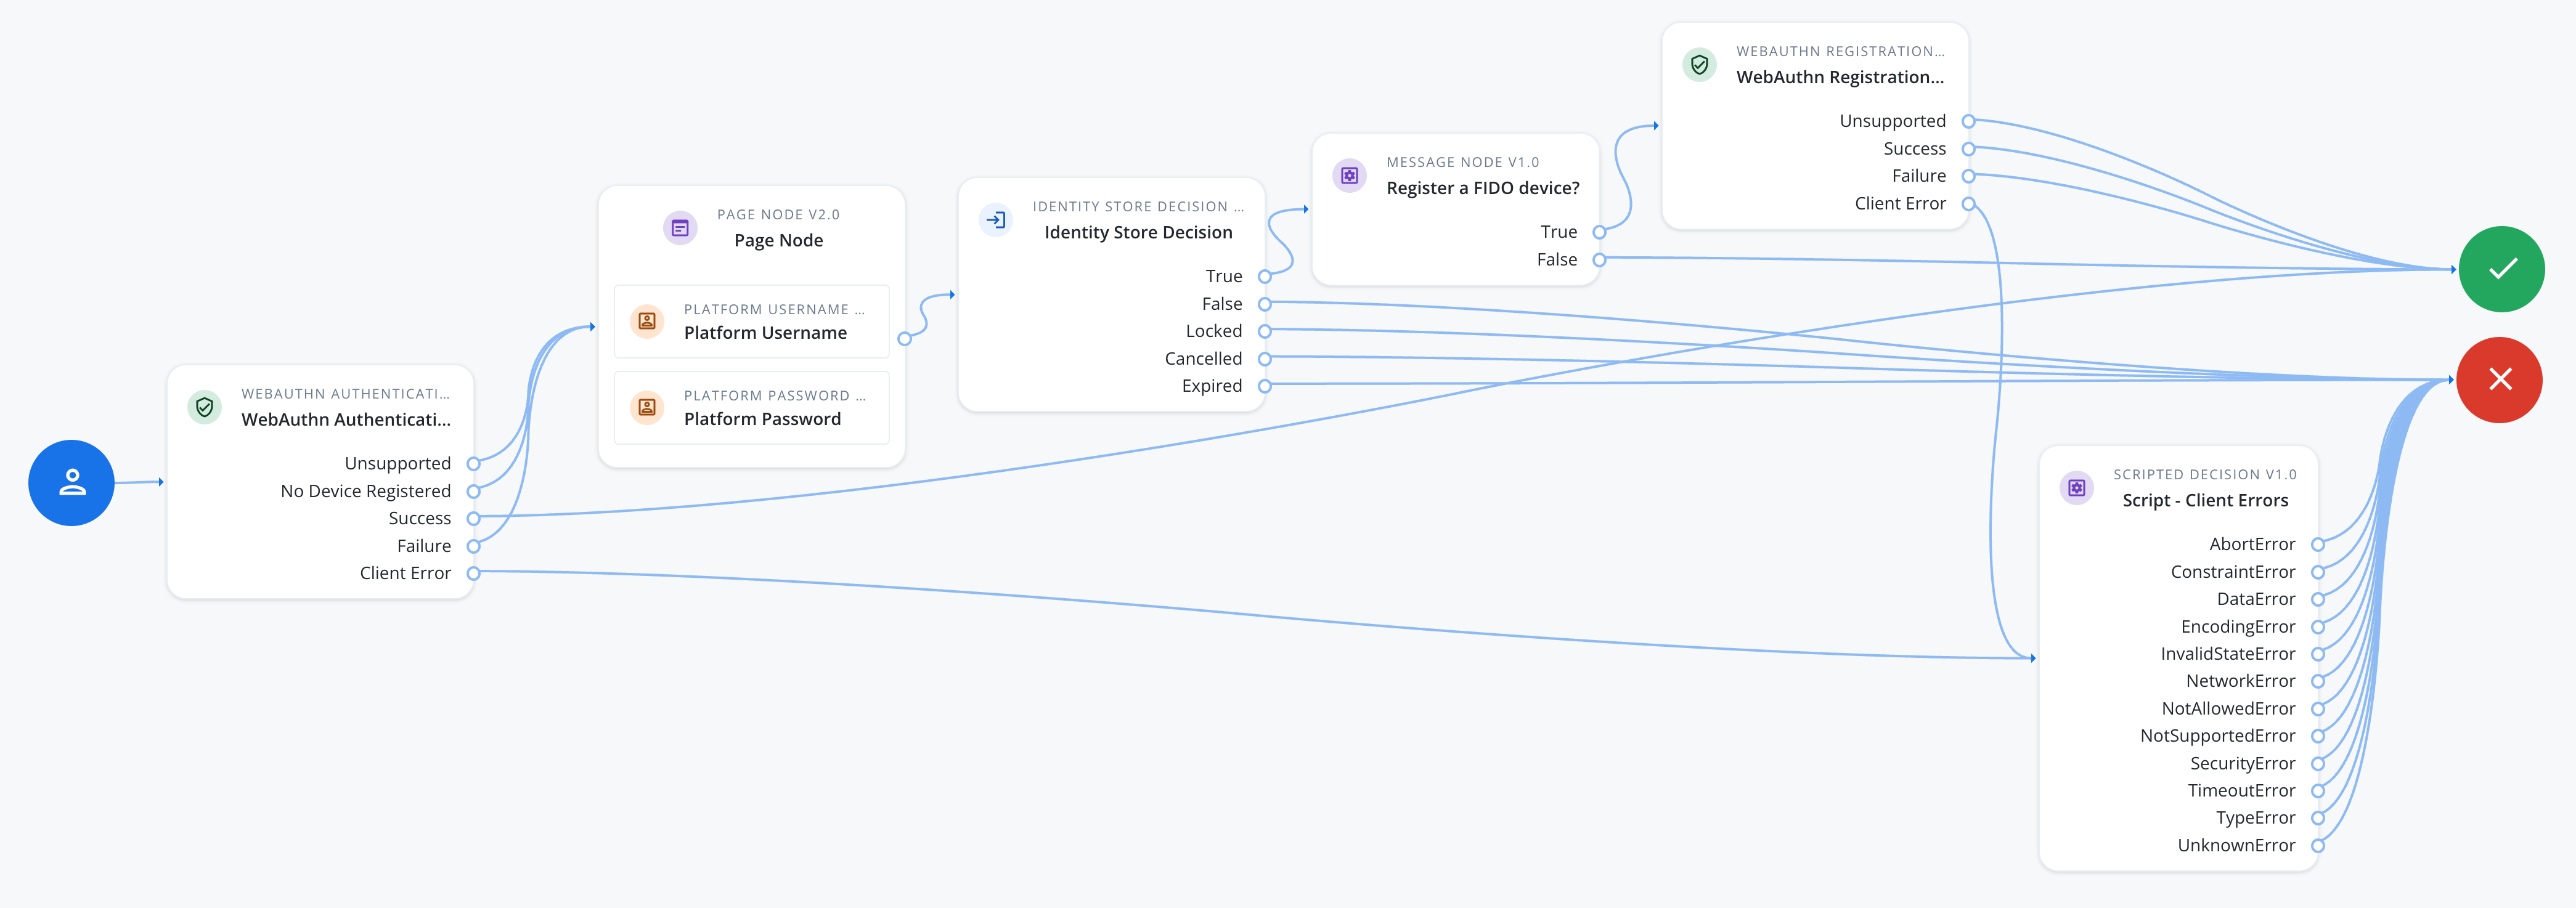
Configure an outcome for each error name your app can produce:
- AbortError
-
The operation was aborted, for example the app cancelled an in-progress request.
Route back to the passkey sign-in step.
- ConstraintError
-
The authenticator can’t satisfy a requested option, such as a resident key.
Route to a password fallback.
- DataError
-
The request contained invalid or malformed data.
Log for troubleshooting; this usually points to a configuration issue rather than something the user can fix.
- EncodingError
-
Encoding or decoding the credential data failed.
Log for troubleshooting; this usually points to a configuration issue rather than something the user can fix.
- InvalidStateError
-
The user tried to register a passkey that’s already registered.
Route to a message telling the user the passkey is already registered.
- NetworkError
-
A network problem prevented the operation from completing.
Route back to the passkey sign-in step so the user can retry.
- NotAllowedError
-
The user cancelled the prompt, or no authenticator matched.
Route back to the passkey sign-in step so the user can try again, or fall back to a password.
- NotSupportedError
-
The device doesn’t support the requested options.
Route to a password fallback instead of retrying WebAuthn.
- SecurityError
-
The operation isn’t allowed in the current context, for example an origin mismatch.
Log for troubleshooting; check your Origin domains and Relying party identifier configuration.
- TimeoutError
-
The operation took longer than the node’s Timeout setting.
Route back to the passkey sign-in step so the user can retry.
- TypeError
-
The request contained an invalid argument.
Log for troubleshooting; this usually points to a configuration issue rather than something the user can fix.
- UnknownError
-
An error occurred that doesn’t map to a more specific outcome, including any error name not listed above.
Log for troubleshooting, and route to a generic failure message.
|
The outcomes above are reported by the journey’s WebAuthn Authentication node or WebAuthn Registration node, not the client-side iOS devices only produce |
Next steps
You can now proceed to Integrating FIDO auth journeys in React Native.