Configuring React Native apps for the Device Authorization Grant
PingOne PingOne Advanced Identity Cloud PingAM React Native
You can configure React Native apps built with the Orchestration SDK to authenticate users using the OAuth 2.0 Device Authorization Grant (RFC 8628).
This is suitable for devices with limited input capabilities, such as smart TVs, kiosks, or IoT devices. The requesting app starts an authorization request, displays a short code and URL to the user, and polls in the background while the user authenticates on a separate browser-capable device.
The Orchestration SDK for React Native provides two ways to implement the flow:
-
A low-level API, using
createOidcDeviceClient()and theOidcDeviceClientit returns, which gives you direct control over the status stream and token handling. -
A high-level API, using the
DeviceAuthGrantProvidercomponent and theuseDeviceAuthGrant()hook, which manages polling state, saved tokens, and user info for you.
Use the low-level API when you need full control over the flow and your own state management. Use the high-level API for most apps, because it handles the lifecycle, token persistence, and user info retrieval on your behalf.
This page shows both approaches as the requesting device, and then how to use a React Native app as the approving device.
Configuring a React Native app as the requesting device
To configure a React Native app as the requesting device in the Device Authorization Grant flow, complete each of the following steps:
Before you begin
You need to prepare your authorization server to support the Device Authorization Grant.
Select your server from the options below and complete the tasks before proceeding to configure your application.
-
PingOne
-
Advanced Identity Cloud
-
PingAM
This tutorial requires you to configure your PingOne server as follows:
Task 1. Create a demo user
The samples and tutorials in this documentation often require that you have an identity set up so that you can test authentication.
To create a demo user in PingOne, follow these steps:
-
Log in to your PingOne administration console.
-
In the left panel, navigate to Directory > Users.
-
Next to the Users label, click the plus icon ().
PingOne displays the Add User panel.
-
Enter the following details:
-
Given Name =
Demo -
Family Name =
User -
Username =
demo -
Email =
demo.user@example.com -
Population =
Default -
Password =
Ch4ng3it!
-
-
Click Save.
Task 2. Register a public OAuth 2.0 client with device authorization enabled
To register a public OAuth 2.0 client application in PingOne for use with the Orchestration SDKs for Android and iOS, follow these steps:
-
Log in to your PingOne administration console.
-
In the left panel, navigate to Applications > Applications.
-
Next to the Applications label, click the plus icon ().
PingOne displays the Add Application panel.
-
In Application Name, enter a name for the profile, for example
sdkNativeClient -
Select Native as the Application Type, and then click Save.
-
On the Configuration tab, click the pencil icon ().
-
In Grant Type, select the following values:
Authorization CodeRefresh TokenDevice Authorization -
In Redirect URIs, enter the following values:
org.forgerock.oidc://oauth2redirect -
In Token Endpoint Authentication Method, select
None. -
Click Save.
-
-
On the Resources tab, next to Allowed Scopes, click the pencil icon ().
-
In Scopes, select the following values:
emailphoneprofileThe openidscope is selected by default.
-
-
Optionally, on the Policies tab, click the pencil icon () to select the authentication policies for the application.
Applications that have no authentication policy assignments use the environment’s default authentication policy to authenticate users.
If you have a DaVinci license, you can select PingOne policies or DaVinci Flow policies, but not both. If you do not have a DaVinci license, the page only displays PingOne policies.
To use a PingOne policy:
-
Click Add policies and then select the policies that you want to apply to the application.
-
Click Save.
PingOne applies the policies in the order in which they appear in the list. PingOne evaluates the first policy in the list first. If the requirements are not met, PingOne moves to the next one.
For more information, see Authentication policies for applications.
To use a DaVinci Flow policy:
-
You must clear all PingOne policies. Click Deselect all PingOne Policies.
-
In the confirmation message, click Continue.
-
On the DaVinci Policies tab, select the policies that you want to apply to the application.
-
Click Save.
PingOne applies the first policy in the list.
-
-
Click Save.
-
Enable the OAuth 2.0 client application by using the toggle next to its name:
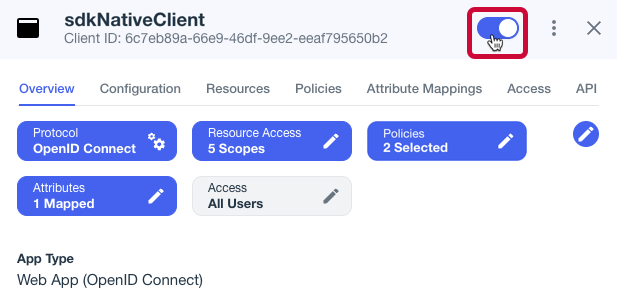 Figure 1. Enable the application using the toggle.
The application is now configured to accept client connections from and issue OAuth 2.0 tokens to the Android and iOS PingOne example applications and tutorials covered by this documentation.
This tutorial requires you to configure your PingOne Advanced Identity Cloud tenant as follows:
Task 1. Create a demo user
The samples and tutorials in this documentation often require that you have an identity set up so that you can test authentication.
To create a demo user in PingOne Advanced Identity Cloud, follow these steps:
-
Log in to your PingOne Advanced Identity Cloud tenant.
-
In the left panel, click Identities > Manage.
-
Click New Alpha realm - User.
-
Enter the following details:
-
Username =
demo -
First Name =
Demo -
Last Name =
User -
Email Address =
demo.user@example.com -
Password =
Ch4ng3it!
-
-
Click Save.
Task 2. Register a public OAuth 2.0 client with device authorization enabled
Public clients do not use a client secret to obtain tokens because they are unable to keep them hidden. The Orchestration SDKs commonly use this type of client to obtain tokens, as they cannot guarantee safekeeping of the client credentials in a browser or on a mobile device.
To register a public OAuth 2.0 client application for use with the SDKs in PingOne Advanced Identity Cloud, follow these steps:
-
Log in to your PingOne Advanced Identity Cloud tenant.
-
In the left panel, click Applications.
-
Click Custom Application.
-
Select OIDC - OpenId Connect as the sign-in method, and then click Next.
-
Select Native / SPA as the application type, and then click Next.
-
In Name, enter a name for the application, such as
Public SDK Client. -
In Owners, select a user that is responsible for maintaining the application, and then click Next.
When trying out the SDKs, you could select the demouser you created previously. -
In Client ID, enter
sdkPublicClient -
Select Configure for SDK Sample Apps.
-
Click Create Application.
PingOne Advanced Identity Cloud creates the application and displays the details screen.
-
On the Sign On tab:
-
In Sign-In URLs, ensure the following values appear, or add them if they don’t:
org.forgerock.oidc://oauth2redirectAlso add any other domains where you host SDK applications. -
In Grant Types, ensure the following values appear:
Authorization CodeRefresh TokenDevice Code -
In Scopes, ensure the following values appear:
openid profile email address
-
-
Click Show advanced settings, and on the Authentication tab, confirm the following properties:
-
In Token Endpoint Authentication Method, select
none. -
In Client Type, select
Public. -
Enable the Implied Consent property.
-
-
Click Save.
The application is now configured to accept client connections from and issue OAuth 2.0 tokens to the example applications and tutorials covered by this documentation.
Task 3. Configure the OAuth 2.0 provider
The provider specifies the supported OAuth 2.0 configuration options for a realm.
To ensure the PingOne Advanced Identity Cloud OAuth 2.0 provider service is configured for use with the Orchestration SDKs, follow these steps:
-
In your PingOne Advanced Identity Cloud tenant, navigate to Native Consoles > Access Management.
-
In the left panel, click Services.
-
In the list of services, click OAuth2 Provider.
-
On the Core tab, ensure Issue Refresh Tokens is enabled.
-
On the Consent tab, ensure Allow Clients to Skip Consent is enabled.
-
Click Save Changes.
This tutorial requires you to configure your PingAM server as follows:
Task 1. Create a demo user
The samples and tutorials in this documentation often require that you have an identity set up so that you can test authentication.
To create a demo user in PingAM, follow these steps:
-
Log in to the PingAM admin UI as an administrator.
-
Navigate to Identities, and then click Add Identity.
-
Enter the following details:
-
User ID =
demo -
Password =
Ch4ng3it! -
Email Address =
demo.user@example.com
-
-
Click Create.
Task 2. Register a public OAuth 2.0 client with device authorization enabled
Public clients do not use a client secret to obtain tokens because they are unable to keep them hidden. The Orchestration SDKs commonly use this type of client to obtain tokens, as they cannot guarantee safekeeping of the client credentials in a browser or on a mobile device.
To register a public OAuth 2.0 client application for use with the SDKs in AM, follow these steps:
-
Log in to the PingAM admin UI as an administrator.
-
Navigate to Applications > OAuth 2.0 > Clients, and then click Add Client.
-
In Client ID, enter
sdkPublicClient. -
Leave Client secret empty.
-
In Redirection URIs, enter the following values:
org.forgerock.oidc://oauth2redirectAlso add any other domains where you will be hosting SDK applications. -
In Scopes, enter the following values:
openid profile email address -
Click Create.
PingAM creates the new OAuth 2.0 client, and displays the properties for further configuration.
-
On the Core tab:
-
In Client type, select
Public. -
Disable Allow wildcard ports in redirect URIs.
-
Click Save Changes.
-
-
On the Advanced tab:
-
In Grant Types, enter the following values:
Authorization Code
Refresh Token
Device Code -
In Token Endpoint Authentication Method, select
None. -
Enable the Implied consent property.
-
-
Click Save Changes.
Task 3. Configure the OAuth 2.0 provider
The provider specifies the supported OAuth 2.0 configuration options for a realm.
To ensure the PingAM OAuth 2.0 provider service is configured for use with the Orchestration SDKs, follow these steps:
-
Log in to the PingAM admin UI as an administrator.
-
In the left panel, click Services.
-
In the list of services, click OAuth2 Provider.
-
On the Core tab, ensure Issue Refresh Tokens is enabled.
-
On the Consent tab, ensure Allow Clients to Skip Consent is enabled.
-
Click Save Changes.
Step 1. Installing modules
Install the OIDC module for React Native, and its dependency, the Core module:
-
yarn
-
npm
yarn add @ping-identity/rn-core
yarn add @ping-identity/rn-oidc
npm install @ping-identity/rn-core
npm install @ping-identity/rn-oidcAfter installation, run pod install in your ios/ directory to link the native dependencies on iOS:
cd ios && pod installStep 2. Creating the device client
Use createOidcDeviceClient() to configure the connection to your authorization server.
The configuration is similar to createOidcClient(), but the flow does not redirect back to your app.
import { createOidcDeviceClient } from '@ping-identity/rn-oidc';

const deviceClient = createOidcDeviceClient({
    clientId: '6c7eb89a-66e9-ab12-cd34-eeaf795650b2',
    discoveryEndpoint: 'https://auth.pingone.com/3072206d-c6ce-ch15-m0nd-f87e972c7cc3/as/.well-known/openid-configuration',
    redirectUri: 'org.forgerock.oidc://oauth2redirect',
    scopes: ['openid', 'email', 'address', 'profile'],
});
Update the following properties with values that match your environment:
- clientId
-
The client ID from your OAuth 2.0 application.
For example,
6c7eb89a-66e9-ab12-cd34-eeaf795650b2 - discoveryEndpoint
-
The
.well-knownendpoint from your OAuth 2.0 application.How do I find my PingOne .well-known URL?
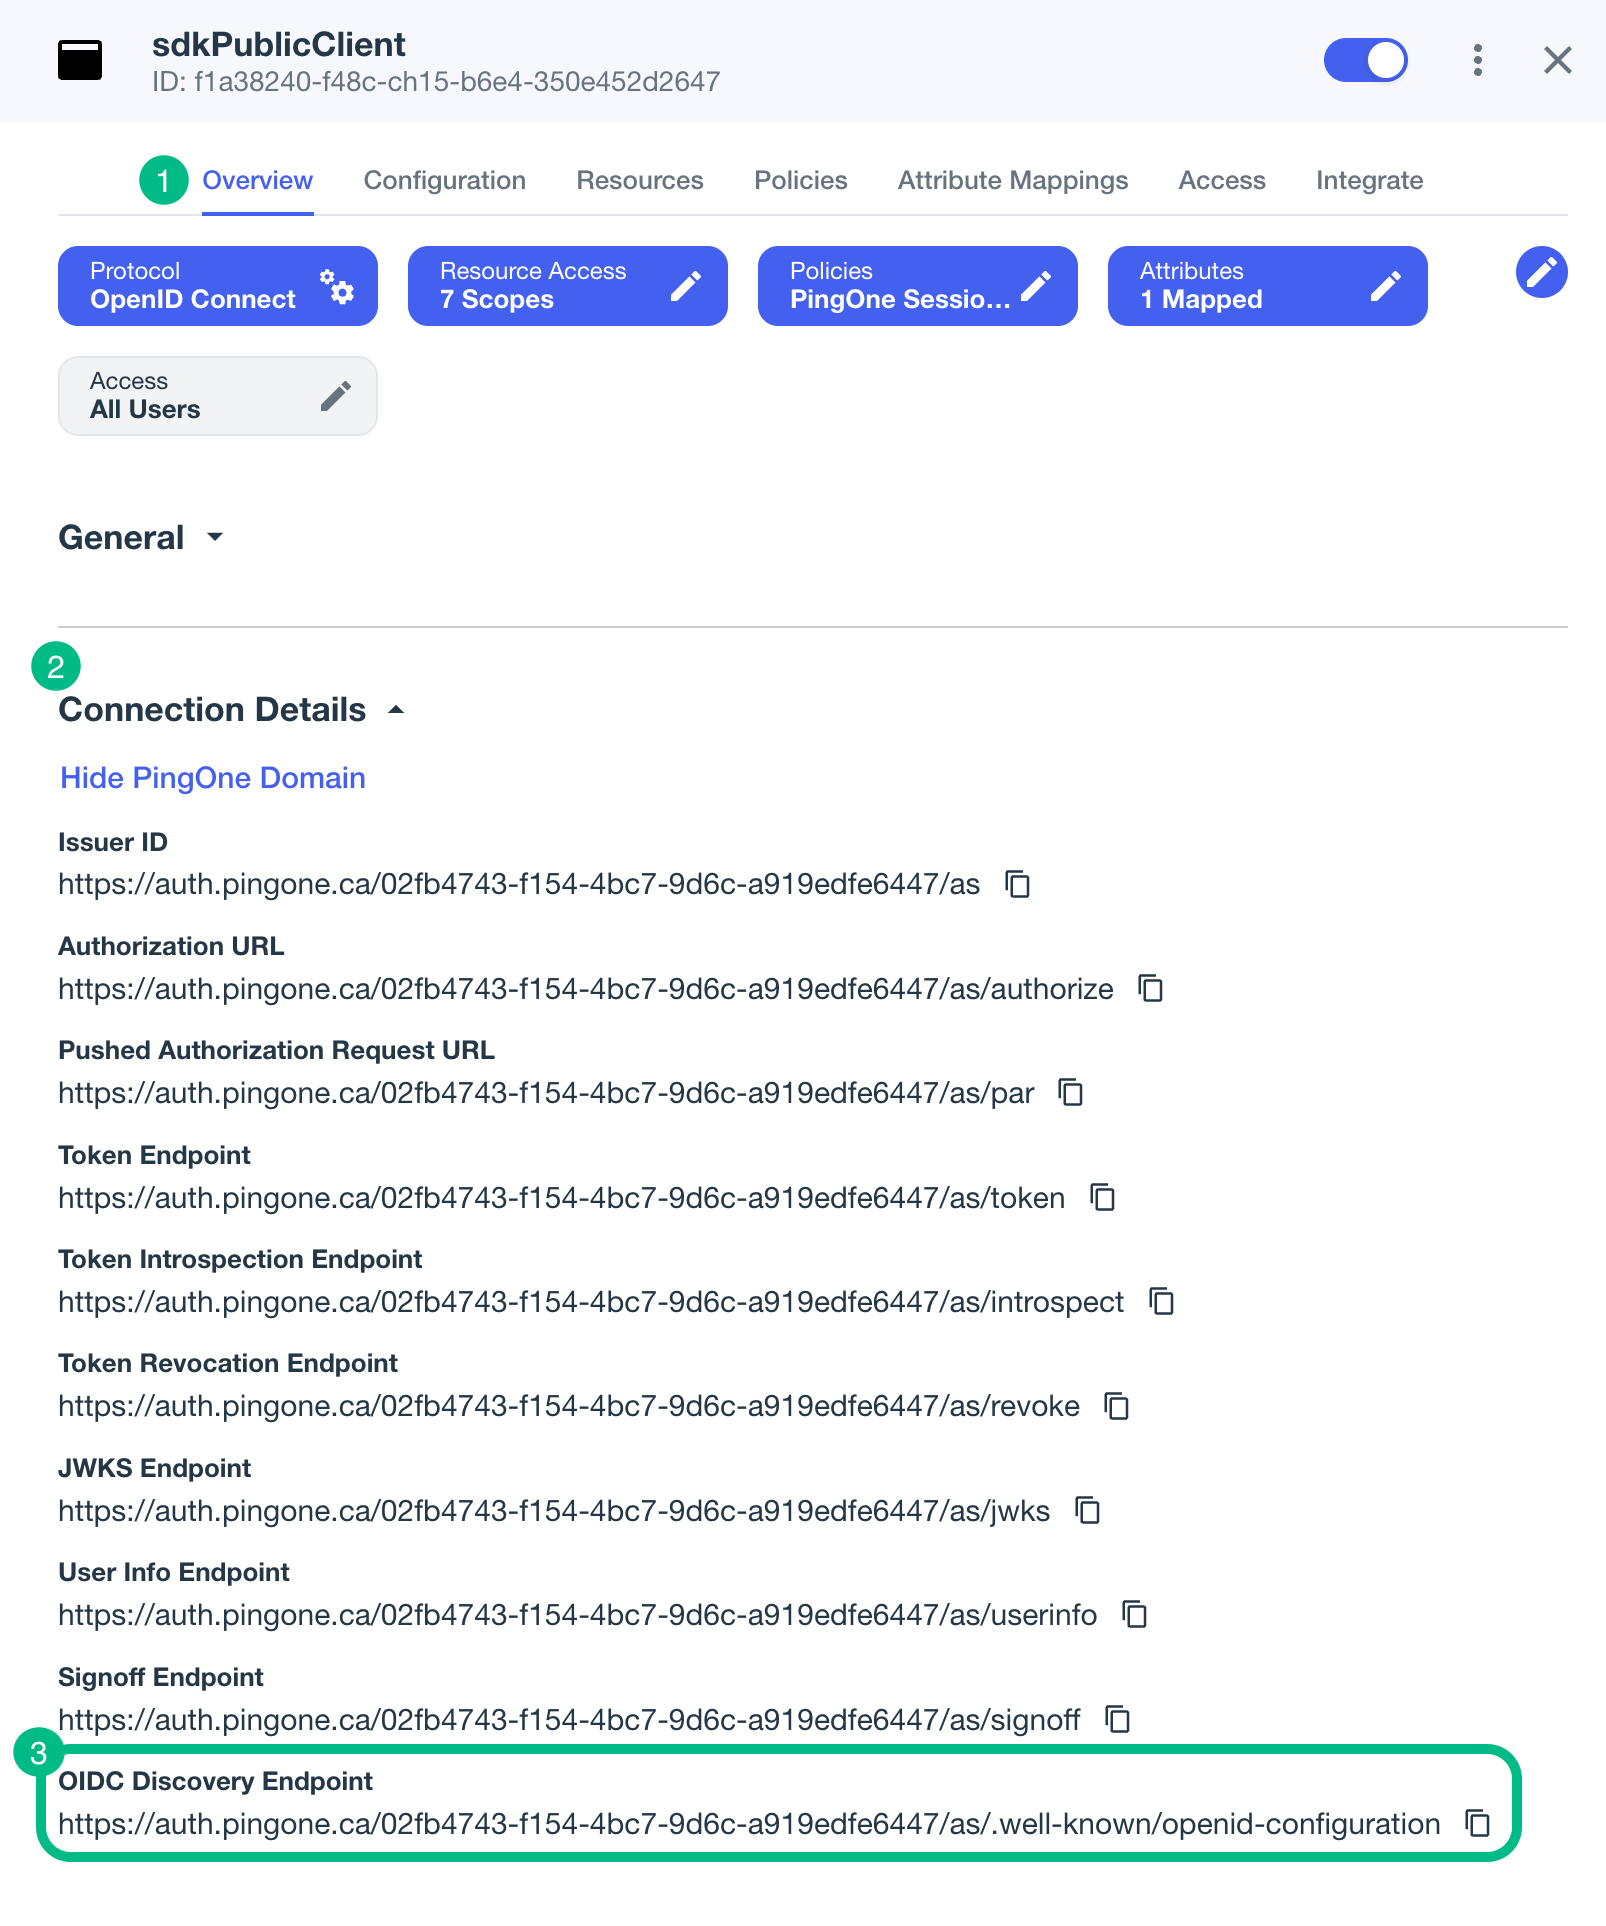
To find the
.well-knownendpoint for an OAuth 2.0 client in PingOne:-
Log in to your PingOne administration console.
-
Go to Applications > Applications, and then select your OAuth 2.0 client.
For example, sdkPublicClient.
-
On the Overview tab, expand the Connection Details section, and then copy the OIDC Discovery Endpoint value.
How do I find my PingOne Advanced Identity Cloud
.well-knownURL?You can view the
.well-knownendpoint for an OAuth 2.0 client in the PingOne Advanced Identity Cloud admin console:-
Log in to your PingOne Advanced Identity Cloud administration console.
-
Click Applications, and then select the OAuth 2.0 client you created earlier. For example, sdkPublicClient.
-
On the Sign On tab, in the Client Credentials section, copy the Discovery URI value.
For example,
https://openam-forgerock-sdks.forgeblocks.com/am/oauth2/alpha/.well-known/openid-configuration
If you are using a custom domain, your
.well-knownis formed as follows:https://<custom-domain-fqdn>/.well-known/openid-configurationLearn more in Access OIDC configuration discovery endpoint.
How do I find my PingAM
.well-knownURL?To form the
.well-knownURL for an PingAM server, concatenate the following information into a single URL:-
The base URL of the PingAM component of your deployment, including the port number and deployment path.
For example,
https://openam.example.com:8443/openam -
The string
/oauth2 -
The hierarchy of the realm that contains the OAuth 2.0 client.
You must specify the entire hierarchy of the realm, starting at the Top Level Realm. Prefix each realm in the hierarchy with the
realms/keyword.For example,
/realms/root/realms/customersIf you omit the realm hierarchy, the top level
ROOTrealm is used by default. -
The string
/.well-known/openid-configuration
For example,
https://auth.pingone.com/3072206d-c6ce-ch15-m0nd-f87e972c7cc3/as/.well-known/openid-configuration -
- redirectUri
-
The redirect URI as configured in the OAuth 2.0 client profile.
The Device Authorization Grant does not redirect back to your app, so the custom scheme setup in Configuring React Native apps for OIDC sign-on (intent filter and URL type) is not needed for this use case. The Orchestration SDK still passes the value to the browser session when the app opens the verification URL in-app, so it must match a value registered in your OAuth 2.0 client.
For example,
org.forgerock.oidc://oauth2redirect - scopes
-
The scopes you added to your OAuth 2.0 application.
For example,
'openid', 'email', 'address', 'profile'
Specifying the device authorization endpoint for Advanced Identity Cloud and PingAM
If you are using the device authorization flow with an Advanced Identity Cloud tenant or PingAM server you must also add the device authorization endpoint in the configuration, as it is not present in the data returned by the .well-known endpoint.
Provide an openId object containing a deviceAuthorizationEndpoint value:
const deviceClient = createOidcDeviceClient({
    clientId: 'sdkPublicClient',
    discoveryEndpoint: 'https://openam-forgerock-sdks.forgeblocks.com/am/oauth2/realms/alpha/.well-known/openid-configuration',
    scopes: ['openid', 'email', 'address', 'profile'],
    openId: {
        deviceAuthorizationEndpoint: 'https://openam-forgerock-sdks.forgeblocks.com/am/oauth2/realms/root/realms/alpha/device/code',
    },
});
Learn more about the /oauth2/device/code endpoint in the Advanced Identity Cloud documentation.
Step 3. Starting the flow
Call authorize() on the device client to start the flow.
Pass a callback function that receives an OidcDeviceFlowStatus object at each stage of the authorization process.
The authorize() method returns a promise that resolves to a stop() function.
Call stop() to cancel the flow and stop polling.
|
Only a single flow can run on a client at a time. Calling Call |
The first stage to handle is started. This status contains an OidcDeviceAuthorizationResponse object with the values you need to present to the user, so that they can authenticate on a different device.
const stop = await deviceClient.authorize((status) => {
    if (status.type === 'started') {
        const userCode = status.response.userCode;
        const verificationUri = status.response.verificationUri;
        const verificationUriComplete = status.response.verificationUriComplete;
        // Display userCode and verificationUri in your UI.
        // Optionally, generate a QR code from verificationUriComplete.
    }
});
The response object contains the following properties:
deviceCode-
The device code used internally for polling. You do not need to use this value directly.
userCode-
The short human-readable code the user enters on the approving device.
verificationUri-
The URL the user navigates to on the approving device to authorize the request.
verificationUriComplete-
An optional URL with the
userCodealready embedded as a query parameter. Use this to generate a QR code: when the user scans it, the authorization server’s page opens with the code pre-filled, so the user does not need to type it manually. expiresIn-
The number of seconds until the device code expires.
interval-
The minimum number of seconds the Orchestration SDK waits between polling requests.
|
Rendering the QR code or any specific UI is the responsibility of your app. The Orchestration SDK only provides the data values. |
Step 4. Polling for success
After emitting started, the Orchestration SDK automatically begins polling the server’s token endpoint. You do not need to manage the polling loop yourself.
The two events to handle when polling are as follows:
polling-
Emitted after each poll while the user has not yet approved the request.
Use this to update a progress indicator if needed. The status includes
pollCount,pollInterval, andnextPollAtvalues. success-
Emitted after the user approves the request and the server returns a token.
The Orchestration SDK automatically saves the tokens in the configured storage solution.
After
success, calldeviceClient.user()to get a user object with methods for retrieving and managing the tokens.
const stop = await deviceClient.authorize((status) => {
    switch (status.type) {
        case 'started':
            // Display codes
            break;
        case 'polling':
            // Optional: update a progress indicator
            // status.pollCount, status.pollInterval, status.nextPollAt
            break;
        case 'success':
            // Authentication complete — tokens saved!
            break;
    }
});
After authenticating, use the user object to access the tokens and user information:
const user = await deviceClient.user();

if (user) {
    const tokens = await user.token();      // Access, ID, and refresh tokens
    const profile = await user.userinfo();  // Claims from the userinfo endpoint
}
The user object exposes the following methods:
token()-
Returns the saved token set, including the access token, ID token, and refresh token.
refresh()-
Requests new tokens using the refresh token.
userinfo(cache?)-
Returns claims from the userinfo endpoint. Pass
falseto bypass the cached result. revoke()-
Revokes the access token.
logout()-
Ends the user’s session.
When you have finished with the device client, call deviceClient.dispose() to release it and cancel any active flow.
Step 5. Handling errors
The Orchestration SDK emits three terminal error statuses you should check for:
expired-
The device code expired before the user approved the request.
Restart the flow to obtain a new device code.
accessDenied-
The user explicitly denied the authorization request.
failure-
An unrecoverable error occurred.
The
errorproperty contains the cause, withmessage, and optionallycodeandstatusvalues.
const stop = await deviceClient.authorize((status) => {
    switch (status.type) {
        case 'started':
            // Display codes
            break;
        case 'polling':
            // Optional: update a progress indicator
            break;
        case 'success':
            // Authentication complete — tokens saved!
            break;
        case 'expired':
            // The device code has expired — restart the flow
            break;
        case 'accessDenied':
            // The user denied the request
            break;
        case 'failure':
            // Handle unexpected errors: status.error.message
            break;
    }
});
Using the high-level API with DeviceAuthGrantProvider
The DeviceAuthGrantProvider component and useDeviceAuthGrant() hook wrap the device client in React state, so you do not need to manage the status stream or token persistence yourself:
import { DeviceAuthGrantProvider } from '@ping-identity/rn-oidc';

function App() {
    return (
        <DeviceAuthGrantProvider client={deviceClient}>
            <DeviceAuthorizationScreen />
        </DeviceAuthGrantProvider>
    );
}
Inside the provider, call useDeviceAuthGrant() with no arguments to access the shared state and actions:
import { useDeviceAuthGrant } from '@ping-identity/rn-oidc';

function DeviceAuthorizationScreen() {
    const [
        { status, authorizationResponse, isFlowActive, isLoading, isAuthenticated },
        actions,
    ] = useDeviceAuthGrant();

    // Render your UI from status and authorizationResponse,
    // and call actions such as authorize() from your event handlers.
}
The hook returns a [state, actions] tuple. Learn about the state properties and actions available on the tuple in the tabs below:
-
state -
actions
| Property | Description |
|---|---|
|
The latest |
|
The |
|
|
|
|
|
|
|
|
|
The authenticated user object, or |
|
The saved token set, or |
|
Claims from the userinfo endpoint, or |
|
The most recent error, or |
| Action | Description |
|---|---|
|
Restores any previously saved user from storage. The provider calls this automatically on mount. |
|
Starts the device authorization flow. Concurrent calls are ignored while a flow is active. |
|
Cancels the active flow and stops polling. |
|
Opens the verification URL in the system browser on the current device. If you omit the argument:
The returned promise resolves with the browser result; for example, Polling continues independently while the browser is open. |
|
Returns the saved token set, or |
|
Requests new tokens using the refresh token. |
|
Returns claims from the userinfo endpoint. Pass |
|
Revokes the access token. |
|
Revokes tokens and ends the session. |
|
Resets the transient state, including the status, authorization response, tokens, user info, and error, without affecting the authenticated user. |
|
Cancels any active flow and releases the client. |
Example: a complete device authorization screen
The following example combines the provider and hook to render the user code, open the verification URL, and handle every status the flow can emit:
import React, { useEffect } from 'react';
import { ActivityIndicator, Button, Text, View } from 'react-native';
import { useDeviceAuthGrant } from '@ping-identity/rn-oidc';
function DeviceAuthorizationScreen() {
const [
{ status, authorizationResponse, isFlowActive, isAuthenticated, error },
actions,
] = useDeviceAuthGrant();
useEffect(() => {
if (isAuthenticated) {
// The user approved the request — navigate to your signed-in UI.
}
}, [isAuthenticated]);
if (status?.type === 'success' \|\| isAuthenticated) {
return <Text>Authorization successful</Text>;
}
if (status?.type === 'expired') {
return (
<View>
<Text>The code has expired. Please start again.</Text>
<Button title="Start again" onPress={() => actions.authorize()} />
</View>
);
}
if (status?.type === 'accessDenied') {
return <Text>Access was denied. Please start again.</Text>;
}
if (status?.type === 'failure') {
return <Text>Authorization failed: {status.error.message}</Text>;
}
return (
<View>
{authorizationResponse && (
<>
<Text>Visit: {authorizationResponse.verificationUri}</Text>
<Text>Enter code: {authorizationResponse.userCode}</Text>
<Button
title="Open verification page"
onPress={() => actions.openVerificationUrl()}
/>
</>
)}
{status?.type === 'polling' && (
<>
<ActivityIndicator />
<Text>Waiting for approval (attempt {status.pollCount})…</Text>
</>
)}
{error && <Text>Error: {error.message}</Text>}
{!isFlowActive && (
<Button title="Start" onPress={() => actions.authorize()} />
)}
</View>
);
}|
Call For headless devices, such as smart TVs and kiosks, display the |
Configuring a React Native app as the approving device
An approving device is often a phone or tablet where the user authenticates to authorize the request that originated on a different device, for example a smart TV or kiosk.
In this scenario, the approving device:
-
Obtains the
verificationUriCompleteURL from the requesting device. Typically the device scans a QR code, but you can use any method for obtaining a URI. -
Authenticates the user through a Journey or DaVinci flow, either natively or by using a browser.
-
Signals approval to the authorization server on the user’s behalf.
The Orchestration SDK handles step 3 automatically after the user successfully authenticates with the authorization server.
Approving a device authorization flow natively
To signal to the Orchestration SDK that it is acting as the approving device, pass the verificationUriComplete URL as the verificationUri option when natively starting a Journey or DaVinci flow:
-
Journey
-
DaVinci flow
import { useJourney } from '@ping-identity/rn-journey';
import React, { useEffect } from 'react';

const [node, actions] = useJourney();

useEffect(() => {
    actions.start('sdkUsernamePasswordJourney', {
        verificationUri: verificationUriCompleteString,
    });
}, []);
After the user authenticates, the module extracts the user_code from the URL and sends it to the authorization server’s device flow endpoint with the user’s session.
The requesting device’s polling loop then receives its access token from the server.
import { useDaVinci } from '@ping-identity/rn-davinci';
import { createDaVinciClient } from '@ping-identity/rn-davinci';

const davinciClient = createDaVinciClient({...})
const { start } = useDaVinci(davinciClient);

useEffect(() => {
    start({
        verificationUri: verificationUriCompleteString,
    }).catch(() => {}); // error surfaced via hook state
}, [start]);
After the user authenticates, the module sends the user_code to the authorization server’s device flow endpoint.
The requesting device’s polling loop then receives its access token from the server.
|
If In this case the polling device will never complete authentication. |
Approving a device authorization flow in-app using the browser
If your React Native app is itself capable of completing the authorization, you can open the verificationUriComplete URL directly in an embedded browser, rather than waiting for the user to scan a QR code or type the URL on a separate device.
Using this method, the request and approval can be completed on the same device. After the user authenticates and approves the request in the browser, the polling loop, which is already running, picks up the token automatically. No second device is needed.
This is useful when an app uses the Device Authorization Grant for its UX simplicity. It doesn’t require a redirect URI or app scheme configured, and has a clean polling model, and the device itself is perfectly capable of completing the approval step, so it becomes a "streamlined OIDC-via-device-flow" pattern.
With the high-level API, call the openVerificationUrl() action:
const result = await actions.openVerificationUrl();With no argument, the action uses verificationUriComplete from the last started status, falling back to verificationUri. When the user dismisses the embedded browser without completing authentication, the result is cancel, and polling continues.
With the low-level API, call the standalone deviceOpenVerificationUrl() helper:
import { deviceOpenVerificationUrl } from '@ping-identity/rn-oidc';

const result = await deviceOpenVerificationUrl(deviceClient, verificationUri);
Call this helper in parallel with the authorize() status stream, for example when the started status arrives. The browser opens, and the polling loop continues independently and emits success once the server returns a token.
Getting the verificationUriComplete value
The verificationUriComplete value is returned in the started status of the requesting device’s flow, as status.response.verificationUriComplete when you use the low-level API, or in authorizationResponse.verificationUriComplete when you use the high-level API.
On the approving device it is typically obtained by scanning a QR code generated by the requesting device, or by the user entering the URL manually.
Learn more
-
Learn more about the specification in OAuth 2.0 Device Authorization Grant (RFC 8628)
-
Learn how your server handles the Device authorization grant in the following links: