Secure a Cloudflare Workers MCP server with PingOne DaVinci
In this configuration, the Cloudflare Workers Model Context Protocol (MCP) server uses the Cloudflare Workers OAuth Provider, which delegates authentication to PingOne DaVinci. This enables clients, such as AI agents, to call a protected API on behalf of an authenticated end user.
|
While serving as a resource server for MCP clients, this MCP server also fulfills two distinct OAuth roles:
|
This configuration uses DaVinci to manage consent. To use this configuration with Cloudflare-managed consent, see Secure a Cloudflare Workers MCP server with PingOne.
Before you begin
This tutorial uses the remote-mcp-pingone/mcp-dv directory in Ping Identity’s cloudflare-mcp Git repository.
Stack
| Role | Name | Description |
|---|---|---|
Platform |
Serverless execution |
|
Framework |
Lightweight API endpoints |
|
Agent Execution |
Base class for implementing the stateful MCP server |
|
Session State |
Provides stateful, isolated storage for each MCP connection |
|
OAuth Core |
Orchestrates the OAuth flow, delegating authentication to PingOne |
|
Ephemeral State |
Stores OAuth state required by the workers oauth provider |
Requirements
-
Node.js v20 or later
-
A PingOne environment
-
A Cloudflare account and Wrangler CLI enabled
-
Todo API deployed
-
MCP Inspector installed
Structure
mcp-dv/
├── package.json                     # Dependencies and scripts
├── tsconfig.json                    # TypeScript compiler settings
│── wrangler.jsonc                   # Worker configuration
└── src/
    ├── index.ts                     # OAuth server flow and MCP server routing
    ├── mcp.ts                       # Stateful MCP server as a Cloudflare McpAgent (durable object)
    ├── config.ts                    # Worker bindings and Cloudflare durable object session data
    ├── todoApi.client.ts            # HTTP client to the downstream Todo API
    └── auth/
        ├── workers-oauth-utils.ts   # Cloudflare OAuth utility functions
        ├── ping-handler.ts          # Endpoints that connect the auth flow between OAuth provider and PingOne
        ├── ping-utils.ts            # PingOne OAuth utility functions
        └── ping-types.ts            # PingOne OAuth types
Tasks
Configuring the MCP server as an OIDC client in PingOne
This step enables the Cloudflare worker to exchange authorization codes on behalf of the end user. Note that the MCP server, not the MCP client, receives the PingOne access token. The MCP server then issues a separate reference token to the MCP client for session lookups. This distinction ensures proper audience scoping: the MCP client token is intended for the MCP server, while the MCP server token is intended for the target API.
-
In the PingOne admin console, go to Applications and click the icon to add a new application.
-
In the Application Type section, click OIDC Web App and then click Save.
-
On the Configuration tab of the application, ensure that:
-
Grant Type is set to Authorization Code.
-
PKCE Enforcement is set to S256_REQUIRED.
-
Redirect URI is set to your Cloudflare worker’s callback endpoint, for example
<mcp_server>/callback. If the worker is not yet deployed, use a placeholder and update it later.
-
-
On the Resources tab of the application, allow the standard OIDC scopes,
openidandprofile, and the Todo API scopes,todo_api:readandtode_api:write. -
On the Policies tab of the application, leave the policy blank for now. You’ll configure this in a later step.
Creating a Worker application to handle MCP server consent
-
In the PingOne admin console, go to Applications and click the icon to add a new application.
-
Select Worker and click Save.
-
On the Overview tab of the application, note the Client ID and Client Secret.
-
On the Configuration tab, set Token Auth Method to Client Secret Basic.
-
On the Roles tab, assign the Environment Admin and Identity Data Admin roles to the application to authorize it to manage user consent.
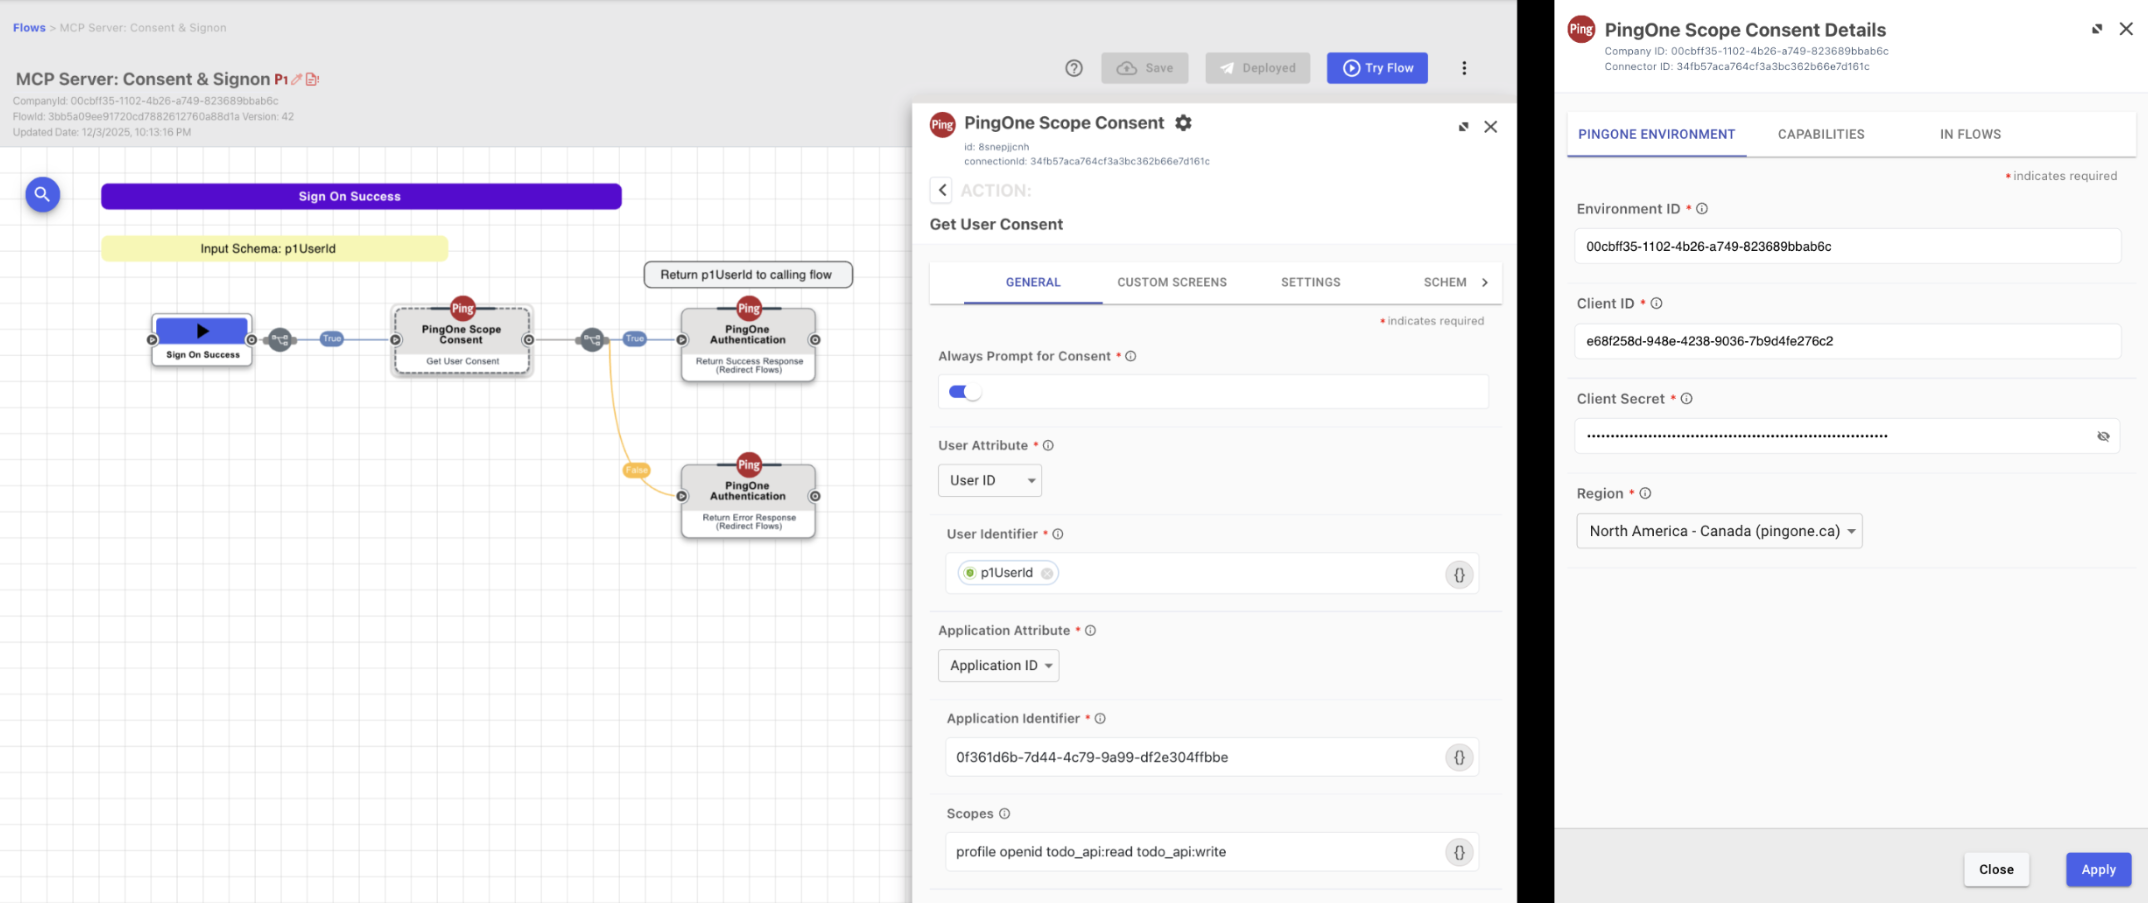
Creating the DaVinci flow using the MCP server OIDC client and the consent service worker
Create the DaVinci flow that orchestrates both authentication and consent for the MCP server. You’ll modify a standard PingOne sign-on flow to include the consent logic.
-
In DaVinci, add the PingOne Scope Consent connector and configure it using the client ID and client secret from the consent service worker.
-
Go to Flows and clone the PingOne Sign On with Registration, Password Reset and Recovery flow.
-
Locate the Sign on Success node and add a Get User Consent node immediately after it.
-
Configure the Get User Consent node by entering the application ID of the MCP server OIDC Client.
-
Configure the PingOne authentication terminal nodes and make sure the flow is a PingOne flow in the flow settings.
Creating a DaVinci policy for the DaVinci flow
Add the DaVinci flow to an application and create a flow policy to control how and when the flow gets used.
-
In DaVinci, go to Applications and create a new application.
-
Add a PingOne flow policy to the application and target the DaVinci flow created in task 3.
Binding the DaVinci policy to the MCP server client profile
This ensures that when the MCP server initiates an OAuth request, PingOne routes the user through the DaVinci flow to capture the required consent.
Deploying to Cloudflare
-
In your terminal, install dependencies and build.
npm install
npm run build
-
Use the Wrangler CLI to set the following remote environment variables:
Name Description Example PINGONE_ISSUERPingOne environment domain
https://auth.pingone.<REGION>/<ENV_ID>/asMCP_SERVER_CLIENT_IDID of the MCP server client
0c24f3a0-0522-4f76-9bcf-89643029e3e0MCP_SERVER_CLIENT_SECRETSecret of the MCP server client
[A long, random, alphanumeric string]API_IDENTIFIERID of the downstream Todo API resource
https://todo.api.comAPI_URLURL of the downstream Todo API
https://todo-api-ping-aic.<ENV>.workers.devCOOKIE_ENCRYPTION_KEYKey used to sign browser cookies
[A long, random, base64 string]wrangler secret put PINGONE_ISSUER wrangler secret put MCP_SERVER_CLIENT_ID wrangler secret put MCP_SERVER_CLIENT_SECRET wrangler secret put API_IDENTIFIER wrangler secret put API_URL wrangler secret put COOKIE_ENCRYPTION_KEY
-
Configure remote KV storage.
wrangler kv namespace create OAUTH_KV
After running this command, update wrangler.jsoncwith the generated KV namespace ID. -
Deploy to Cloudflare.
npm run deploy
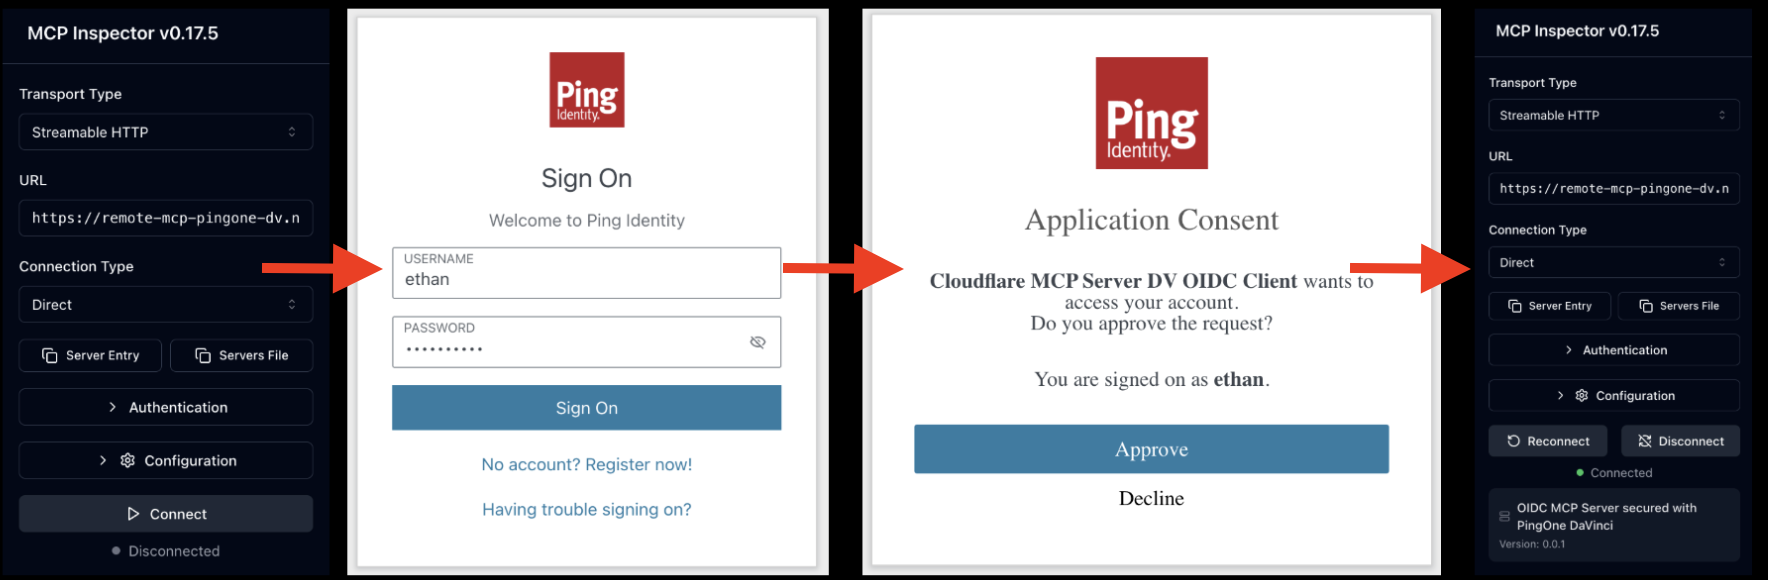
Testing the MCP server with MCP Inspector
MCP Inspector is a developer tool that allows you to test and debug MCP servers by simulating a client connection. This enables you to validate the authentication flow and tool execution interactively. It confirms that the Cloudflare OAuth Provider successfully captures user consent locally before delegating identity verification to PingOne.
-
Launch the Inspector.
npx @modelcontextprotocol/inspector
The Inspector starts on port 6277 and initiates the authentication flow. No CORS rules are needed because authentication occurs server-to-server (MCP server to PingOne), bypassing browser restrictions.
Authentication flow
-
The Inspector initiates a request to the MCP endpoint (
<mcp_server>/mcp). -
The MCP server intercepts the request and presents the local, worker-hosted consent dialog.
-
Upon approval, the MCP server redirects the user to PingOne for authentication.
-
The MCP server exchanges the returned authorization code for an downstream access token.
-
The server binds this downstream token to a new, isolated client session.
-
The server establishes the connection and issues a session handle to the Inspector.
-
-
Verify that the MCP server is working properly by using the Inspector to confirm the following behaviour:
-
Connection initiates the full Cloudflare consent and PingOne login sequence.
-
Reconnecting (without clearing cookies and using the same MCP client ID) recovers the existing session silently.
-
Clearing browser cookies forces a new consent and authentication cycle upon reconnect.
-
The server correctly populates the tool list in the Inspector.
-
The
whoAmItool returns the PingOne access token audienced for the Todo API. -
Downstream API actions (adding/deleting todos) complete successfully.
-
Accessing the remote MCP server from Claude Desktop
-
In Claude Desktop, click your profile icon, and then click Settings.
-
Go to Connectors and then click Add Custom Connector.
-
In the Remote MCP server URL field, enter the URL in this format:
https://remote-mcp-ping-federate.<ENV>.workers.dev/mcpNo OAuth Client ID or Secret is required, as Claude will perform Dynamic Client Registration.
-
Click Save.
-
Connect to the MCP server and authenticate with PingFederate.
-
After they’re connected, you can ask Claude: "Can you tell me what is in my Todo list?"
-
Claude sees the connected tools and calls the appropriate tool after asking for consent.