Secure a Cloudflare Workers MCP server with PingOne Advanced Identity Cloud
In this configuration, the Cloudflare Workers Model Context Protocol (MCP) server delegates authentication to PingOne Advanced Identity Cloud. This enables clients, such as AI agents, to call a protected API on behalf of an authenticated end user.
Before you begin
This tutorial uses the remote-mcp-pingone-aic directory in the Ping Identity cloudflare-mcp Git repository.
Stack
| Role | Name | Description |
|---|---|---|
Platform |
Serverless execution |
|
Framework |
Lightweight API endpoints |
|
Agent Execution |
Base class for implementing the stateful MCP server |
|
Session State |
Provides stateful, isolated storage for each MCP connection |
Requirements
-
Node.js v20 or later
-
A PingOne Advanced Identity Cloud tenant
-
A Cloudflare account and Wrangler CLI enabled
-
Todo API deployed
Structure
mcp/
├── package.json               # Dependencies and scripts
├── tsconfig.json              # TypeScript compiler settings
├── wrangler.jsonc             # Worker configuration
└── src/
    ├── index.ts               # Defines the HTTP interface, handling MCP server discovery and MCP server routing
    ├── mcp.ts                 # Stateful MCP server as a cloudflare McpAgent (durable object)
    ├── config.ts              # Worker bindings and durable object session data
    ├── auth.ts                # Manages auth middleware and executes token exchange (delegation grant)
    └── todoApi.client.ts      # HTTP client to the downstream Todo API
Tasks
Configuring PingOne Advanced Identity Cloud
1. Enable Dynamic Client Registration (DCR) for MCP client onboarding
This step allows MCP clients to automatically register themselves as public OpenID Connect (OIDC) clients and request the necessary scopes to call the downstream Todo API. The MCP client uses the MCP server’s protected resource metadata to determine how to register and which scopes to request.
-
In the PingOne Advanced Identity Cloud Access Management console, go to Services > OAuth2 Provider.
-
On the Client Dynamic Registration tab, enable Allow Open Dynamic Client Registration.
-
On the Advanced tab, allow the following Todo API scopes:
-
todo_api:read -
todo_api:write
-
2. Configure MCP server for token exchange
This step configures delegation and authorizes the MCP server to act on the end user’s behalf.
This allows the MCP server to swap the end user’s token for a new token used to call the downstream Todo API.
This new token is properly audienced for the target API and includes the act claim, identifying the MCP server as the trusted intermediary.
-
Enable grant types and scopes:
-
From the PingOne Advanced Identity Cloud Access Management console, go to Applications > OAuth2 > Clients.
-
Create a new client for the MCP server.
-
On the Core tab, set the scopes to maximum allowable permissions.
-
On the Advanced tab, add the Client Credentials and Token Exchange grant types to allow the MCP server to request its own token and perform the delegation, respectively.
-
-
Flag eligible tokens for token exchange with the
may_actclaim:Run a script upon user token issuance to inject a claim designating the MCP server as the trusted delegate. Because DCR prevents you from knowing the MCP client’s client ID, the script will be applied to all tokens but include safeguards to only target access tokens intended for the MCP server.
-
In the PingOne Advanced Identity Cloud Access Management console, go to Services > OAuth2 Provider > Scripts.
-
Create a new script of type OAuth2 May Act.
-
Copy and paste the following script, replacing placeholder values with your configuration values:
(function () { var frJava = JavaImporter(org.forgerock.json.JsonValue); var normalizeUrl = function(url) { return url.replace(/\/$/, '') }; var mcpServerClientId = 'MCP_SERVER_CLIENT_ID'; // placeholder var mcpServerUrl = 'URL_OF_DEPLOYED_MCP_SERVER'; // placeholder try { var requestedResourceList = requestProperties.requestParams.get('resource'); var requestedResource = String(requestedResourceList.get(0)); // Only modify tokens intended for the MCP server if (normalizeUrl(requestedResource) === normalizeUrl(mcpServerUrl)) { // Explicitly set the MCP server as the audience of this token token.setField("aud", mcpServerUrl); // Authorize MCP server to exchange this token var mayAct = frJava.JsonValue.json(frJava.JsonValue.object()); mayAct.put('client_id', mcpServerClientId); mayAct.put('sub', mcpServerClientId); token.setMayAct(mayAct); }; } catch (error) {}; }()); -
In the PingOne Advanced Identity Cloud Access Management console, go to Services > OAuth2 Provider.
-
On the Core tab, set the OAuth2 Access Token May Act Script.
-
-
Control exchanged token audience with an access token modification script.
This step ensures the downstream API accepts the exchanged token. Because Advanced Identity Cloud doesn’t automatically set the necessary audience claim during token exchange, use an access token modification script tied specifically to the MCP server’s client profile.
-
In the Advanced Identity Cloud Access Management console, go to Services > OAuth2 Provider > Scripts.
-
Create a new script of type OAuth2 Access Token Modification (Next Gen).
-
Copy and paste the following script, replacing the placeholder value with your downstream API URL:
(function () {
  var frJava = JavaImporter(org.forgerock.json.JsonValue);
  var normalizeUrl = function(url) { return url.replace(/\/$/, '') };

  // Only modify MCP server access tokens granted with token exchange
  var grantType = requestProperties.requestParams.get('grant_type');
  if (!grantType || grantType.toString() !== '[urn:ietf:params:oauth:grant-type:token-exchange]') {
    return;
  };

  // Only allow MCP server to call these APIs
  var whitelistedAPIs = [
    'URL_OF_DEPLOYED_API', // placeholder value
  ];

  try {
    var requestedResourceList = requestProperties.requestParams.get('resource');
    var requestedResource = JSON.stringify(requestedResourceList).slice(2, -2);

    for (var i = 0; i < whitelistedAPIs.length; i++) {
      var whitelistedApi = normalizeUrl(whitelistedAPIs[i])
      if (normalizeUrl(requestedResource) === whitelistedApi) {
        // Resulting token will be audienced for the requested & whitelisted API
        accessToken.setField("aud", whitelistedApi);
        break;
      };
    };
  } catch (error) {};
}());
-
3. Setup Cross-Origin Resource Sharing (CORS)
For external MCP clients to communicate with Advanced Identity Cloud during the OAuth flow, explicitly allow the MCP inspector.
-
In the PingOne Advanced Identity Cloud dashboard, go to Tenant Settings > Global Settings.
-
Click Cross-Origin Resource Sharing (CORS), and then Add a CORS Configuration.
-
Configure the rule for the local MCP Inspector using the following values:
-
In the Accepted Origins field, enter
http://localhost:6277. -
In the Accepted Methods field, enter
GETandPOST. -
In the Accepted Headers field, enter
authorizationandcontent-type.
-
-
Click Save CORS Configuration.
Deploying to Cloudflare
-
Install dependencies and deploy the MCP server:
npm install
npm run deploy
-
Use the Wrangler CLI to configure the remote environment variables:
Name Description Example PING_AIC_ISSUER
PingOne Advanced Identity Cloud environment domain
https://<ENV>.forgeblocks.com:443/am/oauth2/alphaMCP_SERVER_URL
URL of the deployed MCP server
https://remote-mcp-ping-aic.<ENV>.workers.devMCP_SERVER_CLIENT_ID
ID of the MCP server client
mcp_serverMCP_SERVER_CLIENT_SECRET
Secret of the MCP server client
[A long, random, alphanumeric string]API_URL
URL of the downstream Todo API
https://todo-api-ping-aic.<ENV>.workers.devwrangler secret put PING_AIC_ISSUER wrangler secret put MCP_SERVER_URL wrangler secret put MCP_SERVER_CLIENT_ID wrangler secret put MCP_SERVER_CLIENT_SECRET wrangler secret put API_URL
-
Ensure the
mcpServerUrlis correct in the Advanced Identity Cloudmay_actscript that you created in step 2.2.
Testing the MCP server with MCP Inspector
-
To validate the deployed MCP server, launch MCP Inspector:
npx @modelcontextprotocol/inspector
MCP Inspector starts on port 6277, which you allowed in the CORS configuration. To confirm that DCR is operational, the Inspector acts as an unregistered client and establishes a secure connection.
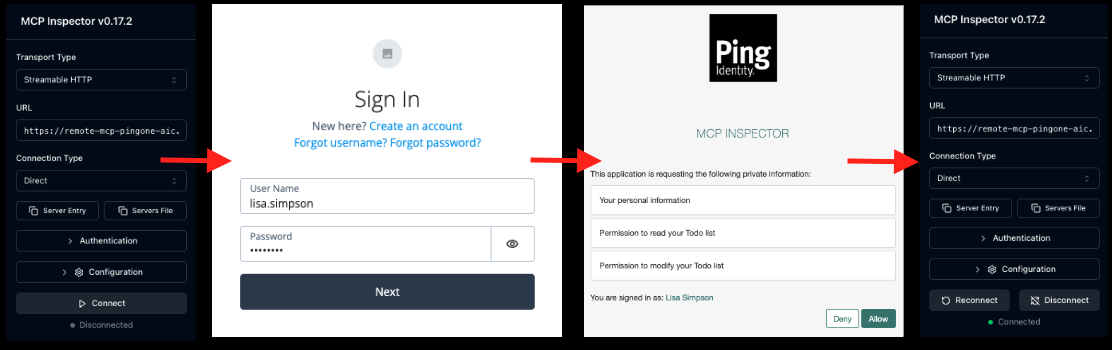
Authentication flow
-
The Inspector attempts an initial, unauthenticated request to the MCP endpoint (
<mcp_server>/mcp). -
The MCP server responds with the protected resource metadata, triggering the discovery process.
-
The MCP inspector consumes the metadata, performs discovery of the authorization server, and self-registers with Advanced Identity Cloud as a public OIDC client.
-
The MCP Inspector initiates the OAuth authorization flow, securing the necessary user consent and establishing a stateful MCP connection.
-
-
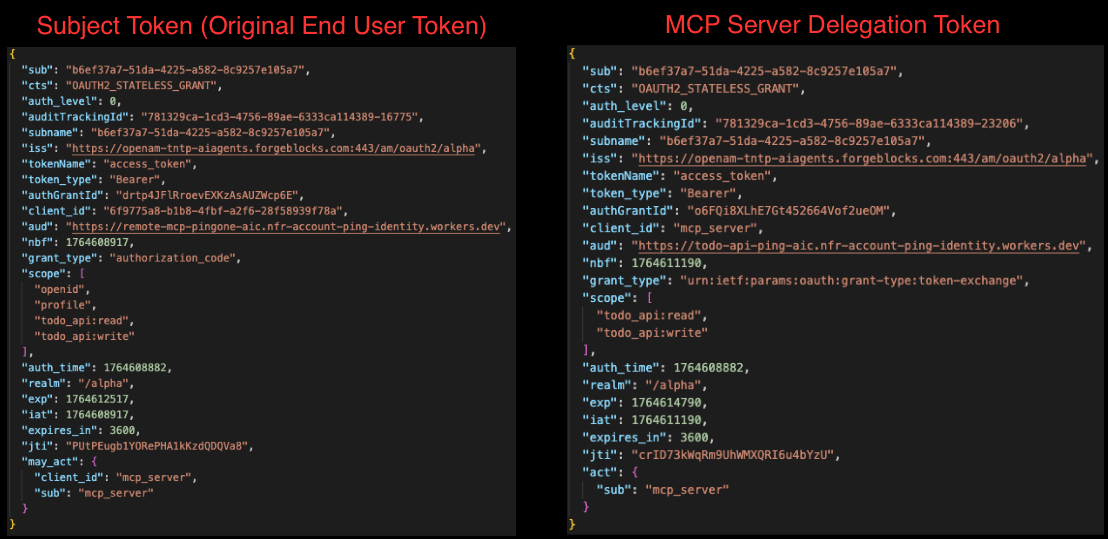
To validate token exchange, observe how the MCP server acquires a new token audienced for the downstream API. Use the
who_am_Iandpeek_api_token_claimstools to compare the two tokens and confirm the following behavior:-
Both tokens share the same
subclaim, confirming they identify the same authenticated end user. -
The subject token contains the
may_actclaim, explicitly authorizing the MCP server for exchange. The resulting delegation token contains theactclaim, identifying the MCP server as the trusted intermediary acting on the user’s behalf. -
The subject token is audienced for the MCP server, while the delegation token is audienced for the downstream API.
-
The subject token retains the user’s full, broader permissions. The delegation token is limited to only whats necessary for its target audience.
-
Accessing the remote MCP server from Claude Desktop
-
In Claude Desktop, click your profile icon, and then click Settings.
-
Go to Connectors and then click Add Custom Connector.
-
In the Remote MCP server URL field, enter the URL in this format:
https://remote-mcp-ping-federate.<ENV>.workers.dev/mcpNo OAuth Client ID or Secret is required, as Claude will perform Dynamic Client Registration.
-
Click Save.
-
Connect to the MCP server and authenticate with PingFederate.
-
After they’re connected, you can ask Claude: "Can you tell me what is in my Todo list?"
-
Claude sees its connected tools and calls the appropriate tool after asking for consent.