Authorizing Gemini Agent2Agent (A2A) chains with Ping Identity solutions
This use case secures multiple agents in an A2A chain to reach a downstream tool, requiring authorization at each step in the chain.
After the user authenticates through a Chat UI, each agent uses RFC 8693 token exchange to generate a token scoped for the next destination in the chain. The Google Cloud Agent Gateway Service Extension intercepts these requests, validates tokens, and executes subsequent token exchanges for every agent interaction. A token for a specific agent isn’t usable anywhere else in the chain. The downstream tool eventually receives a narrowly scoped, short-lived token with a nested act claim recording the delegation chain from the original user to the downstream tool.
This use case extends the core Integrating Gemini Enterprise Agent Platform with Ping Identity solutions architecture by introducing a multi-agent delegation chain.
How this works
Consider a scenario where a user-facing Support Agent answers questions about orders by delegating tasks to a specialized Order Status Agent, which in turn queries an Order Status MCP Server.
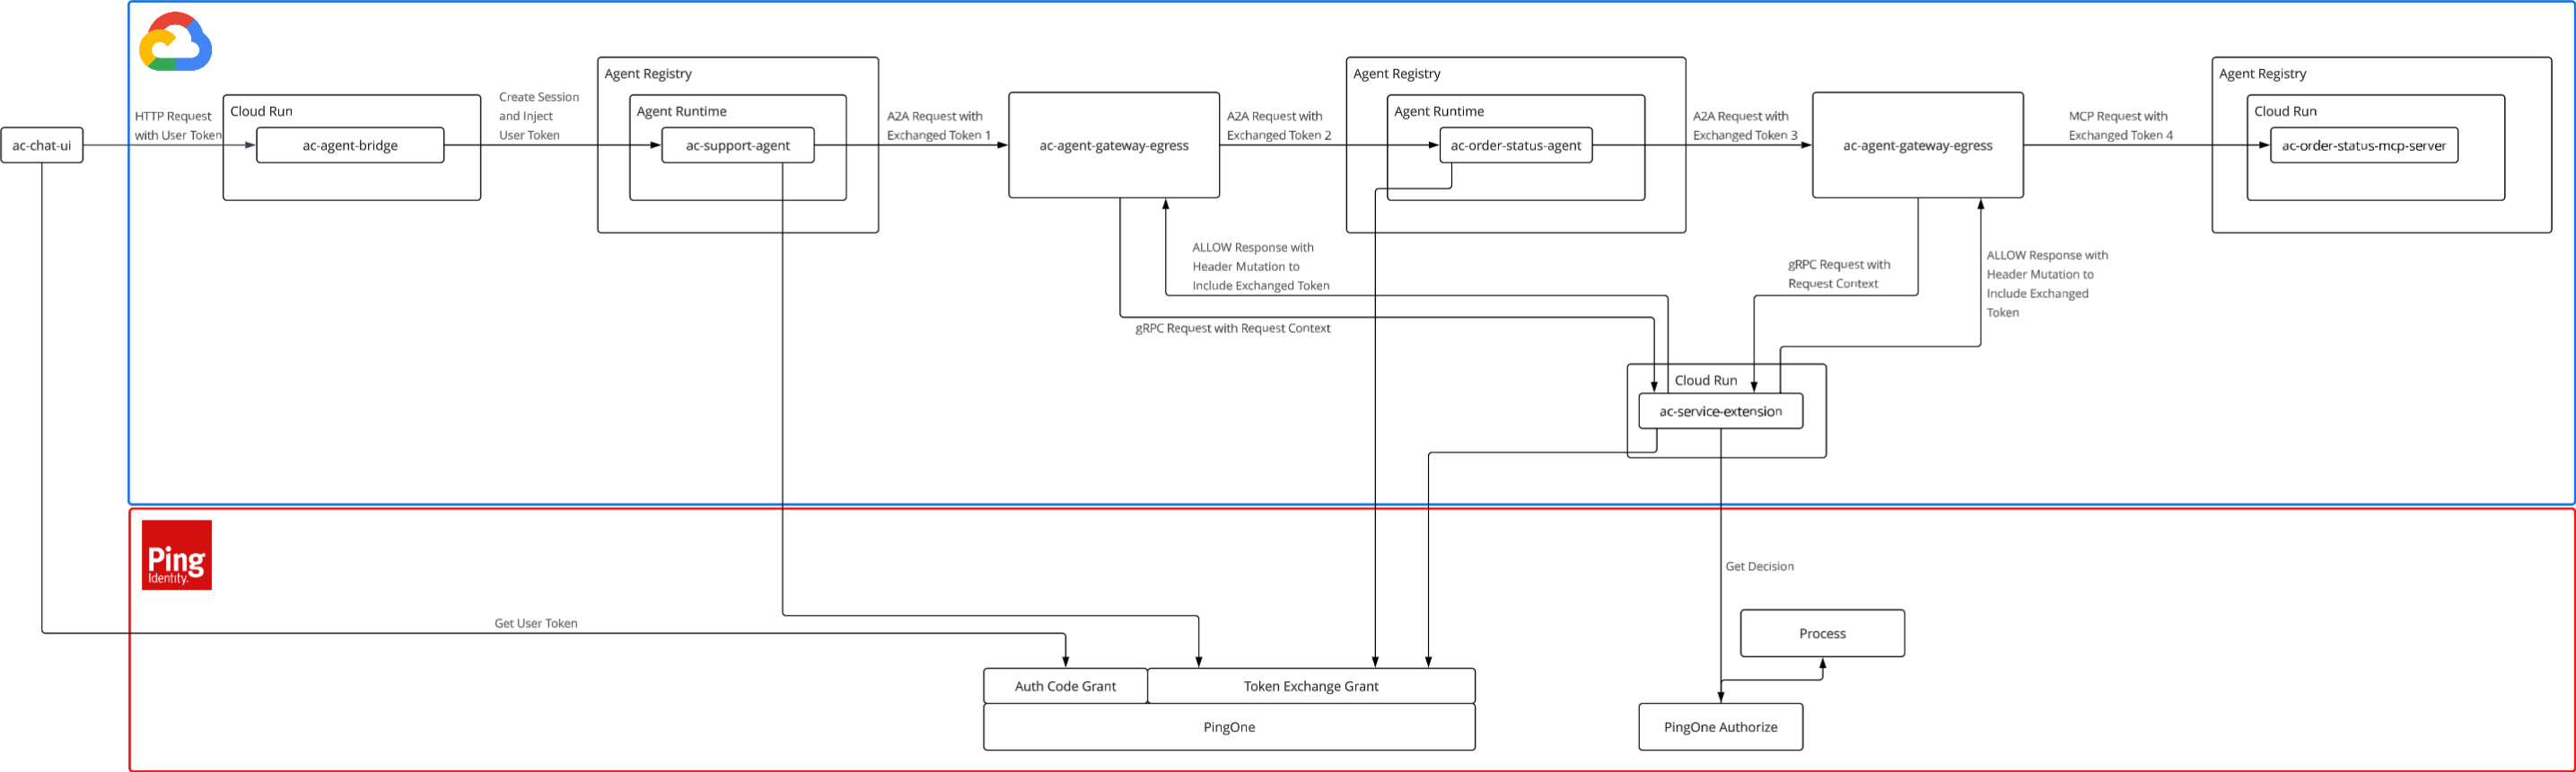
This multi-agent architecture follows a sequence of validation, policy enforcement, and token exchange:
-
The user authenticates through the Chat UI.
-
The Support Agent exchanges the user’s token for a delegated token licensed for the Agent Gateway, then initiates an A2A request to the Order Status Agent. The Agent Gateway intercepts this outbound call.
-
The Agent Gateway Service Extension validates the token and requests an authorization decision from PingOne Authorize. Upon a
PERMITdecision, the service extension performs a token exchange to generate a new token scoped for the Order Status Agent, then forwards the request. -
The Order Status Agent validates the received token. To call the downstream tool, it performs its own token exchange targeting the Agent Gateway.
-
The Agent Gateway intercepts the Order Status Agent’s outbound MCP request. The service extension requests another authorization decision and performs the final token exchange to generate a token scoped for the Order Status MCP Server.
-
The request reaches the MCP server. The server validates the token, which contains a nested
actclaim recording the complete delegation history (service extension to Order Status Agent, to service extension, to Support Agent). The MCP server executes the action.
If PingOne Authorize returns a DENY decision, the service extension blocks the request and returns an error, preventing unauthorized agent access to downstream resources.
Components
| Component | Role |
|---|---|
User chat interface with PingOne PKCE sign-on. |
|
Google Cloud entry point. Validates the user token and stores it in the agent session state. |
|
User-facing agent. Exchanges the user’s token and delegates to the Order Status Agent over A2A. |
|
Specialized agent that owns order lookup. Validates the inbound delegation token, then does a token exchange and calls the MCP server. |
|
Google-managed policy enforcement point that intercepts both agent egress exchanges and forwards each to the service extension over gRPC. |
|
Service extension that sends requests to PingOne Authorize, exchanges tokens, and injects resulting tokens into requests. |
|
Downstream resource that the agent chain invokes to check order status. It validates the final delegated token. |
|
Identity provider (IdP) that issues the user token and every delegated token in the chain. |
|
External policy decision point that evaluates authorization requests. |
Token chain
The token flow begins when the user authenticates through the Chat UI. The Support Agent presents the user’s token to PingOne as the subject of an RFC 8693 token exchange, alongside its own actor token (obtained using the Client Credentials grant). PingOne evaluates the user token’s may_act claim against the acting client before issuing the delegated token, preserving the user as the subject.
The Agent Gateway Service Extension then exchanges the delegated token, generating the token that the Order Status Agent consumes. The Order Status Agent repeats this pattern for its outbound request to the MCP server. During each exchange, PingOne nests the acting client in the act claim, recording the full delegation history.
For simplicity, the individual actor tokens requested by the agents and the gateway aren’t included here.
- User token: Chat UI’s initial sign-on token
-
{ "iss": "https://auth.pingone.<region>/<env>/as", "sub": "<alice-user-id>", "client_id": "<chat-ui-client-id>", "aud": "support-agent", "scope": "openid support-agent:invoke", "grant_type": "authorization_code", "may_act": { "sub": "<support-agent-client-id>" } }-
sub: Represents the user. -
client_id: Generated by the Chat UI. -
aud: Scoped for use on the Support Agent resource. -
scope: Grants the ability to invoke the Support Agent. -
may_act: Licenses the Support Agent as the sole authorized next actor.
-
- Delegated token 1: Support agent’s outbound A2A token
-
{ "iss": "https://auth.pingone.<region>/<env>/as", "sub": "<alice-user-id>", "client_id": "<support-agent-client-id>", "aud": "google-agent-gateway", "scope": "order-status:invoke", "grant_type": "urn:ietf:params:oauth:grant-type:token-exchange", "act": { "sub": "<support-agent-client-id>", "act": null }, "may_act": { "sub": "<agent-gw-extension-client-id>" } }-
sub: Represents the user (the agent acts on behalf of the user, not itself). -
client_id: Generated by the Support Agent. -
aud: Scoped for use on the intermediate Agent Gateway resource. -
scope: Grants the ability to invoke the Order Status Agent. -
act: Records the Support Agent as the first delegate (the original sign-on token had no actor, resulting in an explicit null). -
may_act: Licenses the Agent Gateway Service Extension as the sole authorized next actor.
-
- Delegated token 2: Agent Gateway’s inbound A2A token for the Order Status Agent
-
{ "iss": "https://auth.pingone.<region>/<env>/as", "sub": "<alice-user-id>", "client_id": "<agent-gw-extension-client-id>", "aud": "order-status-agent", "scope": "order-status:invoke", "grant_type": "urn:ietf:params:oauth:grant-type:token-exchange", "act": { "sub": "<agent-gw-extension-client-id>", "act": { "sub": "<support-agent-client-id>", "act": null } }, "may_act": { "sub": "<order-status-agent-client-id>" } }-
sub: Represents the user (identity is preserved end-to-end). -
client_id: Generated by the Agent Gateway Service Extension. -
aud: Scoped for use on the Order Status Agent. -
scope: Grants the ability to invoke the Order Status Agent. -
act: Records the service extension as the next delegate, on behalf of the Support Agent. -
may_act: Licenses the Order Status Agent as the sole authorized next actor.
-
- Delegated token 3: Order Status Agent’s outbound MCP token
-
{ "iss": "https://auth.pingone.<region>/<env>/as", "sub": "<alice-user-id>", "client_id": "<order-status-agent-client-id>", "aud": "google-agent-gateway", "scope": "order:read", "grant_type": "urn:ietf:params:oauth:grant-type:token-exchange", "act": { "sub": "<order-status-agent-client-id>", "act": { "sub": "<agent-gw-extension-client-id>", "act": { "sub": "<support-agent-client-id>", "act": null } } }, "may_act": { "sub": "<agent-gw-extension-client-id>" } }-
sub: Represents the user (identity is preserved end-to-end). -
client_id: Generated by the Order Status Agent. -
aud: Scoped for use on the intermediate Agent Gateway resource. -
scope: Grants the ability to read orders from the downstream MCP server. -
act: Records the Order Status Agent as the next delegate, on behalf of the previous delegation chain. -
may_act: Licenses the Agent Gateway Service Extension as the sole authorized next actor.
-
- MCP tool token: Agent Gateway’s final token for the MCP server
-
{ "iss": "https://auth.pingone.<region>/<env>/as", "sub": "<alice-user-id>", "client_id": "<agent-gw-extension-client-id>", "aud": "order-status-mcp-server", "scope": "order:read", "grant_type": "urn:ietf:params:oauth:grant-type:token-exchange", "act": { "sub": "<agent-gw-extension-client-id>", "act": { "sub": "<order-status-agent-client-id>", "act": { "sub": "<agent-gw-extension-client-id>", "act": { "sub": "<support-agent-client-id>", "act": null } } } } }-
sub: Represents the user (identity is preserved end-to-end). -
client_id: Generated by the Agent Gateway Service Extension. -
aud: Scoped for use on the Order Status MCP Server. -
scope: Grants the ability to read orders. -
act: Contains the complete delegation chain (service extension, on behalf of Order Status Agent, on behalf of service extension, on behalf of Support Agent). -
may_act: Because this is the final token, it doesn’t include this claim. There are no further downstream token exchanges.
-
Benefits of this approach
- Strictly scoped credentials
-
Agents possess short-lived tokens that aren’t broadly applicable. Through continuous RFC 8693 token exchanges, each stage of the delegation chain generates a new token scoped exclusively for its immediate destination. A token generated for one agent is invalid anywhere else in the chain, ensuring that least privilege compounds across every interaction.
- Dual-layer trust boundary
-
A2A interaction requires both a Google credential, to satisfy Google Cloud identity and access management (IAM) at the Agent Runtime endpoint, and a PingOne delegated token to provide verifiable user identity and delegation context. This defense-in-depth approach ensures that compromising one trust layer doesn’t grant access to the other.
- Continuous centralized authorization
-
The Agent Gateway and service extension enforce authorization decisions at every stage of the chain (both A2A and MCP). Because policies are centralized in PingOne Authorize, you can update access rules dynamically without modifying or redeploying agents, the gateway, or the MCP server.
- End-to-end delegation record
-
The final token delivered to the downstream tool contains a nested
actclaim that records every actor in the sequence. Because PingOne strictly enforces themay_actclaim during each exchange, the downstream tool receives proof of who acted on behalf of the user, from the initial Chat UI sign-on to the final server invocation.
Goals
-
Propagate user identity through a multi-agent chain: Authenticate users at the Chat UI and configure PingOne to preserve the complete delegation history (using the
actclaim) across all A2A interactions. -
Centralize policy enforcement for agent actions: Deploy the Agent Gateway and service extension to consult PingOne Authorize for authorization decisions at runtime, restricting agent and tool invocations based on group membership and business hours.
-
Scope downstream access with token exchange: Use RFC 8693 token exchanges at each stage of the delegation chain to translate inbound credentials into narrowly scoped tokens for the next authorized actor.
What you’ll do
-
Deploy the Order Status MCP Server to Google Cloud Run and register it in Google Agent Registry.
-
Create authorization policies that limit agent invocations to business hours and to members of the support group.
-
Deploy the Agent Gateway Service Extension to Cloud Run and configure it to request authorization decisions on every tool call.
-
Deploy the Agent Gateway and attach the service extension to it.
-
Deploy the Order Status Agent and create its PingOne resource.
-
Deploy the Support Agent and create its PingOne resource.
-
Deploy the Agent Bridge to Cloud Run and configure it to validate the user’s token and pass it to the Support Agent.
-
Deploy the Chat UI and configure it to pass the user’s token to the Support Agent through the Agent Bridge.
Before you begin
Ensure you meet the prerequisites in the Gemini Enterprise Agent Platform integration overview.
Tasks
You can find implementation files and code samples for this use case in the Agent Chaining GitHub repository.
Deploy the Order Status MCP Server
The Order Status MCP Server exposes a get_order_status tool. This service holds the order data and is the final enforcement point for the agent chaining delegation model. To access the tool, the agent’s request is routed through the Agent Gateway and the Agent Gateway Service Extension. This MCP server verifies the OAuth token injected by the gateway.
You’ll deploy the supply chain MCP server to Cloud Run, register it in Agent Registry as an approved egress destination, and configure it with a matching resource in PingOne to ensure every token issued for tool access carries claims that prove delegation.
Create the Order Status MCP Server resource in PingOne
Add a custom resource in PingOne that represents the Order Status MCP Server the agent is allowed to access.
|
You can find more details about adding custom resources in the PingOne documentation. |
You’ll configure the following custom attributes to govern how tokens are generated during both token exchanges and standard client credential requests:
-
sub: Determines the subject of the issued token based on the request type. During a token exchange, it copies thesubclaim from the subject token to preserve the user’s identity across the delegation chain. During aclient_credentialsrequest (used by the gateway extension to fetch its own actor token), it outputs the literal stringno-subjectbecause no user context exists. -
act: Manages the token delegation chain. During aclient_credentialsrequest, it outputs the constant valuenoActor. During a token exchange, it verifies that the subject token’smay_actclaim matches the actor token’sclient_id. If they match, it nests the actor’s identity in the subject token’s existingactclaim. If they don’t match, the expression returns a null value. Because this is the only attribute where you must select the Required checkbox, a null return explicitly fails the unauthorized exchange. -
grant_type(Optional): This attribute can enrich the final token by adding the authorization grant type (such asurn:ietf:params:oauth:grant-type:token-exchange) as a first-class claim.
|
Because the Order Status MCP Server resource is terminal, a |
-
In the PingOne admin console, go to Applications > Resources and click the icon.
-
Define the resource:
-
Resource Name:
AC Order Status MCP Server -
Audience:
order-status-mcp-server
-
-
Click Next.
-
Define attributes for the resource:
Detailed steps follow the table.
Attribute Required Expression subNo
(#root.context.requestData.grantType == "client_credentials") ? "no-subject" : #root.context.requestData.subjectToken.subactYes
(#root.context.requestData.grantType == "client_credentials")?"noActor":((#root.context.requestData.subjectToken.may_act.sub == #root.context.requestData.actorToken.client_id)?{"sub":#root.context.requestData.actorToken.client_id,"act":#root.context.requestData.subjectToken.act}:null)grant_typeNo
#root.context.requestData.grantType-
Click the Gear icon () next to the
subattribute, enter the expression, and click Save.Leave the Required checkbox cleared for this attribute to prevent validation errors during
client_credentialsrequests.Learn more about expressions in Using the expression builder in the PingOne documentation.
-
Click + Add and name the attribute
act. -
Click , enter the expression, and click Save.
-
Select the Required checkbox for the
actattribute.This ensures that any token exchange that fails to set
actis rejected. -
(Optional) Click + Add, name the attribute
grant_type, click , enter the expression, and click Save.
-
-
Click Next, then click + Add Scope.
-
Name the scope
order:read. -
Click Save.
Create a support team group in PingOne
Create a group in PingOne to manage user access to the Support Order MCP Server.
|
You can find more details about creating groups in the PingOne documentation. |
-
In the PingOne admin console, go to Directory > Groups.
-
Click the icon.
-
Name the group
support_teamand click Save. -
Add any PingOne users authorized to invoke the Support Order MCP Server:
-
On the Users tab, click Add Individually.
-
In the All Users list, select checkboxes for the users you want to add.
-
-
Click Save.
Deploy the Order Status MCP Server to Cloud Run
Build the MCP server with configured environment variables and deploy it as a Google Cloud Run service.
-
Set environment variables for the MCP server:
-
In the cloned Gemini Enterprise Agent Platform Integrations repository, go to the
pingone/agent-chaining/services/order-status-mcp-serverdirectory. -
Make a copy of the
.env.samplefile and name it.env:cp .env.sample .env -
Set environment variables in the
.envfile:Variable Value GC_REGIONYour Google Cloud Platform region. For example:
us-central1.GC_CLOUD_RUN_SERVICE_NAMEThe Cloud Run service name:
ac-order-status-mcp-server.IDP_ISSUERThe PingOne issuer URL:
https://auth.pingone.<region>/<env-id>/as.Set the placeholders:
-
<region>: The country code top-level domain (ccTLD), such as
.com,.eu,.asia. You can find this in your PingOne admin console URL. For example,https://console.pingone.com/index.html?env=12345678-1234-1234-1234-123456789012has a ccTLD of.com. -
<env-id>: The PingOne environment ID. In the example PingOne admin console URL, the ID is
12345678-1234-1234-1234-123456789012.
IDP_REQUIRED_AUDIENCEThe expected
audclaim. Enter the audience you gave the Order Status MCP Server resource in PingOne:order-status-mcp-server.IDP_REQUIRED_SCOPEThe scope the inbound token must carry. Enter the scope you gave the AC Order Status MCP Server resource in PingOne:
order:read. -
-
-
In the
pingone/agent-chaining/services/order-status-mcp-serverdirectory, run the following command:make deployThis builds the Docker image, pushes it to Google Container Registry, and deploys it to Cloud Run.
Register the Order Status MCP Server in Agent Registry
Register the MCP server in Agent Registry to ensure the Agent Gateway recognizes it as an approved egress destination.
|
No additional IAM configuration is required after registration. The registry-wide |
-
In Google Cloud, go to Agent Platform > Govern > Agent Registry and click Add MCP Server.
-
Enter the following values:
-
Name:
ac-order-status-mcp-server -
Description:
Order status MCP server for the Agent Chaining demo
-
-
Select your Region (for example,
us-central1). -
Enter the MCP server URL:
-
To find the URL, duplicate the browser tab and go to Cloud Run > Services. Click the order-status-mcp-server.
-
Copy the URL at the top of the page. For example:
https://agent-chain-order-status-mcp-server-909399354423.us-central1.run.app. -
In Agent Registry, paste the URL in the MCP server URL field, and then add
/mcpto the end of the URL.The registered URL must match the host URL the agent calls exactly (defined by the
MCP_ORDER_STATUS_SERVER_URLvariable in the agent’s.envfile). Identity-Aware Proxy (IAP) resolves egress destinations by host. If the host doesn’t match, IAP denies the request before it ever reaches the gateway service extension.
-
-
Enter the MCP specification JSON, which defines the MCP server’s endpoints and expected request and response formats:
-
In the cloned repository, go to the
pingone/agent-chaining/services/order-status-mcp-serverdirectory and copy the contents of thetool-spec.jsonfile. -
In Agent Registry, paste the copied contents into the JSON field.
-
Click Next.
-
-
Click Save to complete the registration.
Create authorization policies in PingOne Authorize
Create policies that decide whether the service extension permits the agent’s request to the MCP server. These policies limit access to members of the support group during business hours.
Create attributes in the Trust Framework
Create attributes in PingOne Authorize that extract information from service extension decision requests. These attributes are used in authorization policies to determine whether the agent is allowed to access the MCP server.
|
You can find more details about adding authorization attributes in the PingOne Authorize documentation. |
| Name | Type | Extension parameter key |
|---|---|---|
|
String |
|
|
Number |
|
-
In the PingOne admin console, go to Authorization > Trust Framework.
-
On the Attributes tab, click the icon.
-
Name the attribute
User Sub.The attribute name must match the parameter key in the decision request. It’s case-sensitive.
-
If the attribute has a Parent, click to clear the parent value, ensuring the attribute isn’t nested under another attribute.
-
In the Resolvers section, click Add Resolver and keep the default Request Parameter resolver.
-
(Optional) Name the resolver
user_subto match the parameter name in the agent’s request.Request Parameter resolvers extract values from decision requests and pass them to PingOne Authorize for evaluation. The resolver name is a label only and isn’t matched to the parameter name in the request.
-
For the Value Settings Type, keep the default value of String.
-
Click Save Changes.
-
If you don’t already have the
Request Hourattribute, repeat the steps above to add it, with a resolver parameter optionally namedrequest_hourand the value settings type Number.
Create the AC Agent Gateway Policies policy set
Create a policy set in PingOne Authorize that contains the policies governing the agent’s access to the MCP server.
|
You can find more details about adding policy sets in the PingOne Authorize documentation. |
-
In the PingOne admin console, go to Authorization > Policies.
-
Click the root Policies policy set, then click the icon and select Add Policy Set.
-
Name the policy set
AC Agent Gateway Policies. -
For the Combining Algorithm, select Unless one decision is deny, the decision will be permit.
-
Click Save changes.
Create the Only Permit During Business Hours policy
Create a policy that permits access to the MCP server only during business hours. PingOne Authorize denies access if the request hour is before 8:00 AM or after 6:00 PM.
The service extension converts from UTC before sending a decision request to ensure permitted hours are in local time. For example, a request at 3:00 PM UTC is converted to 8:00 AM Pacific and is permitted, while a request at 3:00 AM UTC is converted to 8:00 PM Pacific and is denied.
|
You can find more details about adding policies in the PingOne Authorize documentation. |
-
In Authorization > Policies, select the AC Agent Gateway Policies policy set.
-
Click the icon and select Add Policy.
-
Name the policy
Only Permit Within Business Hours. -
In Applies When:
-
Click + Comparison, then select Any.
-
Select the Request Hour attribute.
-
Select the Greater Than operator.
-
For the value, enter
18. -
Click + Comparison and select the Request Hour attribute.
-
Select the Less Than operator.
-
For the value, enter
8.
-
-
For the Combining Algorithm, select Unless one decision is deny, the decision will be permit.
-
Click + Add Rule, name the rule
Deny Outside Business Hours, then for Effect, select Deny. -
Click Save changes.
Create the Only Permit Users in Support Group policy
Create a policy that permits only members of the support group to access the MCP server. Agents are denied access when user_sub isn’t a member of the support team.
|
You can find more details about adding policies in the PingOne Authorize documentation. |
-
In Authorization > Policies, select the AC Agent Gateway Policies policy set.
-
Click the icon and select Add Policy.
-
Name the policy
Only Permit Users in Support Group. -
In Applies When:
-
Click + Comparison and select the User Sub attribute.
-
Select the Is Not Member Of operator.
-
For the value, select the support_team attribute.
-
-
For the Combining Algorithm, select Unless one decision is deny, the decision will be permit.
-
Click + Add Rule, name the rule
Deny Non-Members, then for Effect, select Deny. -
Click Save changes.
Publish an authorization policy version
Publish a policy version to deploy your policies to a decision endpoint and make them available in decision evaluations.
|
You can find more details about publishing policy versions in the PingOne Authorize documentation. |
-
In the PingOne admin console, go to Authorization > Version History.
-
Click the More Options (⋮) icon next to the Latest Version and select Publish Version.
-
In the Publish to list, select a decision endpoint.
-
For the version Name, enter
AC. -
Click Publish.
The version name and the endpoint the version is published to are displayed in Version History.
-
Go to Authorization > Decision Endpoints and expand the decision endpoint where you published the policy version. Copy the decision endpoint URL and save it somewhere convenient. You’ll need it later when you deploy the service extension.
Deploy the Agent Gateway Service Extension
The Agent Gateway Service Extension is an Envoy ext_proc gRPC handler that the Agent Gateway calls to request authorization decisions and perform token exchanges.
The service extension governs two interaction paths:
-
A2A: The Support Agent calls the Order Status Agent.
-
Agent to tool (MCP): The Order Status Agent calls the Order Status MCP Server.
For requests matching either target, the service extension performs the following operations:
-
Validates the agent’s delegated token, specifically checking the
iss,aud, andscopeclaims. -
Calls PingOne Authorize on A2A
message:sendor MCPtools/callrequests to evaluate the user’s identity and the time of the request. -
Upon a deny decision, error, or unknown request body, blocks the request and returns a
403 Forbiddenerror. -
Upon a permit decision, performs a token exchange to generate a token scoped to the target audience. The injection method depends on the destination:
-
For A2A requests, injects the new token into the body metadata. The
Authorizationheader is reserved for the Google credential required to pass the receiving endpoint’s IAM check. -
For MCP requests, injects the new token into the
Authorization: Bearerheader.
-
Create a PingOne worker application
Create a PingOne worker application that the service extension uses to call PingOne Authorize for authorization decisions.
|
You can find more details about adding applications in the PingOne documentation. |
-
In the PingOne admin console, go to Applications > Applications.
-
Click the icon and create the application profile:
-
Name the application
AC PingOne Authorize Worker App. -
For the Application Type, click Worker.
-
Click Save.
-
-
To enable the application, click the toggle next to the application name in the details panel.
-
On the Configuration tab, click the Pencil icon (), make sure Client Credentials is the Grant Type, then click Cancel.
-
On the Roles tab, click Grant Roles.
-
Expand the Environment Admin role and select your environment.
-
Expand the Identity Data Read Only role and select your environment.
-
Click Save.
Create a PingOne application for token exchange
Create a PingOne OIDC application that the service extension uses to perform token exchanges for the MCP server.
|
You can find more details about adding applications in the PingOne documentation. |
-
In the PingOne admin console, go to Applications > Applications.
-
Click the icon and create the application profile:
-
Name the application
AC Agent Gateway Extension. -
For the Application Type, click OIDC Web App.
-
Click Save.
-
-
To enable the application, click the toggle next to the application name in the details panel.
-
On the Configuration tab, click :
-
For Grant Type, select Client Credentials and Token Exchange.
-
Clear the Code and Authorization Code checkboxes.
-
Click Save
-
-
On the Resources tab, click , then select the order:read scope on the AC Order Status MCP Server.
-
Select the order_status:invoke scope on the AC Order Status Agent.
This scope isn’t available yet. Skip this step for now and complete it after you deploy the Order Status Agent.
-
Click Save.
-
On the Overview tab, copy the Client ID for this application and save it somewhere convenient. You’ll need it later when you configure attributes for the Agent Gateway resource in PingOne.
Deploy the Agent Gateway Service Extension to Cloud Run
Build the service extension with configured environment variables and deploy it as a Google Cloud Run service.
-
Set environment variables for the service extension:
-
In the cloned repository, go to the
pingone/agent-chaining/services/agent-gateway-extension-servicedirectory. -
Make a copy of the
.env.samplefile and name it.env:cp .env.sample .env -
Set environment variables in the
.envfile:Variable Value GC_REGIONYour Google Cloud Platform region. For example:
us-central1.GC_CLOUD_RUN_SERVICE_NAMEThe Cloud Run service name:
ac-agent-gateway-extension-service.GC_SERVICE_EXTENSION_NAMEThe deployed service extension’s name (created when the service extension was registered):
ac-agent-gateway-extension.IDP_ISSUERThe PingOne issuer URL:
https://auth.pingone.<region>/<env-id>/as.To find this endpoint, go to the AC Agent Gateway Extension application in PingOne. Copy the Issuer ID under Connection Details on the Overview tab.
EXCHANGE_CLIENT_IDThe AC Agent Gateway Extension application’s Client ID. This is located above Connection Details on the Overview tab.
EXCHANGE_CLIENT_SECRETThe AC Agent Gateway Extension application’s Client Secret. This is located above Connection Details on the Overview tab.
AUTHZ_CLIENT_IDThe AC PingOne Authorize Worker App’s Client ID. This is located above Connection Details on the Overview tab for this application.
AUTHZ_CLIENT_SECRETThe AC PingOne Authorize Worker App’s Client Secret. This is located above Connection Details on the Overview tab.
The PingOne Authorize decision endpoint URL where you published the policy version earlier.
To find the URL, go to Authorization > Decision Endpoints and expand the decision endpoint where you published the policy version. Copy the decision endpoint URL.
IDP_REQUIRED_AUDIENCEThe intermediate audience targeted by the initial token exchanges for both the Support Agent and the Order Status Agent. This is
ac-google-cloud-agent-gateway.No downstream service validates this audience directly. Instead, the gateway uses this intermediate audience as the source to generate the final token for the target destination (defined by either
AGENT_AUDIENCEorTOOL_AUDIENCE). This ensures the final PingOne resources remain terminal, requiring onlysubandactattributes rather than processing multiple chained exchanges.IDP_REQUIRED_SCOPE_AGENTThe scope the inbound token must carry to invoke the Order Status Agent. This is
order_status:invoke.IDP_REQUIRED_SCOPE_TOOLThe scope the inbound token must carry to invoke the Order Status MCP Server. This is
order:read.The Reasoning Engine’s identifier for the Order Status Agent. In this example, the ID follows
reasoningEngines:in the Order Status Agent’s Uniform Resource Name (URN):urn:agent:projects-909399354423:projects:909399354423:locations:us-central1:aiplatform:reasoningEngines:7390548000881246208.You’ll populate this placeholder after you deploy the Order Status Agent in a later task. To find the ID at that point, go to the
ac-order-status-agentservice in Agent Registry. After you populate this variable, redeploy the service extension.The Reasoning Engine ID changes each time you redeploy the Order Status Agent. If you redeploy the agent, update this environment variable and redeploy the service extension.
AGENT_SCOPEThe scope the service extension requests during token exchange to authorize access to the downstream Order Status Agent:
order-status:invoke.AGENT_AUDIENCEThe final target audience generated during the A2A request token exchange. This is the audience you’ll give the agent resource in PingOne:
order-status-agent.TOOL_URLThe Order Status MCP Server’s Cloud Run base URL:
https://ac-order-status-mcp-server-<your-project-number>.<your-deployment-region>.run.app.To find this URL, go to Cloud Run > Services and click the order-status-mcp-server service. Copy the URL at the top of the page (for example,
https://ac-order-status-mcp-server-f447x3emfq-uc.a.run.app).TOOL_SCOPEThe scope the service extension requests during token exchange to authorize access to the downstream MCP server:
order:read.TOOL_AUDIENCEThe final target audience generated during the MCP request token exchange. This is the audience you gave the AC Order Status MCP Server resource in PingOne:
order-status-mcp-server.
-
-
In the
pingone/agent-chaining/services/agent-gateway-extension-servicedirectory, run the following commands:make deployThis builds the Docker image, pushes it to Google Container Registry, and deploys it to Cloud Run.
make registerThis command registers your deployed Cloud Run service as an available service extension in Google Cloud. Behind the scenes, it renders the
service-extension.tmpl.yamltemplate with the live Cloud Run URL and imports the configuration, preparing the extension for use by the Agent Gateway.
Create the Agent Gateway
The Agent Gateway is a Google-managed resource that acts as the policy enforcement point for all agent egress traffic. It intercepts all outbound traffic bound for downstream tools and routes it to the service extension.
Because the Support Agent and the Order Status Agent operate concurrently, this gateway is configured to govern both the A2A interaction path (between the agents) and the MCP interaction path (to the downstream server).
You’ll configure the gateway to call the service extension, using Envoy external processing (ext_proc), on every request to the Order Status MCP Server. This includes attaching the service extension to the gateway, registering the egress destinations it can reach, and creating the PingOne resource that licenses the service extension as the only actor allowed to exchange tokens bound for the gateway.
Configure Agent Gateway environment variables
Configure the environment variables required to deploy the Agent Gateway and link it to the service extension.
-
Set environment variables for the Agent Gateway:
-
In the cloned repository, go to the
pingone/agent-chaining/services/agent-gatewaydirectory. -
Make a copy of the
.env.samplefile and name it.env:cp .env.sample .env -
Check the environment variables in the
.envfile. Most are already defined.Variable Value GC_REGIONYour Google Cloud Platform region. For example:
us-central1.GC_GATEWAY_NAMEThe Agent Gateway’s name:
ac-agent-gateway.GC_SERVICE_EXTENSION_NAMEThe deployed service extension’s name (created when the service extension was registered):
ac-agent-gateway-extension.GC_AUTHZ_POLICY_NAMEThe name of the Google Cloud authorization policy resource that binds the extension to the gateway:
ac-authz-policy.
-
Create the Agent Gateway in Google Cloud
Use the Google Cloud Console to deploy the Agent Gateway. This creates the service that intercepts agent egress and hands requests to the service extension.
-
In Google Cloud, go to Agent Platform > Govern > Gateways and click Add gateway.
-
Enter the following values:
-
Name:
ac-agent-gateway. -
Region: Your Google Cloud Platform region. For example:
us-central1. -
Deployment mode: Keep the default Google-managed.
-
Agent registries: Keep the default Regional registry.
-
Governed Access Path: Keep the default Agent-to-Anywhere (egress).
-
Access Authorization: Select Enforce policies.
-
Policy Model: Select Allow Policy.
-
-
Click Add gateway.
Attach the Agent Gateway Service Extension to the Agent Gateway
To enforce your access policies, you must connect the service extension to the Agent Gateway. The make attach command populates authz-policy.tmpl.yaml with your project, region, and gateway name, and then imports it with gcloud. This creates an authorization policy that binds the extension to the gateway as a CONTENT_AUTHZ policy scoped to both the Reasoning Engine A2A path (/v1beta1/projects/…/reasoningEngines/) and the /mcp path.
-
In the
pingone/baseline-autonomous-agent-to-tool/services/agent-gatewaydirectory, run the following command:make attachYou can run
make renderalone to inspect the generated YAML without importing.
There are now two complementary authorization extensions attached to the Agent Gateway:
| Extension | Service role | Target | Description |
|---|---|---|---|
|
|
|
A Google-managed extension automatically created with the gateway. It enforces the IAP identity and egress check ( |
|
|
Cloud Run service extension |
The extension created in the previous step. It routes traffic to your Cloud Run host and requests an authorization decision. Upon permit, the extension performs the PingOne token exchange and injects the resulting delegated token in the |
Register egress destinations for the Agent Gateway
Because the Agent Gateway governs all agent egress, every host the agent communicates with must be registered as a destination in Agent Registry. Your environment currently includes the following registered destinations:
-
Order Status MCP Server: This was registered as an MCP server (rather than a standard endpoint) when you deployed it.
The registered URL must match the host URL invoked by the agent exactly. Because IAP resolves egress destinations by host name, any mismatch causes IAP to block the request before it ever reaches the service extension. For example, a failure occurs if the registry holds the stable Cloud Run URL (
…-<project-number>.<region>.run.app), but the agent calls a direct revision URL (…-<hash>-<region>.a.run.app). If this happens, you’ll see aDENIEDentry in the gateway logs with noagentRegistryResource. -
Google APIs: Endpoints for
aiplatform,iamcredentials, and telemetry (*.mtls.googleapis.com) were automatically generated during the gateway deployment to support the runtime’s internal egress. Don’t modify these endpoints.
You’ll register the PingOne host as the final required egress endpoint.
|
If you completed the authorizing autonomous agents and authorizing agents on behalf of users use cases, you already registered the PingOne host as an endpoint. You can skip this task. |
-
In Google Cloud, go to Agent Platform > Govern > Agent Registry and click Add Endpoint.
-
Enter the following values:
-
Name:
PingOne. -
Region: Your Google Cloud Platform region. For example:
us-central1. -
Destination URL: Your PingOne host. For example:
https://auth.pingone.com.
-
-
Click Save.
Create the Agent Gateway resource in PingOne
The Agent Gateway resource acts as an intermediate target for both agents' initial token exchanges. The gateway service extension uses the output of these initial exchanges to perform subsequent exchanges targeting the next actor.
Custom attributes secure this delegation chain. While a basic token exchange can function without them, omitting these attributes means an actor token could be accepted at face value. By defining them, PingOne explicitly attests to the actor’s identity and refuses to generate a token if the subject token didn’t authorize the exchanging actor.
You’ll configure the following attributes:
-
sub: Determines the subject of the token based on the grant type. During a token exchange, it copies the subject token’ssubclaim to carry the user’s identity through the transaction. During aclient_credentialsrequest (used when the agents fetch their own actor tokens), it outputs the stringno-subject. -
act: Preserves the complete delegation history. During an exchange, it verifies that the incoming token’smay_actclaim matches the exchanging agent’sclient_id. If authorized, it nests the incoming token’sactclaim inside the new one, ensuring the entire chain survives the transaction rather than just the previous actor. -
may_act: Explicitly licenses the gateway service extension as the sole authorized next actor on every token minted for this resource. For both token exchanges, the extension is the only client whose client ID matches, ensuring the downstream resource’s required act check passes for it and fails closed for anyone else. -
grant_type(Optional): Enriches the token by exposing the authorization grant type (such asurn:ietf:params:oauth:grant-type:token-exchange) as a first-class claim.
|
You can find more details about adding custom resources in the PingOne documentation. |
-
In the PingOne admin console, go to Applications > Resources and click the icon.
-
Define the resource:
-
Resource Name:
AC Google Cloud Agent Gateway -
Audience:
ac-google-cloud-agent-gateway
-
-
Click Next.
-
Define attributes for the resource:
Detailed steps follow the table.
Attribute Required Expression subNo
(#root.context.requestData.grantType == "client_credentials") ? "no-subject" : #root.context.requestData.subjectToken.subactYes
(#root.context.requestData.grantType == "client_credentials")?"noActor":((#root.context.requestData.subjectToken.may_act.sub == #root.context.requestData.actorToken.client_id)?{"sub":#root.context.requestData.actorToken.client_id,"act":#root.context.requestData.subjectToken.act}:null)may_actNo
{"sub":"<extension-client-id>"}grant_typeNo
#root.context.requestData.grantType-
Click the Gear icon () next to the
subattribute, enter the expression, and click Save.Leave the Required checkbox cleared. If marked required, standard
client_credentialsrequests are rejected by PingOne before the attribute expression is evaluated.Learn more about expressions in Using the expression builder in the PingOne documentation.
-
Click + Add and name the attribute
act. -
Click , enter the expression, and click Save.
-
Select the Required checkbox for the
actattribute.This ensures that any token exchange that fails to set
actis rejected. Unauthorized requests evaluate to null and explicitly fail. -
Click + Add and name the attribute
may_act. -
Click , enter the expression, replace the
<extension-client-id>placeholder with the AC Agent Gateway Extension application’s Client ID you saved earlier, and click Save. -
(Optional) Click + Add, name the attribute
grant_type, click , enter the expression, and click Save.
-
-
Click Next, then click + Add Scope.
-
Name the scope
order-status:invoke.The Support Agent requests this scope when it exchanges the user’s sign-on token during the first exchange.
-
Click + Add Scope and name it
order:read.The Order Status Agent requests this scope when it exchanges the Support Agent’s delegated token during the third exchange.
-
Click Save.
Deploy the Order Status Agent
The Order Status Agent acts as the specialized downstream agent in the agent delegation chain. In the A2A path, it receives get_order_status requests from the Support Agent and serves as the only client authorized to call the Order Status MCP Server.
When the gateway extension routes an A2A message to this agent, it delivers a delegated token with the metadata.delegatedAuthorization property. The agent independently validates this token, verifying its signature, issuer, the order-status-agent audience, and the order-status:invoke scope. The agent then executes its own token exchange (using the validated token as the subject and its own PingOne client credentials as the actor), targeting the shared intermediate ac-google-cloud-agent-gateway audience.
As the agent initiates the outbound call to the MCP server, the Agent Runtime routes the egress traffic through the Agent Gateway. The service extension intercepts this request and performs the final token exchange, generating a token scoped to the order-status-mcp-server audience.
You’ll create an identity for the agent in PingOne and deploy the agent to the Agent Runtime, binding it to the Agent Gateway.
Create the Order Status Agent in PingOne
Create an AI agent in PingOne to establish a dedicated identity for the Order Status Agent. This identity enables the agent to authenticate and acquire access tokens during delegation exchanges.
|
You can find more details about adding AI agents in the PingOne documentation. |
-
In the PingOne admin console, go to AI Agents and click the icon.
-
Name the agent
AC Order Status Agent. -
Click Save.
-
To enable the agent, click the toggle next to the agent name in the details panel.
-
On the Configuration tab, click :
-
In Grant Type, select Client Credentials and Token Exchange.
-
Clear the Code and Authorization Code checkboxes.
-
Click Save
-
-
On the Resources tab, click , then select the order:read scope on the AC Google Cloud Agent Gateway resource.
-
Click Save.
-
On the Overview tab, copy the Client ID for this agent and save it somewhere convenient. You’ll need it later when you configure attributes for the Order Status Agent resource in PingOne.
Create the Order Status Agent resource in PingOne
The Order Status Agent resource acts as the primary destination target for the A2A invocation. Only the gateway service extension generates tokens against this resource, using either an RFC 8693 token exchange (for the A2A request) or a client_credentials grant (to fetch its own actor token for the A2A scope). Because no tokens are generated here with a direct user sign-on (authorization_code grant), you must configure the following custom attributes to securely manage the delegation chain:
-
sub: Determines the subject of the token based on the grant type. During a token exchange, it copies the incoming token’ssubclaim to carry the user’s identity through the A2A interaction. During aclient_credentialsrequest, it outputs the stringno-subject.Configure this expression using only the
subjectToken.subandno-subjectbranches. Do not include a#root.user.idbranch. Because no user context exists during aclient_credentialsgrant, referencing the user object causes the entire expression evaluation to fail, which drops thesubclaim from the token entirely. -
act: Preserves the delegation history across the A2A interaction. During an exchange, it verifies that the incoming token’smay_actclaim identifies the exchanging service extension. If authorized, it nests the subject token’sactclaim one level deeper in the new token. If the original sign-on token lacked anactclaim, it flows through the nesting as an explicit null at the innermost position. -
may_act: Licenses the Order Status Agent as the sole authorized next actor on every token minted for this resource. By assigning a constant value containing this agent’s PingOne client ID, this attribute ensures the agent’s subsequent token exchange (which targets the shared gateway audience), carries a validactclaim and passes the gateway resource’s delegation check, failing closed for anyone else. -
grant_type(Optional): Enriches the token by exposing the authorization grant type (such asurn:ietf:params:oauth:grant-type:token-exchange) as a first-class claim.
|
You can find more details about adding custom resources in the PingOne documentation. |
-
In the PingOne admin console, go to Applications > Resources and click the icon.
-
Define the resource:
-
Resource Name:
AC Order Status Agent -
Audience:
order-status-agent
-
-
Click Next.
-
Define attributes for the resource:
Detailed steps follow the table.
Attribute Required Expression subNo
(#root.context.requestData.grantType == "client_credentials") ? "no-subject" : #root.context.requestData.subjectToken.subactYes
(#root.context.requestData.grantType == "client_credentials")?"noActor":((#root.context.requestData.subjectToken.may_act.sub == #root.context.requestData.actorToken.client_id)?{"sub":#root.context.requestData.actorToken.client_id,"act":#root.context.requestData.subjectToken.act}:null)may_actNo
{"sub":"<ORDER-STATUS-AGENT-CLIENT-ID>"}grant_typeNo
#root.context.requestData.grantType-
Click the Gear icon () next to the
subattribute, enter the expression, and click Save.Leave the Required checkbox cleared. If marked required, standard
client_credentialsrequests are rejected by PingOne before the attribute expression is evaluated.Learn more about expressions in Using the expression builder in the PingOne documentation.
-
Click + Add and name the attribute
act. -
Click , enter the expression, and click Save.
-
Select the Required checkbox for the
actattribute.This ensures that any token exchange that fails to set
actis rejected. Unauthorized requests evaluate to null and explicitly fail. -
Click + Add and name the attribute
may_act. -
Click , enter the expression, replace the
<ORDER-STATUS-AGENT-CLIENT-ID>placeholder with the AC Order Status Agent’s Client ID you saved earlier, and click Save. -
(Optional) Click + Add, name the attribute
grant_type, click , enter the expression, and click Save.
-
-
Click Next, then click + Add Scope.
-
Name the scope
order-status:invoke.The Support Agent requests this scope when it exchanges the user’s sign-on token during the first exchange.
-
Click Save.
Deploy and register the Order Status Agent in Agent Registry
To finish Order Status Agent setup, deploy it to the Google Cloud Agent Runtime. This deployment automatically registers the agent in Agent Registry and routes all of its egress traffic through the Agent Gateway.
-
Set environment variables for the agent:
-
In the cloned repository, go to the
pingone/agent-chaining/services/order-status-agentdirectory. -
Make a copy of the
.env.samplefile and name it.env:cp .env.sample .env -
Set environment variables in the
.envfile:Variable Value GC_REGIONYour Google Cloud Platform region. For example:
us-central1.AGENT_DISPLAY_NAMEDisplay name for the Reasoning Engine:
ac-order-status-agent.IDP_ISSUERThe PingOne issuer URL:
https://auth.pingone.<region>/<env-id>/as.To find this endpoint, go to the AC Order Status Agent in PingOne. Copy the Issuer ID under Connection Details on the Overview tab.
GC_AGENT_GATEWAYThe gateway name:
ac-agent-gateway.AGENT_CLIENT_IDThe AC Order Status Agent’s Client ID. This is located above Connection Details on the agent’s Overview tab in PingOne.
AGENT_CLIENT_SECRETThe AC Order Status Agent’s Client Secret. This is located above Connection Details on the agent’s Overview tab.
IDP_REQUIRED_AUDIENCEThe audience accepted on the inbound A2A token exchange:
order-status-agent.The gateway service extension validates this audience before generating the outbound token for the MCP server.
IDP_REQUIRED_SCOPEThe scope accepted on the inbound A2A token exchange:
order-status:invoke.The gateway service extension validates this scope before generating the outbound token for the MCP server.
TOOL_URLThe Order Status MCP Server’s Cloud Run base URL:
https://ac-order-status-mcp-server-<your-project-number>.<your-deployment-region>.run.app/mcp.To find this URL, go to Cloud Run > Services and click the order-status-mcp-server. Copy the URL at the top of the page. Paste the URL in the
.envfile, making sure/mcpis at the end of the URL.TOOL_SCOPEThe scope the agent requests during token exchange to authorize access to the downstream MCP server:
order:read.GATEWAY_AUDIENCEThe audience the agent requests during token exchange to authorize access to the Agent Gateway:
ac-google-cloud-agent-gateway.The agent doesn’t target the final
order-status-mcp-serveraudience directly. Instead, it exchanges its token for this intermediate audience. The gateway service extension then intercepts the outbound request and performs the final token exchange to the MCP server. This value must exactly match theAGENT_GATEWAY_AUDIENCEvalue configured in the gateway service extension.
-
-
In the
pingone/agent-chaining/services/order-status-agentdirectory, run the following command:make deployThe
deploy.pyscript provisions the Reasoning Engine usingidentity_type = AGENT_IDENTITY. The script also binds the engine to the gateway and grants it theroles/iap.egressorrole on Agent Registry, authorizing the agent to securely reach all registered downstream endpoints. -
Complete the Order Status Agent’s
AGENT_ENGINE_IDplaceholder in the service extension’s.envfile, then redeploy the service extension. -
In PingOne, go to the AC Agent Gateway Extension application and assign the order_status:invoke scope on the AC Order Status Agent.
Deploy the Support Agent
The Support Agent serves as the user-facing entry point in the delegation chain. Instead of interacting with the downstream Order Status MCP Server directly, it delegates order status requests to the Order Status Agent over A2A.
The Agent Bridge stores the user’s PingOne sign-on token in ADK session state. This token is initially scoped to the agent’s own support-agent audience. The agent manages the token through this sequence:
-
The agent independently verifies the token’s signature, issuer, audience, and the
support-agent:invokescope before using it. -
The agent performs a token exchange using the user’s token as the subject and its own PingOne client credentials as the actor. This targets the intermediate
ac-google-cloud-agent-gatewayaudience. -
As the agent initiates the outbound A2A request, the Agent Runtime routes egress traffic through the Agent Gateway. The service extension intercepts this request and performs the final token exchange, generating a token scoped to the
order-status-agentaudience.
You’ll create the agent’s PingOne application and deploy the agent to the Agent Runtime, binding it to the Agent Gateway.
Create the Support Agent in PingOne
Create an AI agent in PingOne to establish a dedicated identity for the Support Agent. This identity enables the agent to authenticate and acquire access tokens during delegation exchanges.
|
You can find more details about adding AI agents in the PingOne documentation. |
-
In the PingOne admin console, go to AI Agents and click the icon.
-
Name the agent
AC Support Agent. -
Click Save.
-
To enable the agent, click the toggle next to the agent name in the details panel.
-
On the Configuration tab, click :
-
In Grant Type, select Client Credentials and Token Exchange.
-
Clear the Code and Authorization Code checkboxes.
-
Click Save.
-
-
On the Resources tab, click , then select the order-status:invoke scope on the AC Google Cloud Agent Gateway resource.
-
Click Save.
-
On the Overview tab, copy the Client ID for this agent and save it somewhere convenient. You’ll need it later when you configure attributes for the Support Agent resource in PingOne.
Create the Support Agent resource in PingOne
The Support Agent resource generates the Chat UI’s sign-on token, establishing the user identity that enters the delegation chain.
Because this resource exclusively processes direct user sign-ons with the authorization_code grant and doesn’t process client_credentials requests, the default User ID mapping for the sub claim is sufficient. This mirrors the AOBOU Financial Agent resource in the authorizing agents on behalf of users use case.
You don’t need to configure an act attribute. Because no actor exists during a direct user sign-on, the initial sign-on token doesn’t include an act claim. During subsequent token exchanges, the gateway resource’s nesting logic translates this absence into a null at the innermost position of every downstream token.
To initialize the delegation chain, you’ll configure the following custom attributes:
-
may_act: Licenses the Support Agent as the only authorized next actor on every token minted for this resource. Assigning a constant value (the agent’s PingOne client ID) to this attribute ensures the Support Agent’s subsequent token exchange, which targets the shared gateway audience, carries a validactclaim. This allows the exchange to pass the gateway resource’s delegation check while failing closed for anyone else. -
grant_type(Optional): Enriches the token by exposing the authorization grant type (such asauthorization_code) as a first-class claim.
|
You can find more details about adding custom resources in the PingOne documentation. |
-
In the PingOne admin console, go to Applications > Resources and click the icon.
-
Define the resource:
-
Resource Name:
AC Support Agent -
Audience:
support-agent
-
-
Click Next.
-
Define attributes for the resource:
Detailed steps follow the table.
Attribute Required Expression may_actNo
{"sub":"<SUPPORT-AGENT-CLIENT-ID>"}grant_typeNo
#root.context.requestData.grantType-
Click + Add and name the attribute
may_act. -
Click , enter the expression, replace the
<SUPPORT-AGENT-CLIENT-ID>placeholder with the AC Support Agent’s Client ID you saved earlier, and click Save.Learn more about expressions in Using the expression builder in the PingOne documentation.
-
(Optional) Click + Add, name the attribute
grant_type, click , enter the expression, and click Save.
-
-
Click Next, then click + Add Scope.
-
Name the scope
support-agent:invoke.The Order Status Agent requests this scope when it exchanges the Support Agent’s delegated token during the second exchange.
-
Click Save.
Deploy and register the Support Agent in Agent Registry
To finish Support Agent setup, deploy it to the Google Cloud Agent Runtime. This deployment automatically registers the agent in Agent Registry and routes all of its egress traffic through the Agent Gateway.
-
Set environment variables for the agent:
-
In the cloned repository, go to the
pingone/agent-chaining/services/support-agentdirectory. -
Make a copy of the
.env.samplefile and name it.env:cp .env.sample .env -
Set environment variables in the
.envfile:Variable Value GC_REGIONYour Google Cloud Platform region. For example:
us-central1.AGENT_DISPLAY_NAMEDisplay name for the Reasoning Engine:
ac_support_agent.IDP_ISSUERThe PingOne issuer URL:
https://auth.pingone.<region>/<env-id>/as.To find this endpoint, go to the AC Support Agent in PingOne. Copy the Issuer ID under Connection Details on the Overview tab.
GC_AGENT_GATEWAYThe gateway name:
ac-agent-gateway.AGENT_CLIENT_IDThe AC Support Agent’s Client ID. This is located above Connection Details on the agent’s Overview tab in PingOne.
AGENT_CLIENT_SECRETThe AC Support Agent’s Client Secret. This is located above Connection Details on the agent’s Overview tab.
IDP_REQUIRED_AUDIENCEThe expected audience used to validate the user’s incoming PKCE sign-on token provided by the Agent Bridge:
support-agent.The gateway service extension validates the token against this audience before using it as the subject token in the outbound token exchange. The validation process is independent of the agent’s own client credentials.
IDP_REQUIRED_SCOPEThe expected scope on the inbound browser token:
support-agent:invoke.AGENT_ENGINE_IDThe Reasoning Engine’s identifier for the Order Status Agent. In this example, the ID follows
reasoningEngines:in the Order Status Agent’s URN:urn:agent:projects-909399354423:projects:909399354423:locations:us-central1:aiplatform:reasoningEngines:7390548000881246208.To find this ID, go to the
ac-order-status-agentservice in Agent Registry.AGENT_SCOPEThe scope requested on the delegated A2A token:
order-status:invoke. The gateway service extension validates this scope before generating the outbound token for the Order Status Agent.GATEWAY_AUDIENCEThe audience the agent requests during token exchange to authorize access to the Agent Gateway:
ac-google-cloud-agent-gateway.The agent doesn’t target the
order-status-agentaudience directly. Instead, it exchanges its token for this intermediate audience. The gateway service extension then intercepts the outbound request and performs the token exchange to the Order Status Agent. This value must exactly match theAGENT_GATEWAY_AUDIENCEvalue configured in the gateway service extension.
-
-
In the
pingone/agent-chaining/services/support-agentdirectory, run the following command:make deployThe
deploy.pyscript provisions the Reasoning Engine usingidentity_type = AGENT_IDENTITY. The script also binds the engine to the gateway and grants it theroles/iap.egressorrole on Agent Registry, authorizing the agent to securely reach all registered downstream endpoints.
Deploy the Agent Bridge
The Agent Bridge acts as the secure integration layer between the Chat UI and the Support Agent. This server-side bridge mediates the connection between the browser, which holds only a PingOne identity, and the agent running on the Google Cloud Agent Runtime. When it receives a chat request, the bridge validates the user’s PingOne token against the PingOne JSON Web Key Set (JWKS), verifying the signature, issuer, support-agent audience, and sub claim. The bridge then resolves the agent session and stores the token in the session state for the Support Agent to consume.
Deploy the Agent Bridge to Cloud Run
Build the Agent Bridge with configured environment variables and deploy it as a Google Cloud Run service.
-
Set environment variables for the Agent Bridge:
-
In the cloned repository, go to the
pingone/agent-chaining/services/agent-bridgedirectory. -
Make a copy of the
.env.samplefile and name it.env:cp .env.sample .env -
Set environment variables in the
.envfile:Variable Value GC_REGIONYour Google Cloud Platform region. For example:
us-central1.GC_CLOUD_RUN_SERVICE_NAMEThe Cloud Run service name:
ac-agent-bridge.IDP_ISSUERThe PingOne issuer URL:
https://auth.pingone.<region>/<env-id>/as.To find this endpoint, go to the AC Support Agent in PingOne. Copy the Issuer ID under Connection Details on the Overview tab.
The Chat UI Cloud Run URL. For example:
https://ac-chat-ui-<project-id>.<region>.run.app.This is a placeholder. After you deploy the Chat UI in a later task, update this value with the actual URL, then redeploy the Agent Bridge.
IDP_REQUIRED_AUDIENCEThe expected audience for the browser’s PKCE sign-on token:
support-agent.This is the Support Agent’s PingOne resource audience. The Agent Bridge validates the token against this audience before storing it in session state for the Support Agent to consume.
AGENT_ENGINE_IDThe Reasoning Engine’s identifier for the Support Agent. In this example, the ID follows
reasoningEngines:in the Support Agent’s URN:urn:agent:projects-909399354423:projects:909399354423:locations:us-central1:aiplatform:reasoningEngines:5246834578252890112.To find this ID, go to the
ac_support-agentservice in Agent Registry.The Reasoning Engine ID changes each time you redeploy the Support Agent. If you redeploy the agent, update this environment variable and redeploy the Agent Bridge.
-
-
In the
pingone/agent-chaining/services/agent-bridgedirectory, run the following command:make deployThis builds the Docker image, pushes it to Google Container Registry, and deploys it to Cloud Run.
Deploy the Chat UI
The Chat UI is a React and Vite single-page application (SPA) that serves as the frontend interface for users. It handles user authentication directly against PingOne using an OAuth 2.0 Authorization Code grant with PKCE. After a user authenticates, the application routes chat requests and the resulting sign-on token to the Support Agent through the Agent Bridge.
Create the Chat UI application in PingOne
Create a SPA in PingOne that represents the Chat UI. This application manages initial user authentication using PKCE. It acquires the user’s baseline sign-on token and passes it to the Agent Bridge, which uses the token to initialize the downstream delegation chain.
-
In the PingOne admin console, go to Applications > Applications.
-
Click the icon and create the application profile:
-
Name the application
Agent Chaining Chat UI. -
For the Application Type, click Single-Page.
-
Click Save.
-
-
To enable the application, click the toggle next to the application name in the details panel.
-
On the Configuration tab, click :
-
Make sure Authorization Code with S256_REQUIRED is the Grant Type.
-
In the Redirect URIs and Signoff URLs fields, enter the Chat UI URL from Cloud Run. For example:
https://ac-chat-ui-<project-id>.<region>.run.app.These are placeholders. After you deploy the Chat UI in a later task, update these values with the actual URL.
-
-
Click Save.
-
On the Resources tab, click , then select scopes:
-
email
-
openid (selected by default)
-
profile
-
support-agent:invoke scope on the AC Support Agent resource (at the bottom of the scopes list)
-
-
Click Save.
Deploy the Chat UI to Cloud Run
Configure environment variables and deploy the Chat UI to Cloud Run. The deployment process compiles the Vite application, packages the static web assets into an NGINX Docker image, and deploys the container to connect to the Agent Bridge.
-
Set environment variables for the Chat UI:
-
In the cloned repository, go to the
pingone/agent-chaining/services/chat-uidirectory. -
Make a copy of the
.env.samplefile and name it.env:cp .env.sample .env -
Set environment variables in the
.envfile:Variable Value GC_REGIONYour Google Cloud Platform region. For example:
us-central1.GC_CLOUD_RUN_SERVICE_NAMEThe Chat UI’s Cloud Run service name:
ac-chat-ui.VITE_IDP_ISSUERThe PingOne issuer URL:
https://auth.pingone.<region>/<env-id>/as.To find this endpoint, go to the Agent Chaining Chat UI application in PingOne. Copy the Issuer ID under Connection Details on the Overview tab.
VITE_CLIENT_IDThe Agent Chaining Chat UI application’s Client ID. This is located above Connection Details on the Overview tab.
The Chat UI Cloud Run URL:
https://ac-chat-ui-<project-id>.<region>.run.app.After you deploy the Chat UI to Cloud Run, update this value with the actual URL. To find the URL, go to Cloud Run > Services and click the ac-chat-ui service. Copy the URL at the top of the page.
This redirect URL must exactly match the Redirect URIs and Signoff URLs configured in the Chat UI application in PingOne.
VITE_AGENT_BRIDGE_URLYour Agent Bridge Cloud Run URL. For example:
https://ac-agent-chain-bridge-<project-id>.<region>.run.app.To find this URL, go to Cloud Run > Services and click the ac-agent-bridge service. Copy the URL at the top of the page.
VITE_SCOPESThe OAuth 2.0 scopes the Chat UI requests from PingOne during the user authentication flow:
openid profile email support-agent:invoke.This includes standard OpenID Connect scopes (such as
openidandprofile) along with the specific scope required to authorize the request to the Support Agent (support-agent:invoke).
-
-
In the
pingone/agent-chaining/services/chat-uidirectory, run the following command:make deployThis builds the Vite app, packages it in an NGINX Docker image, and deploys it to Cloud Run.
Vite statically embeds all
VITE_*environment variables (such asVITE_SCOPES) directly into the JavaScript bundle during the build phase. Updating variables on a running Cloud Run container has no effect. You must runmake deployto rebuild the application and apply your changes.Docker can silently reuse a cached build layer even after you modify your local
.envfile. If a variable change doesn’t appear in the deployed application (which you can verify by checking if the servedindex-*.jsfilename remains identical to the previous build), force a clean build using the--no-cacheflag. Always rule out a stale Docker cache before troubleshooting your PingOne or backend configurations. -
Complete the Chat UI’s
CORS_ORIGINplaceholder in the Agent Bridge’s.envfile, then redeploy the Agent Bridge. -
Complete the Chat UI’s
VITE_REDIRECT_URIplaceholder in the Chat UI’s.envfile, then redeploy the Chat UI. -
In the Chat UI application in PingOne, enter the deployed
ac-chat-uiservice’s Cloud Run URL in the Redirect URIs and Signoff URLs placeholders.This ensures that the Chat UI can successfully redirect users back to the application after authentication.
Validation
To validate your configuration, sign on to the Chat UI as a PingOne user belonging to the support_team group and query the status of an order. This initiates a request that the Support Agent delegates to the Order Status Agent, which calls the Order Status MCP Server to retrieve the order status. Because the delegation chain is recorded at every stage of the interaction, you can verify that the correct tokens are exchanged and validated.
-
Go to the Chat UI URL (
https://ac-chat-ui-<project-id>.<region>.run.app) and click Sign In. -
Authenticate as a PingOne user assigned to the
support_teamgroup. -
Ask the agent:
What is the status of order ORD-123?The agent should reply with the correct order status (for example,
ORD-123returns as shipped, andORD-456returns as processing).
You can observe the full delegation sequence by monitoring the Cloud Run logs for the service extension and the Order Status MCP Server, along with the Reasoning Engine logs for the Order Status Agent.
While the chat runs, the logs should display the following progression:
# service extension (A2A hop): the Support Agent's delegated token is validated
# against the shared gateway audience, reminted for the Order Status Agent, and
# injected alongside the Google credential the A2A endpoint's IAM check requires.
[ExtSvc] onHeaders authority="us-central1-aiplatform.mtls.googleapis.com" path="<redacted>/reasoningEngines/<order-status-agent-id>/a2a/message:send" matched=true
[ExtSvc] delegated token minted target=A2A ttl=59m30s
[ExtSvc] validated delegated token — sub=<user-sub> aud=ac-google-cloud-agent-gateway scope="order-status:invoke"
[ExtSvc] injecting Google credential + reminted token (aud=order-status-agent scope=order-status:invoke) for A2A

# service extension: {p1-paz} is consulted on every governed action
# (A2A message:send and MCP tools/call alike).
[ExtSvc] authorize user=<user-sub> action=get_order_status hour=10
[ExtSvc] {p1-paz} PERMIT user=<user-sub>
[ExtSvc] PERMIT target=A2A action=get_order_status order=ORD-123 (authz=pingone-authorize)

# Order Status Agent: the gateway-reminted A2A token is validated independently
# (signature, issuer, audience, and scope) before use. The log shows who the call
# is for (sub, the user throughout), which audience it was minted for (aud),
# who acted for it (act, the delegation chain so far), and the granted scope.
[OrderStatusAgent] Delegated token verified — sub=<user-sub> aud=['order-status-agent'] act=<ext-svc-client-id> -> <support-agent-client-id> scope="order-status:invoke"

# Order Status Agent: its own exchange mints the MCP-scoped token, then the
# MCP call runs only after the PERMIT above.
[OrderStatusAgent] get_order_status start order_id=ORD-123
[OrderStatusAgent] exchanged for MCP token (aud=order-status-mcp-server), calling MCP server order_id=ORD-123

# service extension (MCP hop): the Order Status Agent's token is validated and
# reminted for the MCP server; Authorization now carries the PingOne token
# directly (no Google credential needed on this hop).
[ExtSvc] onHeaders authority="<order-status-mcp-server-url>" path="/mcp" matched=true
[ExtSvc] delegated token minted target=MCP ttl=59m30s
[ExtSvc] validated delegated token — sub=<user-sub> aud=ac-google-cloud-agent-gateway scope="order:read"
[ExtSvc] injecting reminted token (aud=order-status-mcp-server scope=order:read) for MCP
[ExtSvc] authorize user=<user-sub> action=get_order_status hour=10
[ExtSvc] {p1-paz} PERMIT user=<user-sub>
[ExtSvc] PERMIT target=MCP action=get_order_status order=ORD-123 (authz=pingone-authorize)

# Order Status MCP server: every request's token is verified (signature,
# issuer, audience, and scope) before handling. The log shows who the call is
# for (sub, the user throughout), which audience it was minted for (aud), who
# acted for it (act.sub — the full chain: extension -> Order Status Agent ->
# extension -> Support Agent, the delegation).
[OrderStatusMCP] Token verified — sub=<user-sub> aud=[order-status-mcp-server] act.sub=<ext-svc-client-id> -> <order-status-agent-client-id> -> <ext-svc-client-id> -> <support-agent-client-id> scope="order:read"

# Order Status MCP server: the lookup itself.
[OrderStatusMCP] tool=get_order_status — caller=<user-sub> order=ORD-123 status=shipped
Outside the governed execution paths, the service extension also logs the Reasoning Engine’s internal Agent Runtime session calls (matched=false). These internal calls pass through untouched. Only the matched=true lines above represent governed interactions. If PingOne Authorize issues a deny decision (for example, if the request occurs outside business hours or the user isn’t on the support team), the logs surface an [ExtSvc] DENY target=… entry followed by an immediate 403 Forbidden error, and the agent notifies the user that the request was denied.
Troubleshooting
If you encounter issues while deploying or testing the A2A chain, use the following information to resolve common problems:
- Chat UI authentication fails
-
Verify that the Agent Chaining Chat UI application in PingOne is configured with the Authorization Code grant type with PKCE. Additionally, check that the configured redirect URI exactly matches the URL of your deployed Cloud Run service.
- Chat UI configuration changes aren’t applied after deployment
-
If you update a
VITE_*environment variable (such asVITE_SCOPES) but the deployed UI doesn’t reflect the change, the Docker build cache probably reused a stale compilation layer. Rebuild and deploy the application using the--no-cacheflag to force Vite to statically embed the new variables in the JavaScript bundle. - Support Agent doesn’t receive the user token
-
Verify that the Agent Bridge is correctly deployed to Cloud Run and that the Chat UI is successfully sending the token to the bridge payload during the initial chat request.
- Requests are blocked before they reach the service extension
-
If the Agent Gateway returns a 403 Forbidden error or logs a
DENIEDmessage with noagentRegistryResource, the request is failing Google Cloud’s IAP egress check.-
Make sure the Reasoning Engine identity has the
roles/iap.egressorrole applied. -
Verify that the downstream URL registered in Agent Registry exactly matches the host URL the agent is configured to call. IAP resolves egress destinations by host name, and a mismatch causes an immediate denial.
-
- Order Status Agent or MCP server doesn’t receive the delegated token
-
Confirm that the Agent Gateway Service Extension is correctly deployed and attached to the Agent Gateway. Check the service extension logs in Cloud Run to verify that it’s successfully intercepting the request and performing the RFC 8693 token exchange for the target audience.
If the Order Status MCP Server fails to receive the delegated token, check that the Agent Gateway Service Extension is correctly reminting the token for the MCP server and that the MCP server is correctly validating the token.
- Token validation or token exchange fails
-
Verify that your PingOne resources are configured with the correct custom attributes.
-
Ensure the
may_actclaims are set to the client ID of the next permitted actor in the delegation chain. -
If a token exchange fails with a 400 error during a
client_credentialsgrant, verify that the Required checkbox is cleared for thesubattribute on the target PingOne resource.
-
- PingOne Authorize policies aren’t enforced
-
Make sure the PingOne Authorize decision endpoint URL is correctly configured in your service extension environment variables. In PingOne Authorize Version History, verify that your policies are published to the correct version.
What’s next
A2A delegation is a powerful pattern for enabling secure, governed interactions between autonomous agents. Consider extending this architecture to support additional agents, tools, and services in your environment.
|
When you’re finished working with the A2A use case, you can clean up the resources you deployed in this environment. From the |