Getting Started
|
The AIC Remote MCP Server is currently available in Rapid (Sandbox) environments only. Support for Development, UAT, Staging, and Production environments is rolling out over the coming weeks. |
To enable the AIC Remote MCP Server for your PingOne Advanced Identity Cloud tenant, follow the enablement procedure in Overview.
Connect a supported AI client to the AIC Remote MCP Server.
Prerequisites
Before you configure a client, make sure you have:
-
A PingOne Advanced Identity Cloud tenant with the AIC Remote MCP Server enabled.
-
An MCP-compatible client. This page provides step-by-step configuration for Claude Code, VS Code with GitHub Copilot, OpenAI Codex CLI, and Cursor. If your client isn’t listed, use the General JSON tab below and adapt it.
Server details
Use these values in every client configuration below:
| Field | Value |
|---|---|
Server URL |
|
OAuth client ID |
|
|
Only the default AM FQDN ( |
|
Some MCP clients let you specify the OAuth redirect URI instead of using a fixed value. If your client provides this option, use a loopback URI such as |
|
Clients that support RFC 9728 Protected Resource Metadata discover the authorization server and required scopes automatically. Clients that don’t must list them explicitly. Refer to Scopes. |
Configure your MCP client
-
Claude Code (CLI)
-
VS Code
-
Codex (OpenAI)
-
Cursor
-
General JSON
Where to apply the configuration
Run the MCP add command in your terminal. Claude Code auto-discovers the authorization server and required scopes.
Configuration steps
-
Open a terminal window.
-
Run the command to add the AIC Remote MCP Server.
-
Run
claude mcp listto confirm that the server appears in the list. -
On first tool use, complete the OAuth sign-on flow in the browser window that opens.
Example command
claude mcp add \
  --transport http \
  --client-id AICRemoteMCPClient \
  --callback-port 3000 \
  aic-mcp-server \
  https://openam-<your-tenant>.forgeblocks.com/mcp
Example configuration
Alternatively, add an entry to
.mcp.json(project) or~/.claude.json:{ "mcpServers": { "aic-remote-mcp": { "type": "http", "url": "https://openam-<your-tenant>.forgeblocks.com/mcp", "oauth": { "clientId": "AICRemoteMCPClient", "callbackPort": 3000 } } } }Claude Desktop uses the same JSON shape in
claude_desktop_config.json.Learn more in Claude Code MCP documentation.
Where to apply the configuration
Open the Command Palette and select MCP: Open User Configuration. Update the mcp.json file.
Configuration steps
-
Open VS Code.
-
Open the Command Palette.
-
Run MCP: Add Server.
-
Select HTTP as the transport type.
-
When prompted for the server URL, enter:
https://openam-<your-tenant>.forgeblocks.com/mcp -
Set the Server ID or Name to your preferred name, for example,
aic-remote-mcp. -
Choose whether to store the configuration at the global or workspace level.
-
Open the Command Palette again and run MCP: List Servers.
-
If prompted for the OAuth client ID, enter
AICRemoteMCPClient. -
If prompted for a client secret, leave the field empty and press Enter to continue.
-
Complete the browser authentication flow when prompted. Scopes are discovered automatically.
Example configuration
{
  "servers": {
    "aic-mcp-server": {
      "url": "https://openam-<your-tenant>.forgeblocks.com/mcp",
      "type": "http"
    }
  }
}
Learn more in Microsoft’s MCP documentation.
Where to apply the configuration
Run the MCP add command in your terminal. Alternatively, add the server to your Codex MCP configuration file.
|
Codex might not correctly discover the scopes offered by the server and can send incorrect scopes during sign-on. Request scopes explicitly when you sign on. |
Configuration steps
-
Open a terminal window.
-
Run the command to add the AIC Remote MCP Server.
-
If you manage MCP servers through a config file, add the same server definition there.
-
Run
codex mcp login aic-remote-mcp --scopes aic:mcp:access,aic:mcp:identities.readto complete the OAuth sign-on flow. Request the scopes your use case requires; this example requests the scopes needed to list managed object types. Refer to Scopes for other scope combinations. -
If Codex does not request the correct scopes automatically, run
codex mcp login aic-remote-mcp --scopes {add MCP scopes}. Replace{add MCP scopes}with a comma-separated list of the scopes your use case requires. -
In an interactive Codex session, enter
/mcpto list the configured MCP tools. Enter/mcp verboseto view more details.Example command
codex mcp add aic-remote-mcp \
  --url https://openam-<your-tenant>.forgeblocks.com/mcp \
  --oauth-client-id AICRemoteMCPClient

codex mcp login aic-remote-mcp \
  --scopes aic:mcp:access,aic:mcp:identities.read
Example configuration file
Place the following in
~/.codex/config.toml:[mcp_servers.aic-remote-mcp] url = "https://openam-<your-tenant>.forgeblocks.com/mcp" auth = "oauth" [mcp_servers.aic-remote-mcp.oauth] client_id = "AICRemoteMCPClient" scopes = ["aic:mcp:access", "aic:mcp:identities.read"]Learn more in Codex MCP documentation.
Where to apply the configuration
In Cursor, configure the server through Settings > Tools & MCP.
Configuration steps
-
Open Cursor.
-
Go to Cursor Customize > MCPs.
-
Click Add New MCP Server.
-
Edit the config file with the example below.
-
Save the file.
-
Cursor discovers scopes automatically. If you use the Cursor CLI, run
cursor-agent mcp login aic-remote-mcpto trigger the OAuth flow.Example configuration file
Edit
~/.cursor/mcp.json(global) or.cursor/mcp.json(workspace):{ "mcpServers": { "aic-remote-mcp": { "url": "https://openam-<your-tenant>.forgeblocks.com/mcp", "auth": { "CLIENT_ID": "AICRemoteMCPClient" } } } }Learn more in Cursor’s MCP documentation.
Where to apply the configuration
Add the server definition to your MCP client’s configuration file. Refer to your client’s MCP documentation for the exact file location and schema.
Configuration steps
-
Open your client’s MCP configuration file.
-
Add the AIC Remote MCP Server using the shape below. Some clients (VS Code, for example) use
serversas the top-level key instead ofmcpServers. -
For clients that don’t auto-discover scopes, list the scopes your use case requires. Refer to Scopes.
-
Save the file and restart the client.
-
Complete the OAuth sign-on flow when prompted.
Example configuration
{
  "mcpServers": {
    "aic-remote-mcp": {
      "type": "http",
      "url": "https://openam-<your-tenant>.forgeblocks.com/mcp",
      "oauth": {
        "clientId": "AICRemoteMCPClient"
      }
    }
  }
}
Validation
After configuring any client:
-
Confirm that the client shows the AIC Remote MCP Server as connected or available.
-
Test the connection with a simple prompt, such as "List the managed object types in my PingOne Advanced Identity Cloud tenant".
-
Confirm that the OAuth redirect URI configured for your client is allowed by the tenant’s Content Security Policy (CSP), if CSP is enforced. See Content Security Policy (CSP).
The first tool invocation opens a browser for the OAuth sign-on flow. After you authenticate, the server returns the list of managed object types in your tenant. A successful response confirms that the MCP client is authorized and the connection is working.
|
You can add MCP configurations for multiple PingOne Advanced Identity Cloud tenants to the same client. Use a different server name for each tenant in the MCP client configuration. |
Content Security Policy (CSP)
If your PingOne Advanced Identity Cloud tenant enforces a Content Security Policy (CSP), the form-action directive must include the OAuth redirect URI used by your MCP client. Without this entry, the browser blocks the OAuth redirect and sign-on fails.
For each client you configured above, identify the redirect URI it uses for OAuth callbacks (this varies by client and by how you’ve configured it) and add that URI as a source under the form-action directive in your tenant’s CSP configuration. The example below shows http://localhost:3000 added, which is the default callback for Claude Code. Your value differs based on your MCP client and its configuration.
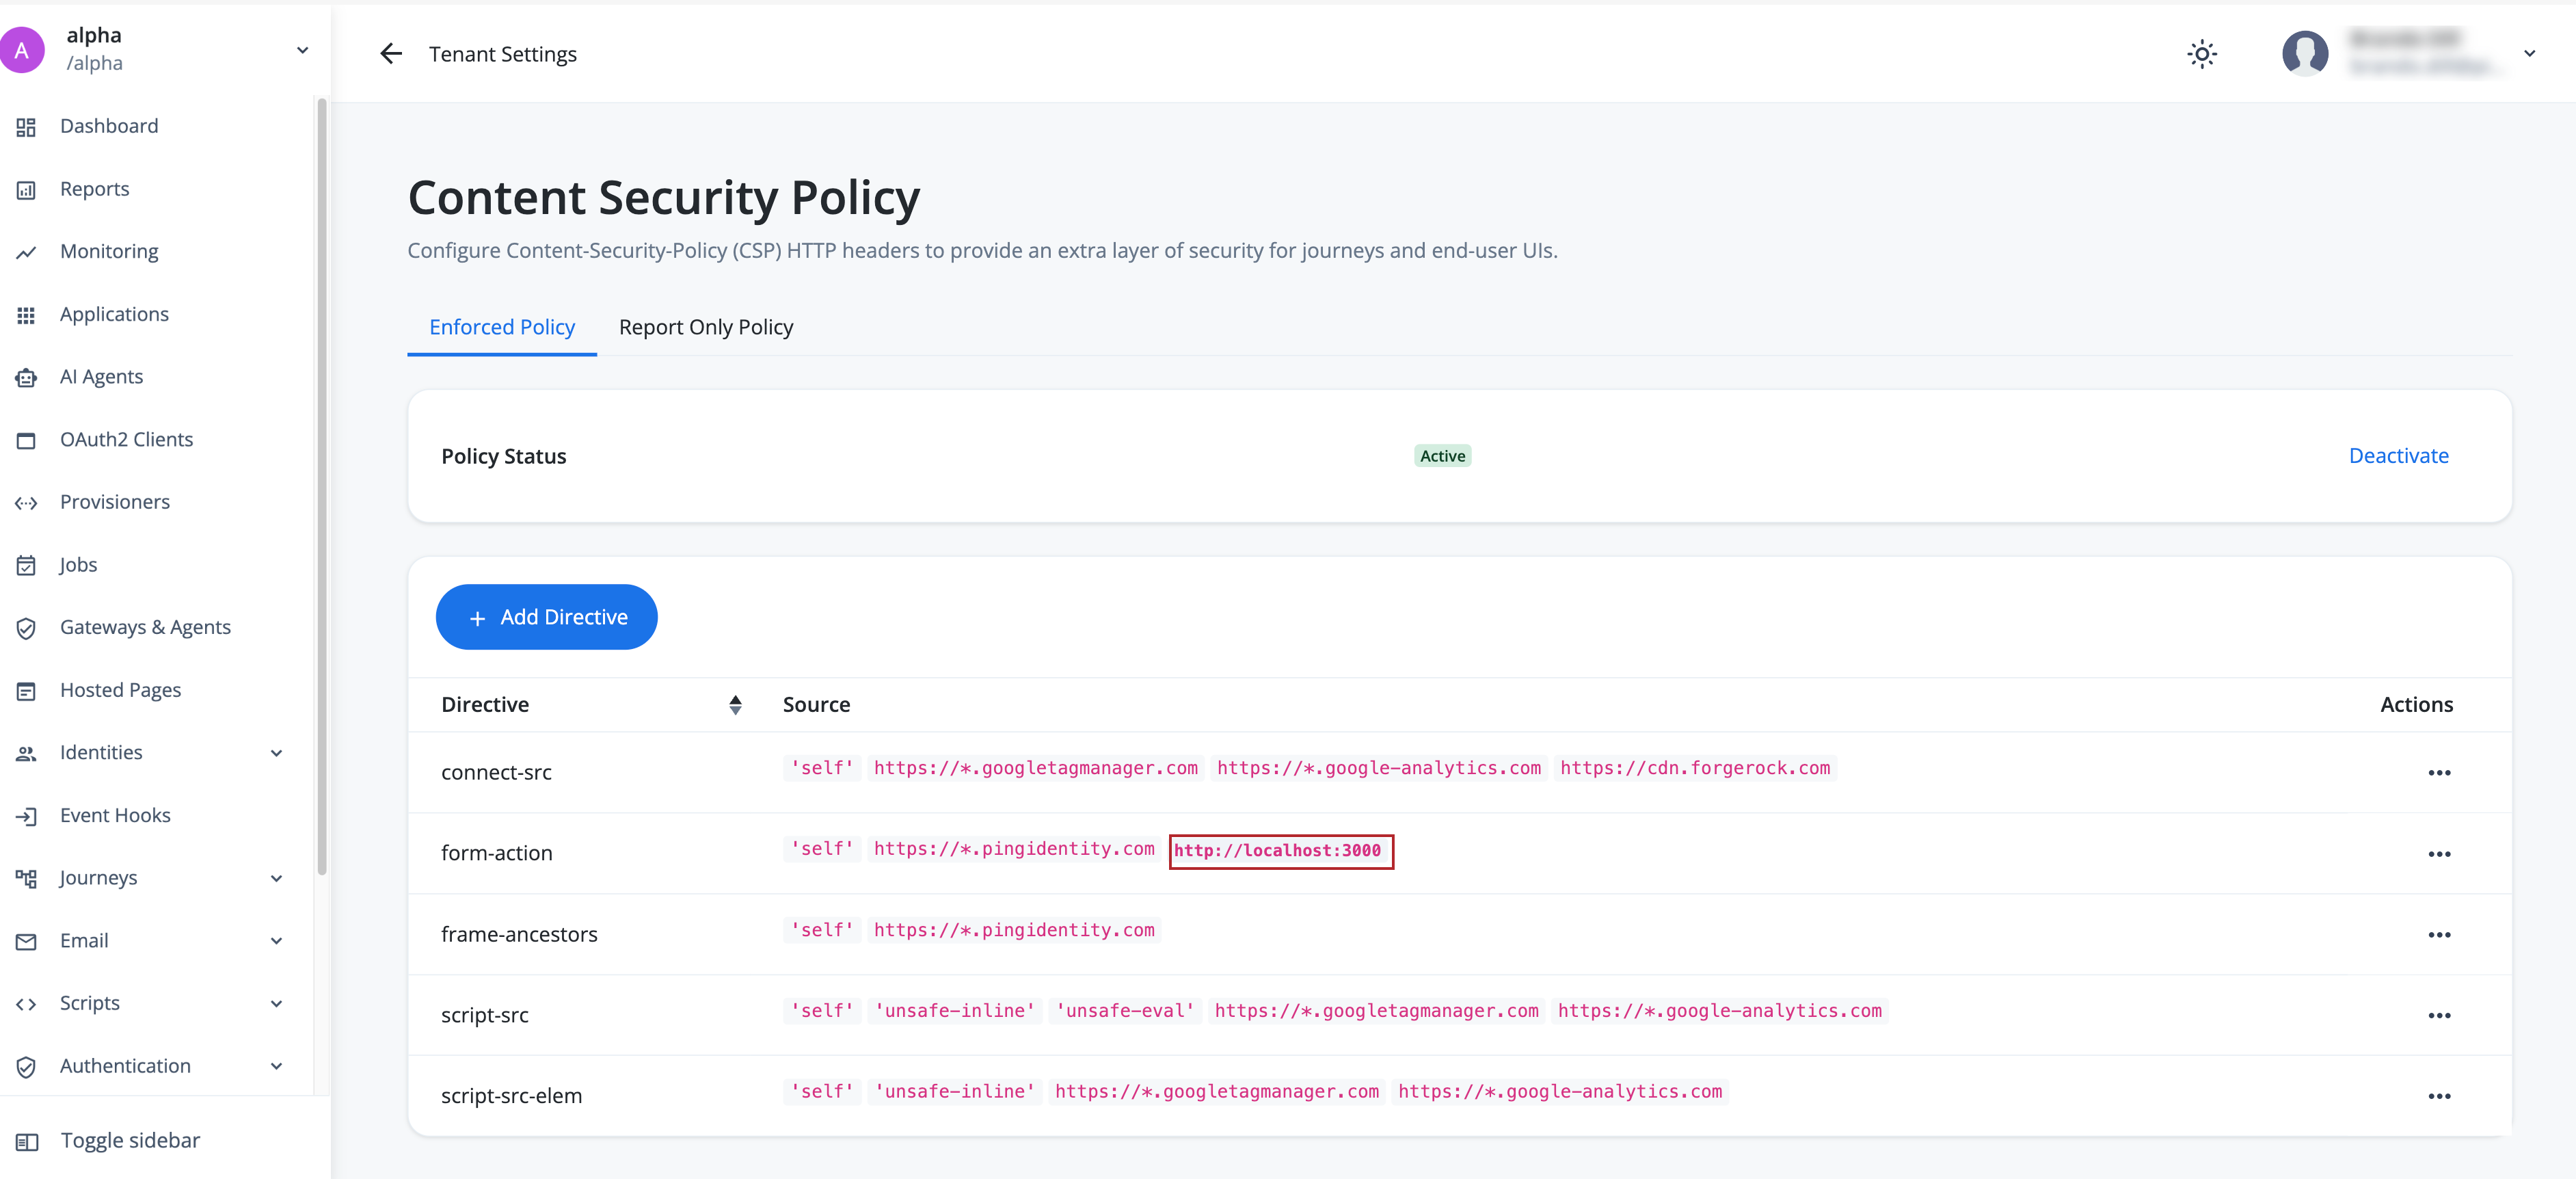
Refer to the Advanced Identity Cloud documentation on managing Content Security Policy directives for step-by-step instructions.