Understanding Virtual Properties
Learn how to configure Virtual Properties and Relationship-Derived Virtual Properties (RDVPs) in PingIDM and PingOne Advanced Identity Cloud.

This post was originally published on Gwiz Kid.
Introduction
PingOne Advanced Identity Cloud (AIC) and PingIDM (IDM) contain an impressive range of flexible identity configuration schema that allow you to define complex relationships and dynamic concepts given the data inside your directory. And if that sentence sounded complicated, it’s because it is: relationships are hard enough in the real world, let alone when configuring it in an enterprise identity management system!
This Guide will walk you through the concepts of Virtual Properties and Relationship-Derived Virtual Properties (otherwise known as RDVPs). It’s expected that you are comfortable with navigating the identity management console in PingIDM or AIC and have a reasonable understanding of managing properties within that console. While this Guide covers RDVPs, it is not a primer on Relationships in either platform.
This Guide is broken down into the following sections:
By the end of this Guide you will have gained an understanding on where and when to use each virtual property type as well as how to configure those properties. You will also have configured a set of simple examples illustrating the capabilities of those properties.
Virtual Properties
A Virtual Property is a Property that can dynamically calculate its own data. Rather than having a separate sub-process generate and store a value, a Virtual Property handles the dirty work for you directly on the property itself.
A great example of when a Virtual Property can be used is a user’s full name. We could have a function in our client app(s) that pulls in the user’s Given Name and Surname and then merges them together, but we might run into consistency issues on how that name is displayed. If we are provisioning users to an application, we’d have to repeat our work again to ensure that our target app gets the same value. Rather, with a Virtual Property we can define a “Full Name” value that ensures that the name is consistent each and every time it needs to be referenced.
But it’s more than just combining values together. Virtual Properties have access to IDM’s scripting engine, meaning that you can return whatever values you deem necessary to be retrieved alongside your object - even if the value doesn’t live on that object! As an example, let’s say you’re a retailer that uses a third-party service to calculate and store a user’s clothing sizes. Since that service is holding the sizing information, why not just reach out via API to pull in the user’s size dynamically? No need to create a polling schedule, no need to store that value both in your system and in theirs - the data is in one spot but can be returned in more than one type of request.
Creating a Virtual Property
We will walk through specific examples of virtual properties below, but the big thing you need to know when defining a Virtual Property is the Virtual Property Setting, Return by Default, and onRetrieve Scripting.
To make an element a Virtual Property, enable the “Virtual Property” option under the “Show Advanced Options” section on the property’s main page.
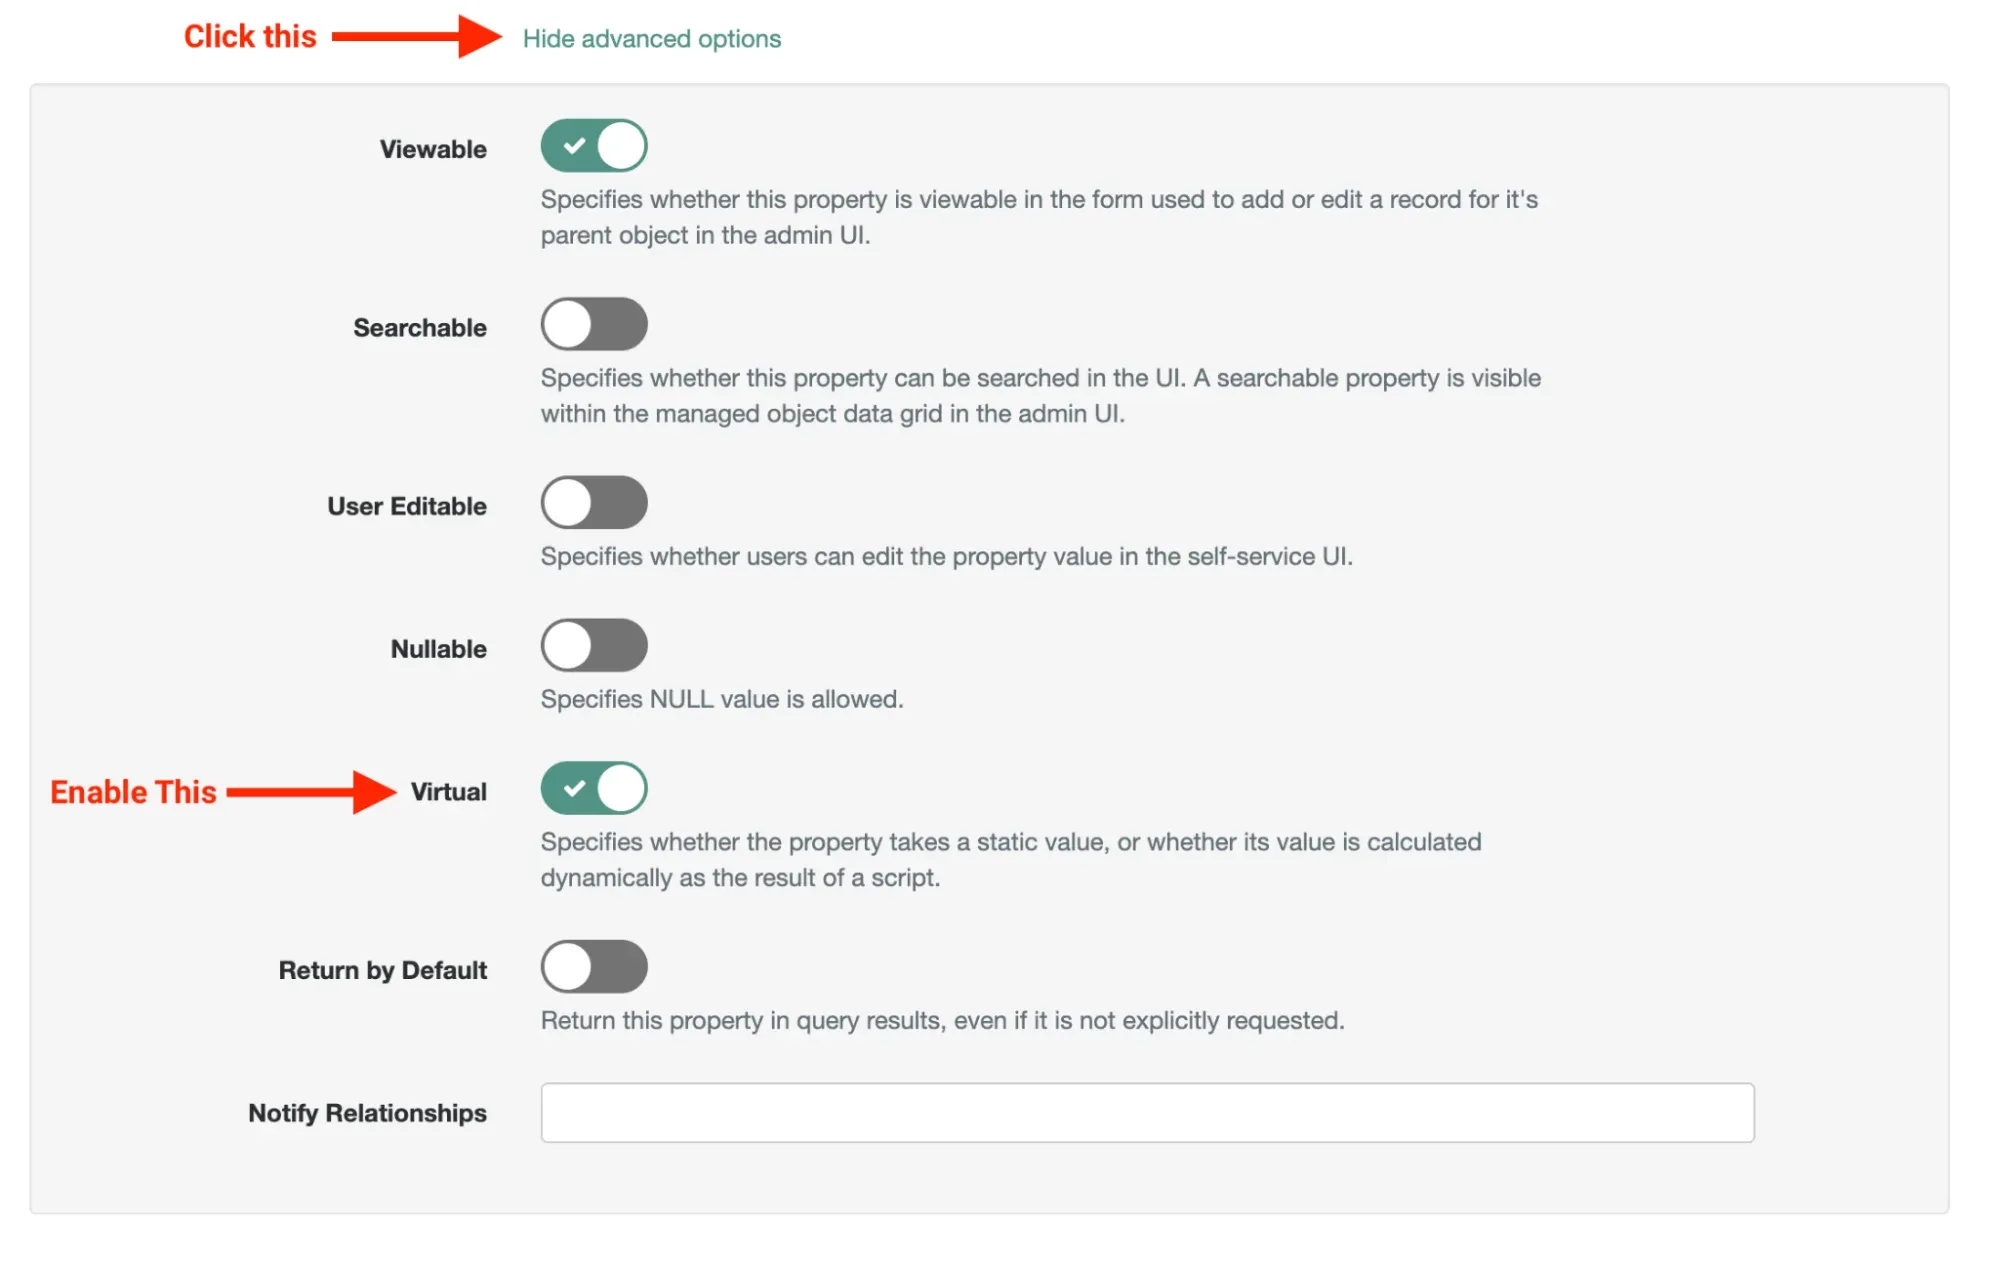 Creating a Virtual Property
Enabling this checkbox does three things:
- It informs IDM that this property is a virtual property and as a result cannot be modified directly by the user. Whether or not you enable “User Editable” in the advanced options will not change this behavior.
- It enables and displays the “Return by Default” checkbox, which lets you specify if this property should show up as a default field when querying the object (kind of like how the
_idproperty shows up in every query). For most cases, enable Return by Default. If you don’t, the virtual property won’t show up throughout your platform UI (which is expecting static values) or your application unless explicitly requested. - It enables and displays the “Query” tab, which lets you specify queries to interact with relationships and define Relationship-Derived Virtual Properties - more on that later.
Now that your property is defined as being a Virtual Property, to make it useful you’ll want to define an onRetrieve script that auto-calculates the dynamic data. The scripts for your property are located in the “Scripts” tab.
What Makes a Virtual Property a Virtual Property?
You’ve probably noticed that your properties have two more scripts available - onValidate and onStore. In fact, all three script types are available (including onRetrieve) whether or not you enabled this element to be a Virtual Property. What gives?
Virtual Properties in IDM are special in that they cannot be edited and can be returned by default. Regular properties, while able to be dynamically updated, can still be configured to be edited and have to be specified to be returned.
Virtual properties can also use onValidate and onStore scripts when defining their data. But what makes Virtual Properties interesting is that they can dynamically calculate data at time of retrieval WITHOUT having to store that information. By making a property virtual, you are indicating that this data will always be available and up to date when requested.
So as a recap: Virtual Properties give you a way to define a property that is calculated and returned at run-time and that your system recognizes will always be dynamically calculated. When creating a Virtual Property, you’re probably using the onRetrieve script because then you aren’t storing a value that could easily fall out of date.
Defining the onRetrieve Script
The onRetrieve script lets you return a value when requested. The returned value is not stored unless explicitly provided when updating the object.
PingIDM supports JavaScript and Groovy for scripting. However, since JavaScript is available in both AIC and PingIDM, our examples in this guide will stick with JavaScript only.
There are two main documents you should be referencing when working with scripts in IDM:
- Script Triggers & Variables: This page will tell you for each script type what default variables exist within the script itself.
- Script Functions: This page will define the types of functions that extend capabilities, such as encryption/decryption, interacting with identity resources, or performing REST calls.
The most important takeaways from those documents are found in the below sections.
IDM Scripting Variables
It’s easy to miss, but the documentation for onRetrieve actually exists in two parts of the Script Triggers page: the Managed Configuration Object and in the Property Object. In the case of a Virtual Property, we care about the Property Object details.
There are two variables in particular that you’ll likely deal with the most: object and property.
- The object variable is the object that is being requested. That means your Virtual Property can request, via object notation, other properties from your object to be used within the Virtual Property. Think, for example, referencing a user’s student ID from their profile to retrieve a list of library books they’ve checked out in an external library service.
- The property variable is the property you’re returning. The property variable is required in an onRetrieve script if you want to return data. To use, set
property =whatever variable/value you’ve created at the end of your script and you’re done.
The predefined variables are protected. If you create a variable with the same name your script won’t work as expected.
IDM Scripting Functions
There are a good number of script functions available to you, but the following in particular will likely be your go-tos:
openidm.query()
openidm.query queries resource objects along with a query filter. Resource objects can be managed objects or the underlying system configuration. There may be use cases in which you need to pull data that exists off of another resource based on data that you have on your existing object and the query function lets you get that data to be dynamically returned in your Virtual Property.
As an example, let’s say that you wanted a list of all of the child organizations that you are a member of (as a result of being a member of the parent organization). You could query the organizations managed object to get those IDs based on a property you have on your user.
var query = object.memberOfOrgIDs.map(orgID => `parentIDs eq '${orgID}'`).join(' or ');
var myChildOrgs = openidm.query("managed/alpha_organization", {"_queryFilter": query}).result;
openidm.action()
openidm.action performs HTTP actions on a particular resource. This could be an action on something in AIC, say sending an email template:
var emailParams = {
    "templateName" : "welcome",
    "to" : user.mail,
    "cc" : "ccUser1@example.com,ccUser2@example.com",
    "bcc" : "bigBoss@example.com",
    "object" : {
        "this": "value",
        "that": "another value"
    }
};
openidm.action("external/email", "sendTemplate",  emailParams);
But it could also be interacting with custom IDM endpoints:
openidm.action("endpoint/{yourEndpointName}", "yourEndpointAction", params);As well as interacting with external REST APIs:
var convertObjectToQueryParams = (object) => {
  return Object.keys(object)
    .map(key => encodeURIComponent(key) + '=' + encodeURIComponent(object[key]))
    .join('&');
};

var body = {
  "foo": "bar"
};

var params = {
  url: `https://my-endpoint-example.example`,
  method: 'POST',
  body: convertObjectToQueryParams(body),
  authenticate: {
    type: 'bearer',
    token: token
  }
};
var response = openidm.action('external/rest', 'call', params);
There are plenty of other use cases for openidm.action but the above will serve you well when working with Virtual Properties.
identityServer.getProperty()
This one is a bit sneaky because it’s most useful in AIC and doesn’t appear in the aforementioned documentation. identityServer.getProperty(esvName) lets you reference ESVs stored in Google Secrets Manager within your scripts. Just remember - your ESVs are referenced with dots and not dashes, so the ESV you created with the name esv-my-cool-esv would be referenced as identityServer.getProperty('esv.my.cool.esv').
As always with ESVs, be careful not to leak sensitive data in your scripting.
Now that we’ve gotten a sense of Virtual Properties, let’s make a couple examples and test them out!
Virtual Property Examples
If you’re using PingOne Advanced Identity Cloud (e.g. AIC), head to the Native IDM Console underneath Native Consoles → Identity Management. If you are using PingIDM, you’re already where you need to be.
In our example we will be updating our User object (in AIC, that’ll be called alpha_user) to return the “Full Name” attribute we discussed above. In the Managed Objects page (normally your homepage, but also under Configure → Managed Objects) click on your User object. The property editor for your user should appear along with all of the pre-defined properties that exist on that user.
Click the “+ Add a Property” button and add a new property with the name custom_fullName, the label “Full Name”, and the type String and then hit “Save”.
 Creating the Full Name Property
Click on your new property to edit it.
At this point, we are dealing with a standard String property. You can enter in a full name value and it’ll store that value. What we want is a property that dynamically updates based on the details of the givenName and sn of our user.
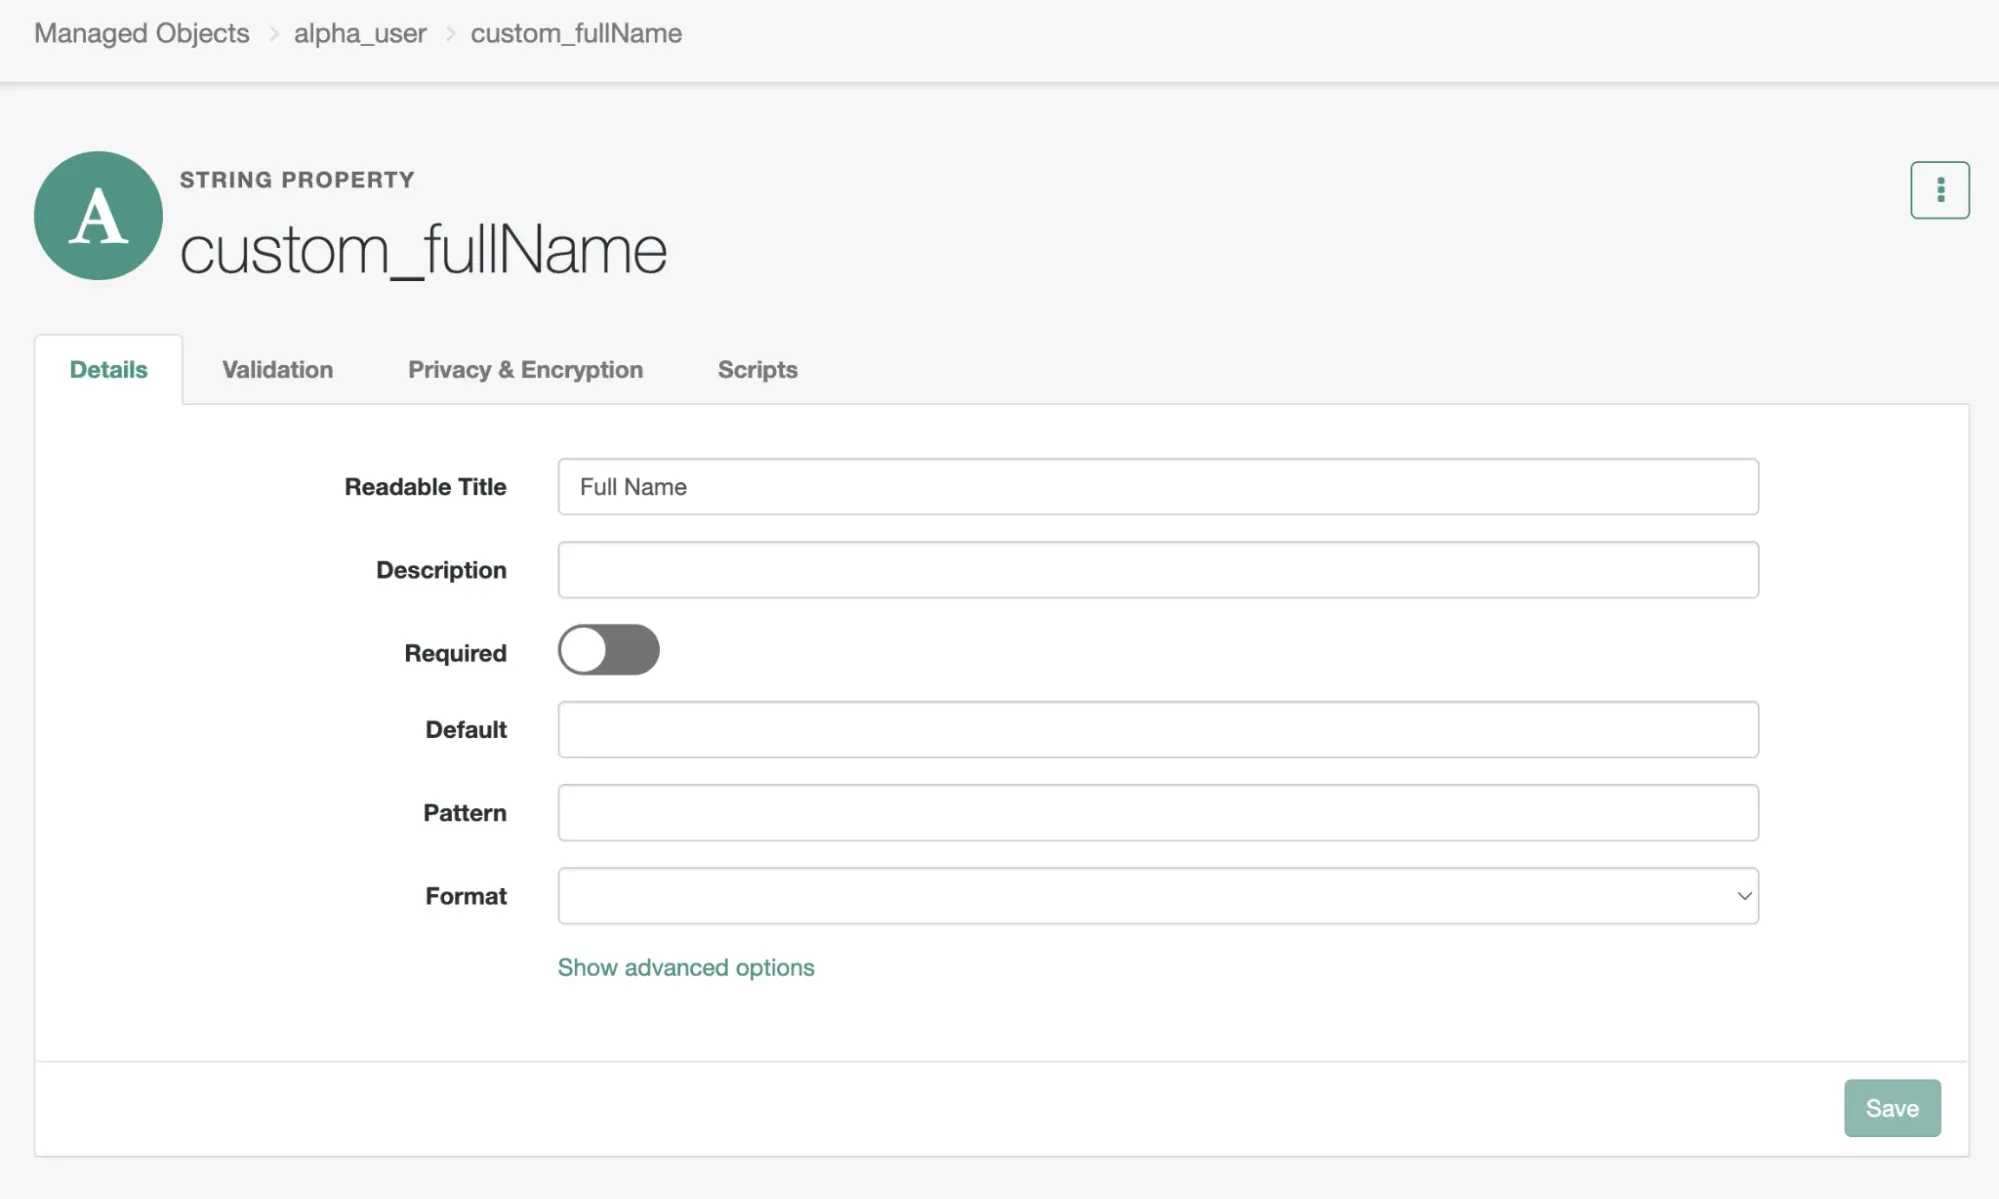 The Generic Full Name String Property
Click on “Show advanced options”, uncheck “User Editable”, and check “Virtual”. You’ll notice that an additional property, “Return by Default” appears. Check the “Return by Default” property if you want the full name to show up in UIs (like the end-user dashboard and the administrative UI), by default in API calls, or if you want this property to be fetched in provisioners - otherwise you may not have access to the result.
In our case we are going to check “Return by Default” since we will want to see the value in the UI.
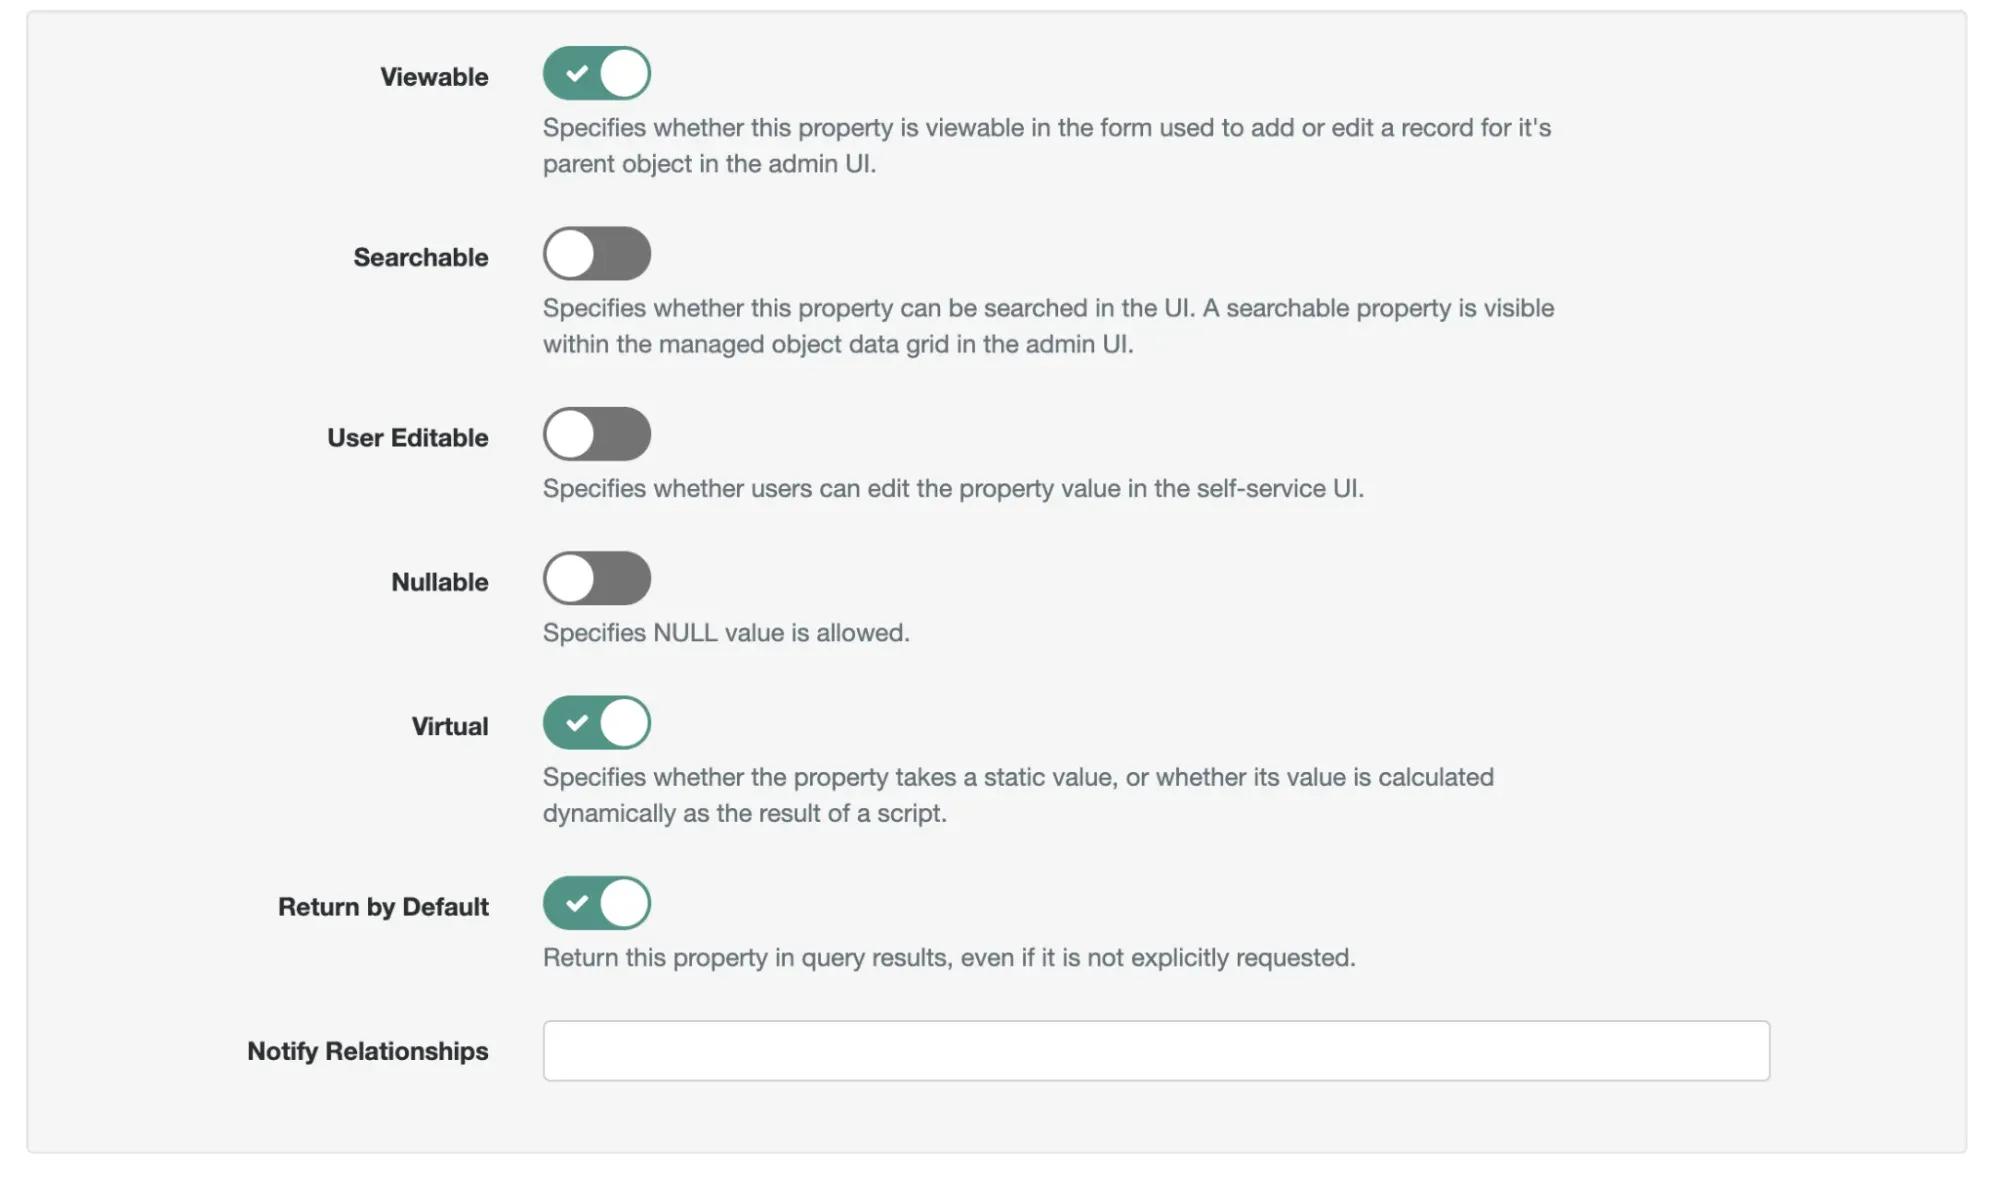 The Advanced Configuration
Save the changes. When you do, something interesting happens: A Query Configuration tab appears at the top of the property. We’ll get back to that later - right now, what we care about is the Scripts tab.
Let’s define the script that makes our Virtual Property tick.
Example: Manipulating Existing Properties
Click on the Scripts tab, select the onRetrieve script type and click “+ Add Script”. A Script Manager window will appear with the ability to select a script type, provide an inline script or a file, and pass variables into that script. If you’re using AIC, you’ll only have access to JavaScript and the Inline Script option (don’t worry, you can still pass variables too) - in PingIDM, you can pick and choose what you prefer.
Your inline script should look like this:
property = object.givenName + " " + object.sn;Hit Save.
Note: To set your property variable, you must put the property definition at the end of your script. Otherwise, the value will not be set. If you are setting property in more than one location in your script, you can alternatively end the script with just the value
property.
Create a user with a First and Last name and then take a look at their properties. You should see the concatenated First and Last name.
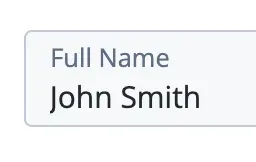 The Full Name Virtual Property
Now this script by itself isn’t particularly exciting. In fact, the cn property on the user already has this information. Why don’t we change this property to update the order of the First and Last name given the country they reside in, based on common ordering in those areas?
Updated your onRetrieve function to the following:
var givenFamilyNameOrderCountries = ["US", "ES", "AU", "CA", "GB"];
var familyGivenOrderCountries = ["FR", "JP", "CN", "IN"];

if (givenFamilyNameOrderCountries.includes(object.country)) {
    property = object.givenName + " " + object.sn;
} else if (familyGivenOrderCountries.includes(object.country)) {
    property = object.sn + " " + object.givenName;
} else {
    property = object.givenName + " " + object.sn;
}
On your user, change your country to US and then to IN. You’ll see that the order of your first and last name flips.
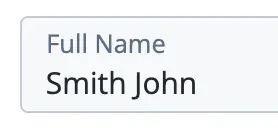 The Full Name Virtual Property, Surname First
Now, before any of you send me a strongly-worded email:
- This is an example. It’s not how you should be determining name order - ideally, other information like the user’s language preference and possibly a boolean on their profile could help determine the positioning of a person’s name.
- Yes, we have variables. But then you would have had to have typed each of those country codes one at a time into the variable array(s) you created. I just saved you 5 minutes of time and reduced your risk of carpal tunnel syndrome.
That all being said, onto a more interesting use case.
Example: Returning Data from External APIs
Now that we have the capability to get data based on attributes, let’s pass some of that data into an external REST API. Here’s where we really get into the good stuff Virtual Properties have to offer: if the data you need lives elsewhere, and you don’t really want that data inside your directory (AIC or PingDS or otherwise), Virtual Properties let you get that data when you need it without having to set up and perform any syncing operations. Your data is always up to date because it is asking for the data from the source.
A Note On Performance: Consider the implications of reaching out to an external API if you are making many read operations on your data. If the frequency as to which you’re getting this property far exceeds the frequency that data is updated, you should consider updating the property via a scheduled job or onStore trigger instead.
We’re going to update our virtual property to guess the country of the user based on their first name if their country code was not provided. Then, that country can be used in the same way as above to determine the user’s name order.
We’ll use the free nationalize.io API to do this. Update your onRetrieve script to the following:
var givenFamilyNameOrderCountries = ["US", "ES", "AU", "CA", "GB"];
var familyGivenOrderCountries = ["FR", "JP", "CN", "IN"];
var country = object.country;

if (country == null || country === "") {
    var params = {
        url: `https://api.nationalize.io/?name=${encodeURIComponent(object.givenName)}`,
        method: 'GET',
    };
    var response = openidm.action('external/rest', 'call', params);
    var sorted_countries = response.country.sort((a, b) => b.probability - a.probability)
    var filtered_countries = sorted_countries
        .filter(c => givenFamilyNameOrderCountries.includes(c.country_id) || familyGivenOrderCountries.includes(c.country_id));
    if (filtered_countries.length > 0) {
        country = filtered_countries[0].country_id;
    }
}

if (givenFamilyNameOrderCountries.includes(country)) {
    property = object.givenName + " " + object.sn;
} else if (familyGivenOrderCountries.includes(country)) {
    property = object.sn + " " + object.givenName;
} else {
    property = object.givenName + " " + object.sn;
}
Now, testing with common names from different countries, you should see the name order position accordingly. Feel free to test with the name combinations below to see for yourself - remembering to remove the Country code for the HTTP call to be made.
| Expected Order | Given Name | Surname |
|---|---|---|
| Surname, Given Name | Ashok | Kumar |
| Given Name, Surname | John | Doe |
Relationship-Derived Virtual Properties (RDVPs)
Virtual Properties can be updated either on time of retrieval or based on notifications received from a relationship tied to the managed object this property lives in. When we are updating the property based on information provided by the relationship, we are working with a Relationship-Derived Virtual Property, or RDVP.
A Relationship-Derived Virtual Property updates based on notifications from the Relationships linked to its Managed Object. An RDVP has access to content from the Object’s Relationships and can traverse the entire Relationship path to create a value composed from an aggregate of that traversal.
Let’s look at an example of when an RDVP might be useful - a management chain.
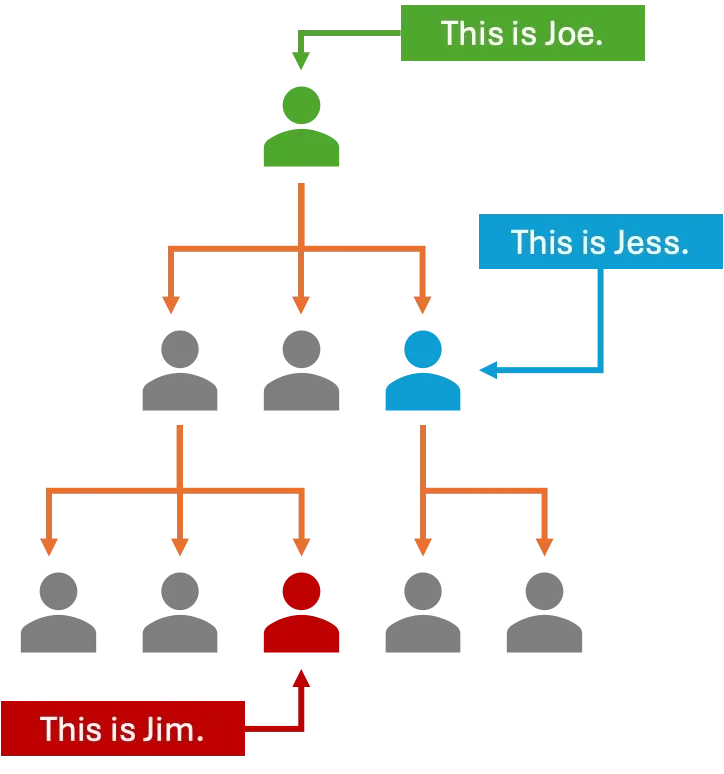 A Simple Management Diagram
In the diagram above, Joe is the CEO and the top of the management hierarchy. Jess is one of his direct reports, and Jim lives at the bottom of the hierarchy underneath another of Joe’s reports.
This hierarchy is defined by relationships - the linkages between each manager and their reports.
If you wanted to get a list of all of the Managers above an Employee, how would you go about it? Normally, it would likely be a series of queries that would look something like this:
- Get the Employee
- Find the Employee’s Manager
- Get the Manager
- Find the Manager’s Manager
- Get the Manager’s Manager
- Find the Manager’s Manager’s Manager
- …
- Manager X has no Manager, return
Think about this the other way, too. If I wanted to get all of the Employees under a Manager, and each Manager has more than one Employee, how many operations do I have to take? Now what if I had to perform this action every time I entered an application, or every time I pull data on a user? This is starting to sound a lot like one of those classic graph traversal interview questions!
The deeper or wider you go, with the more connections you have, the more operations you would normally have to take. This makes your code complex and significantly increases the number of queries you need to make to get the data you and your users need to be successful. RDVPs solve this problem.
RDVPs travel the Relationships for you and update a static result on the object directly at time of change from anywhere in the Relationship.
If we looked at the previous example, if I wanted to get a list of the Employee’s Managers, or a list of the Manager’s Employees, the data is on the User directly. If the Employee is promoted, or switches teams, and the managerial hierarchy changes, the data on the User updates automatically.
When to Use RDVPs
RDVPs update when the data updates in the relationship, anywhere in the relationship(s) you are getting the data from.
There’s a time and a place to use RDVPs as a result:
| If the data updates | …and you want to get that data | …then you should use |
|---|---|---|
| Frequently | Infrequently | A Virtual Property |
| Infrequently | Frequently | An RDVP |
RDVPs are triggered on relationship notifications and can trigger additional notifications as a result of them updating. If you’re not careful, these notifications can get rather noisy - one change could result in hundreds (if not hundreds of thousands) of changes cascading through your directory. The tradeoff is that you aren’t making that same calculation at time of retrieval - the likely point in which your enforcement point or authorization server is attempting to make a real-time decision based on that information.
RDVPs should only traverse a relationship tree in one direction. Cyclical RDVPs could result in cyclical updates that end in slowdown, or potentially takedown, of your entire system.
RDVPs are stored. They are only updated when the data they’re related to updates. If your relationship notifications do not inform the RDVP to change, they will not change. This is a good and a bad thing - it means you have a static representation of your relationship data, but it also means that representation is a snapshot of what the data was when the notification was triggered. A newly-configured RDVP won’t have any data in it until the linked relationship notifies it to be updated (i.e. a specific property in that relationship has updated).
Creating an RDVP
Remember that “Query” tab we talked about earlier that our Virtual Property enabled? That is specifically the editor for RDVPs, and is the secret sauce to making these properties work.
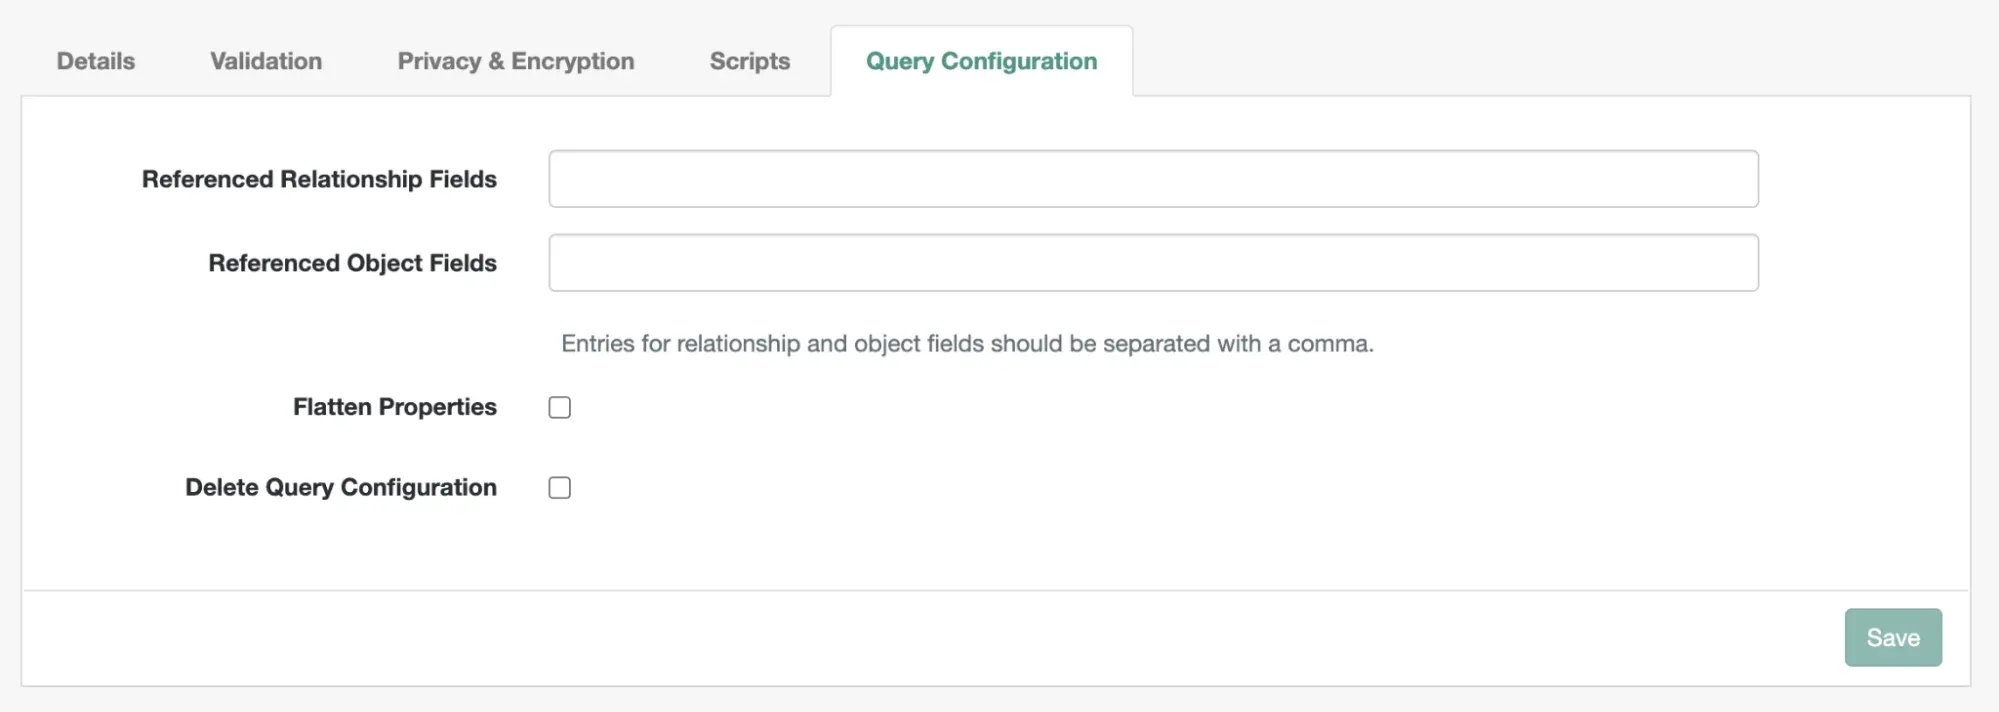 The RDVP Query Configuration Tab
Let’s walk through each of the fields in more detail:
Referenced Relationship Fields
The Referenced Relationship Fields define what relationships should be referenced to create this RDVP. Since you could be referencing more than one relationship these fields are defined as an array.
For instance, let’s say that you wanted to traverse the user’s manager relationship. To do so, your “referenced relationship fields” property would be ["manager"].
As a more complicated example, let’s say that you wanted to get a list of data aggregated from all of your managers and reports. Since you are now looking at both your manager and reports relationship, your array would look like [["manager"], ["reports"]].
More complex still, let’s say that you need to calculate information based on a relationship’s relationship. Perhaps you want an RDVP that gives me a list of all of my coworkers under my manager, i.e. your manager’s reports. If you want to calculate off of a relationship of a relationship, in this case your manager’s reports, your array would look like [["manager", "reports"]]. If you’re dealing with a singular relationship chain, you don’t need the nested array (we saw that earlier with the manager-only relationship) but for clarity it’s recommended to use the array approach shown here.
The concepts above can be chained together. Perhaps I want to reference data not only on an nth-level relationship, but also another direct relationship (or another nth-level relationship). If we use the above examples, maybe you want not only data on your manager’s reports (i.e. your coworkers) but also your reports. Then your array would look like [["manager", "reports"], ["reports"]].
You can see an example of a complex Referenced Relationship Field in action on the effectiveAssignments property. This property is looking at both the assignments on the user but also the assignments on the roles related to that user, since roles have their own assignments.
Why do the documentation examples not show nested arrays? As RDVPs evolved, they went from referencing a single object relationship, to being able to traverse from one relationship to another in the chain, to being able to reference multiple relationships and relationship chains simultaneously. While a single array of values is a valid approach, it doesn’t account for the newer capabilities added to RDVPs.
Referenced Object Fields
The Referenced Object Fields define what data is to be gathered from the referenced relationship(s) to create the RDVP. This is a comma-separated list of properties that exist on the referenced relationship fields.
As an example, let’s say you wanted to get a reference to your manager (like what your manager relationship already does). Your referenced relationship field would be ["manager"] and the referenced object field can be left blank.
Now, let’s say that you wanted to get all of the information on your manager. In that case, use * for your referenced object field.
It’s likely you don’t need all of that information. Instead, let’s just get the email address of your manager. Your referenced object field would be mail.
Now RDVPs get interesting when you start traversing more than one layer in your relationship. What if you wanted the email addresses of all of your managers, i.e. your manager’s manager, your manager’s manager’s manager, and so on?
Firstly, you could specify a depth of traversal by modifying your referenced relationship field. If you are always getting your manager’s manager’s email address, your Referenced Relationship field would look like ["manager", "manager"].
Since the referenced object field references your relationship’s property, and an RDVP itself is a static property, you can reference RDVPs as a reference object field in an RDVP. So if you wanted to get all of your manager’s emails in the hierarchy and your RDVP is called managerEmails, your referenced object fields would be mail, managerEmails.
Let’s quickly break down how an RDVP referencing itself in its referenced object field works, top down:
- In the above example, the CEO of your company doesn’t have any managers. As a result, both of their referenced object fields would return
nulland theirmanagerEmailsproperty would benull. - Let’s say that the CTO reports to the CEO. Their referenced
mailobject field would be themailof their manager, the CEO. Their referencedmanagerEmailsfield would benullsince the CEO’s isnulland that’s what is being referenced. - Your boss reports to the CTO. As a result, their referenced
mailobject field is themailof their manager, the CTO. Their referencedmanagerEmailsfield is themanagerEmailsfield of the CTO, which contains the CEO’smail. - Starting to see where this is going? Since you report to your boss, the referenced
mailobject field is your boss’mail, and your referencedmanagerEmailsis themanagerEmailsfield of your boss, which is both the CTO and the CEO’s emails!
All of these objects are calculated on store, meaning that you have a static field defining hierarchical data that would require many loops or recursions to traditionally aggregate. All of the processing power required to calculate this deeply-nested data is handled once at time of update.
A useful callout: If you are referencing more than one relationship field, only the relationship(s) with the referenced object field will provide data. As an example, if your referenced relationship fields looked like [["manager"], ["adminOfOrg"]] and your referenced object fields looked like mail, unless you added an email property to your Organization you will only be getting the email of your manager.
Flatten Properties
RDVPs will return by default an array of objects which includes the referenced object fields you’ve requested, the _id of the managed object’s relationship (i.e. the relationship ID), and the _rev (i.e. the revision of that relationship). Flatten properties will return an array containing just the requested fields. Even if you request more than one field, those fields will be concatenated together in the array in sequential order of listing. This makes managing, and interacting with, multiple object fields much easier.
Let’s take the above example. If you set up a referenced relationship field of ["manager"] and a referenced object field of mail,managerEmails by default your response may look something like this:
"managerEmails": [
    {
        "mail": "theBoss@example.com",
        "managerEmails": [
            {
                "mail": "theCTO@example.com",
                "managerEmails": [
                    {
                        "mail": "theCEO@example.com",
                        "managerEmails": [

                        ],
                        "_id": "7162ddd4-591a-413e-a30b-3a5864bee5ec",
                        "_rev": "0"
                    }
                ],
                "_id": "02b166cc-d7ed-46b7-813f-5ed103145e76",
                "_rev": "2"
            }
        ],
        "_id": "f1e2d3c4-b5a6-7890-1234-56789abcdef0",
        "_rev": "0"
    }
]
Yuck. That’ll get annoying to traverse real quickly.
With flatten properties enabled, your result looks like this:
"managerEmails": [
    "theBoss@example.com",
    "theCTO@example.com",
    "theCEO@example.com"
]
Much nicer.
When flattening properties, it’s important to understand what data types you are flattening. It’s best practice to flatten only if you are working with string, boolean, or number properties and if all of your properties are of the same type. Otherwise, you’ll end up with a jumble of objects in an array that will be very difficult to parse later.
Delete Property Configuration
This is a UI-only addition that will remove the above configuration. You can accomplish the same by deleting the values in their respective fields (which is probably best considering the UI keeps these values.
Warning: Deleting your property configuration doesn’t delete the data on your property. Just because you changed a configuration doesn’t change the fact that the data only updates when it’s notified. If you are greatly overhauling what an RDVP is meant to do it may be wise to create a new property or define a means to notify all of the objects that contain that property to update.
Notifications
For an RDVP to be calculated at all, there needs to be a relationship change notification. A relationship change notification indicates to related objects that “hey, something has happened here that you care about” which informs those objects to update their RDVPs accordingly.
There are three ways in which a notification can be configured on a property:
- Notify Relationships, under the advanced details of a property
- Notify, under the relationship editor
- Notify Self, under the advanced details of a relationship
The “Notify” and “Notify Self” flags signal to the base objects when the relationship has changed (e.g. a relationship has been added or removed). Notify will notify the downstream relationship, and Notify Self will notify the object you’re currently on.
The “Notify Relationships” flag signals to the specified relationship when the specific property has changed.
Rarely you may need to notify a property to update that isn’t directly related to you. To do so, use “Notify Relationships” on a relationship property to notify indirect relationships.
Notifications Example
Looking back at our manager emails example:
The manager emails property is meant to store a record of the email addresses of a user’s managers up the management hierarchy. That means that the value should recalculate if:
- The employee gets a new manager
- Any manager upstream (e.g. the manager’s manager) has been changed
- Any manager upstream has changed their email address
In terms of notifications, then:
- The owner of the
managerrelationship should Notify Self which tells itself to update when the relationship has changed. - The owner of the
reportsrelationship should Notify which tells the reports to recalculate based on this relationship changing. - The
mailattribute should Notify Relationships to thereportsthat the email has changed.
A common trip-up when defining notifications is that your relationship definition describes what it’s pointing to, not what it lives on. Your manager has reports: you have a manager. If you need to update yourself when you change your manager, you need to put Notify Self on your Manager relationship property and not on your reports property. If your manager needs to let you know that something has changed, they need to Notify their reports property.
Let’s look at a more complicated real-world example: effectiveAssignments.
Effective Assignments lists all assignments tied to a user. Assignments can be directly assigned to a user (via the assignments relationship) but they can also be assigned to a role which then is assigned to a user (via the roles relationship). As a result, effective assignments change if:
- The user has added or removed an assignment relationship
- The user has added or removed a role relationship
- The role related to a user has added or removed an assignment relationship
- Any of the related assignments have changed their properties
Start by taking a look at the Query Configuration for effectiveAssignments on the user. You’ll see that it’s referencing both the assignments directly related to the user as well as the assignments tied to roles ([["roles","assignments"],["assignments"]]), and that it’s returning all the properties within the assignments (*). This definition should inform you that notifications will be occurring on the user (where this property is located), roles, and assignments and that we need to notify based on properties updating from assignments specifically.
Looking at these relationships, you’ll see the following:
- On the Assignment object:
- Notify is enabled for its
membersrelationship. This notifies the user linked to the assignment if their relationship has changed. - Notify is enabled if its
rolesrelationship. This notifies the role linked to the assignment if their relationship has changed. - Notify Relationships is enabled for
rolesandmemberson theattributesproperty and theweightproperty. This notifies users and roles if the attributes and weight properties on the assignment have changed, as these properties are referenced in RDVPs.
- Notify is enabled for its
- On the Role object:
- Notify is enabled for its
membersrelationship. This notifies the user linked to the role if their relationship has changed. - Notify Self is enabled on the
assignmentsrelationship. This notifies the role if the relationship has changed with the assignment. - Notify Relationships is enabled for
memberson theassignmentsrelationship. This notifies the user if the role’s assignments have changed, which is used in the effectiveAssignments RDVP definition.
- Notify is enabled for its
- On the User object:
- Notify Self is enabled on both the
assignmentsandrolesrelationships. This notifies the user if their relationships have changed with either assignments or roles.
- Notify Self is enabled on both the
Enough talk: let’s build an RDVP and see it in action.
RDVP Examples
An RDVP requires a relationship to derive the property. So that we don’t alter notifications for pre-existing relationships, let’s create a brand new relationship that we can use.
This example will expand on the manager and employee concept and add in departments. Departments are going to link together users and other departments so that we can create a hierarchical view of our business.
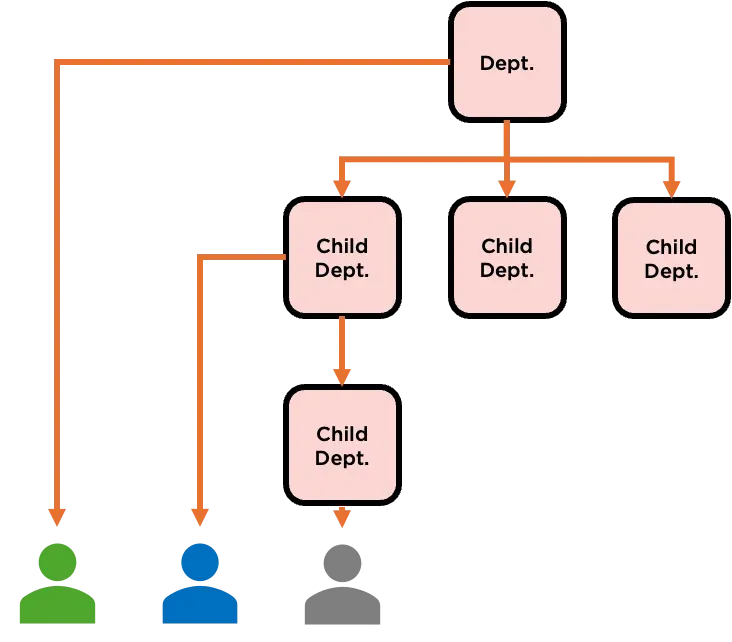 Departmental Structure
To start, head back to the Native IDM Console. Under the Managed Objects view (Configure → Managed Objects) click the New Managed Object button and give it the following details:
| Name | Value |
|---|---|
| Managed Object Name | department |
| Readable Title | Department |
The rest of the values can be left blank. Click Save, and then using the “Add a Property” button on the next screen add a property with the name name, the Label Name, the type String, and make the value required. In the advanced properties, set this value to “Searchable”.
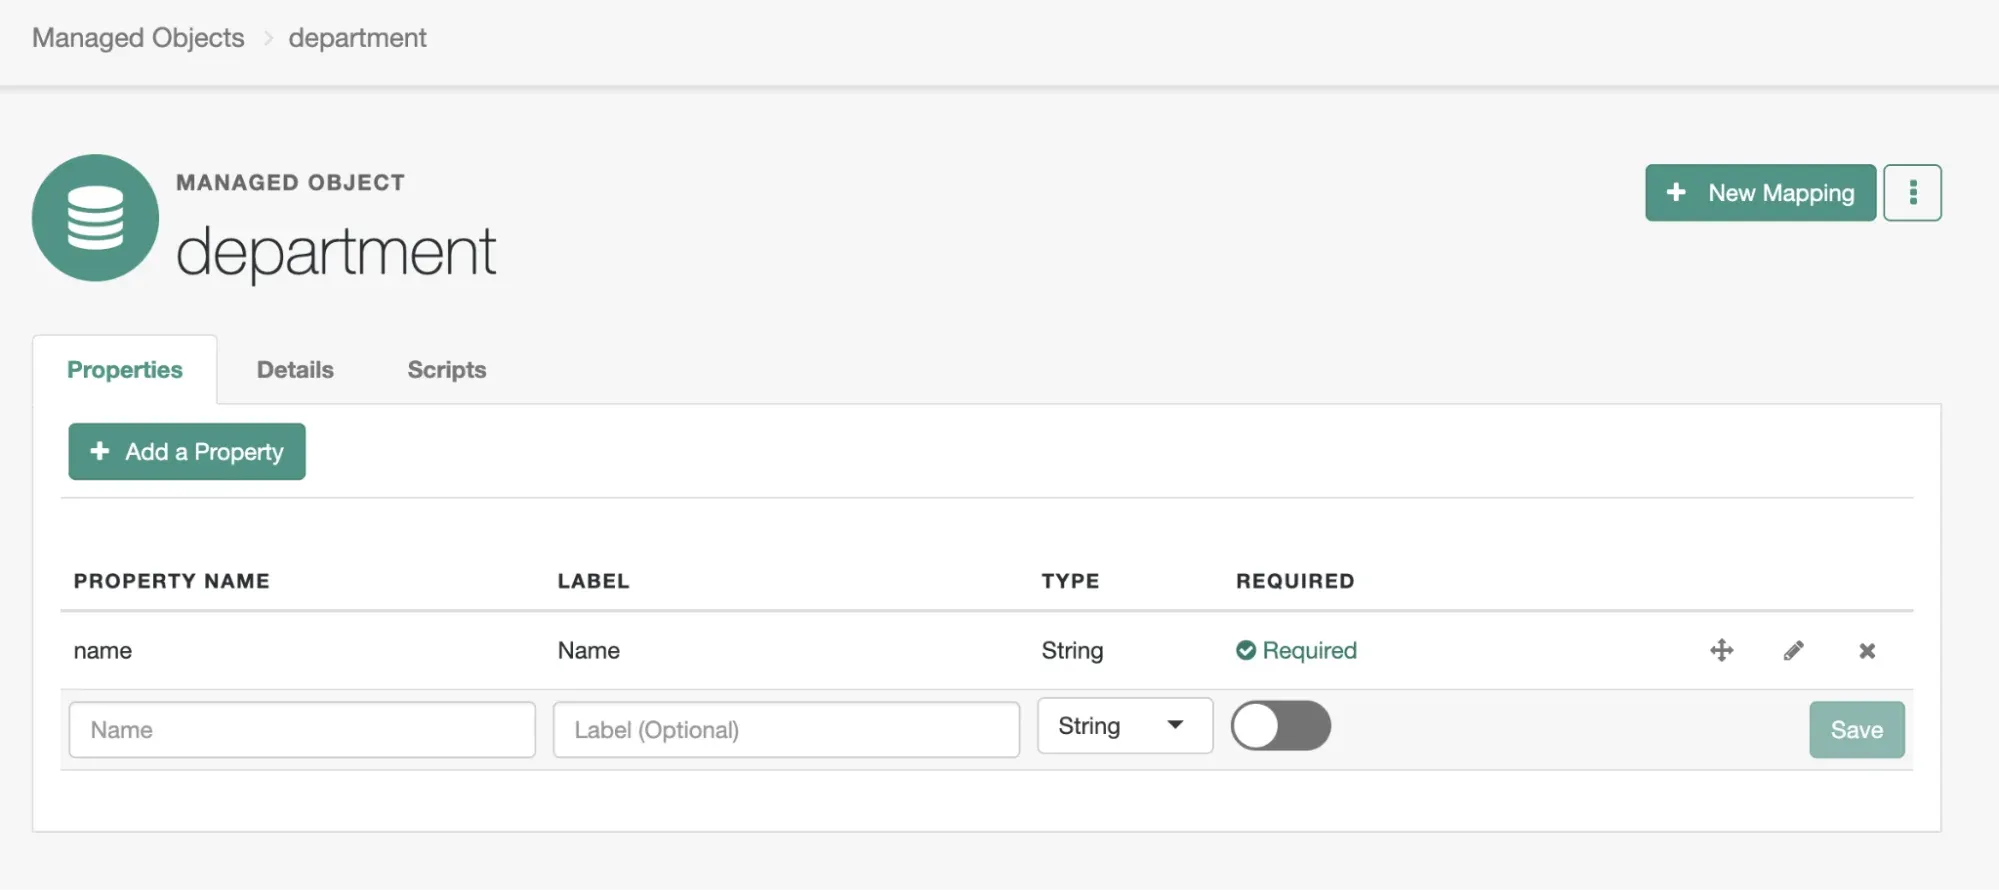 The Base Department Object
Go to your Identity Management Screen (in AIC, that’s in the Platform UI under Identities → Manage, and in PingIDM that’s the Manage Tab) and click on the Departments object. You should be able to create a new Department with its own name.
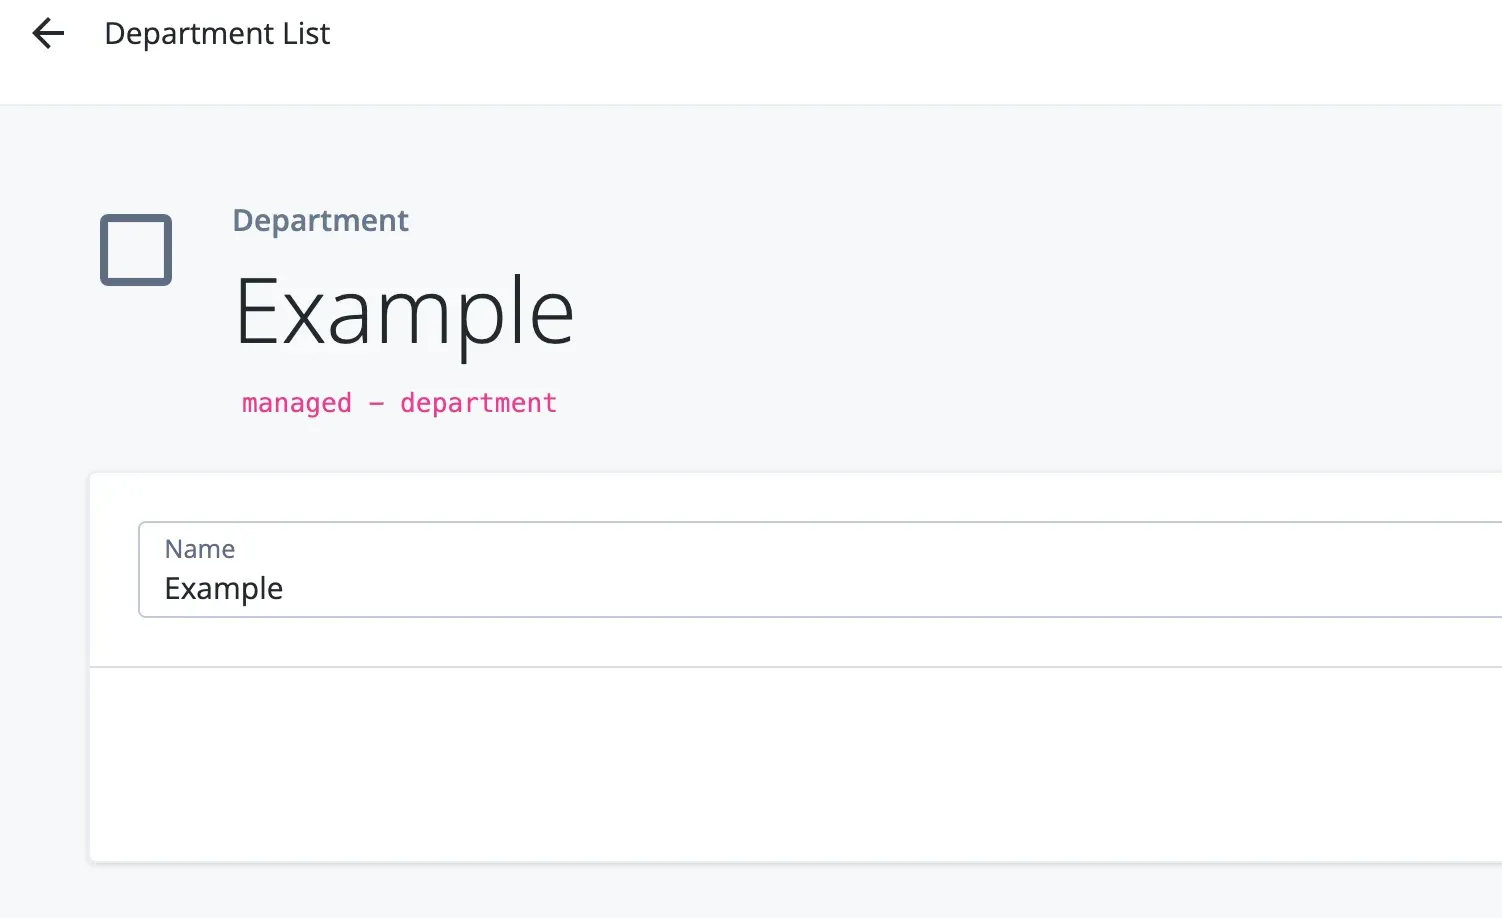 An Example Department
Next, let’s add the relationships to our Department object.
The Department should be able to have employees and should be able to have subdepartments.
In the department management page, add a new property called employees with the type relationship and hit save. You’ll be taken to the relationship management page - here you should select your User (in AIC, that’s alpha_user for the alpha realm) and select the userName and mail properties as display properties. Hit save.
You’ve now created a unidirectional linkage between a department and a user, in which that linkage will display the username and the email address of that employee in REST calls and the Platform UI.
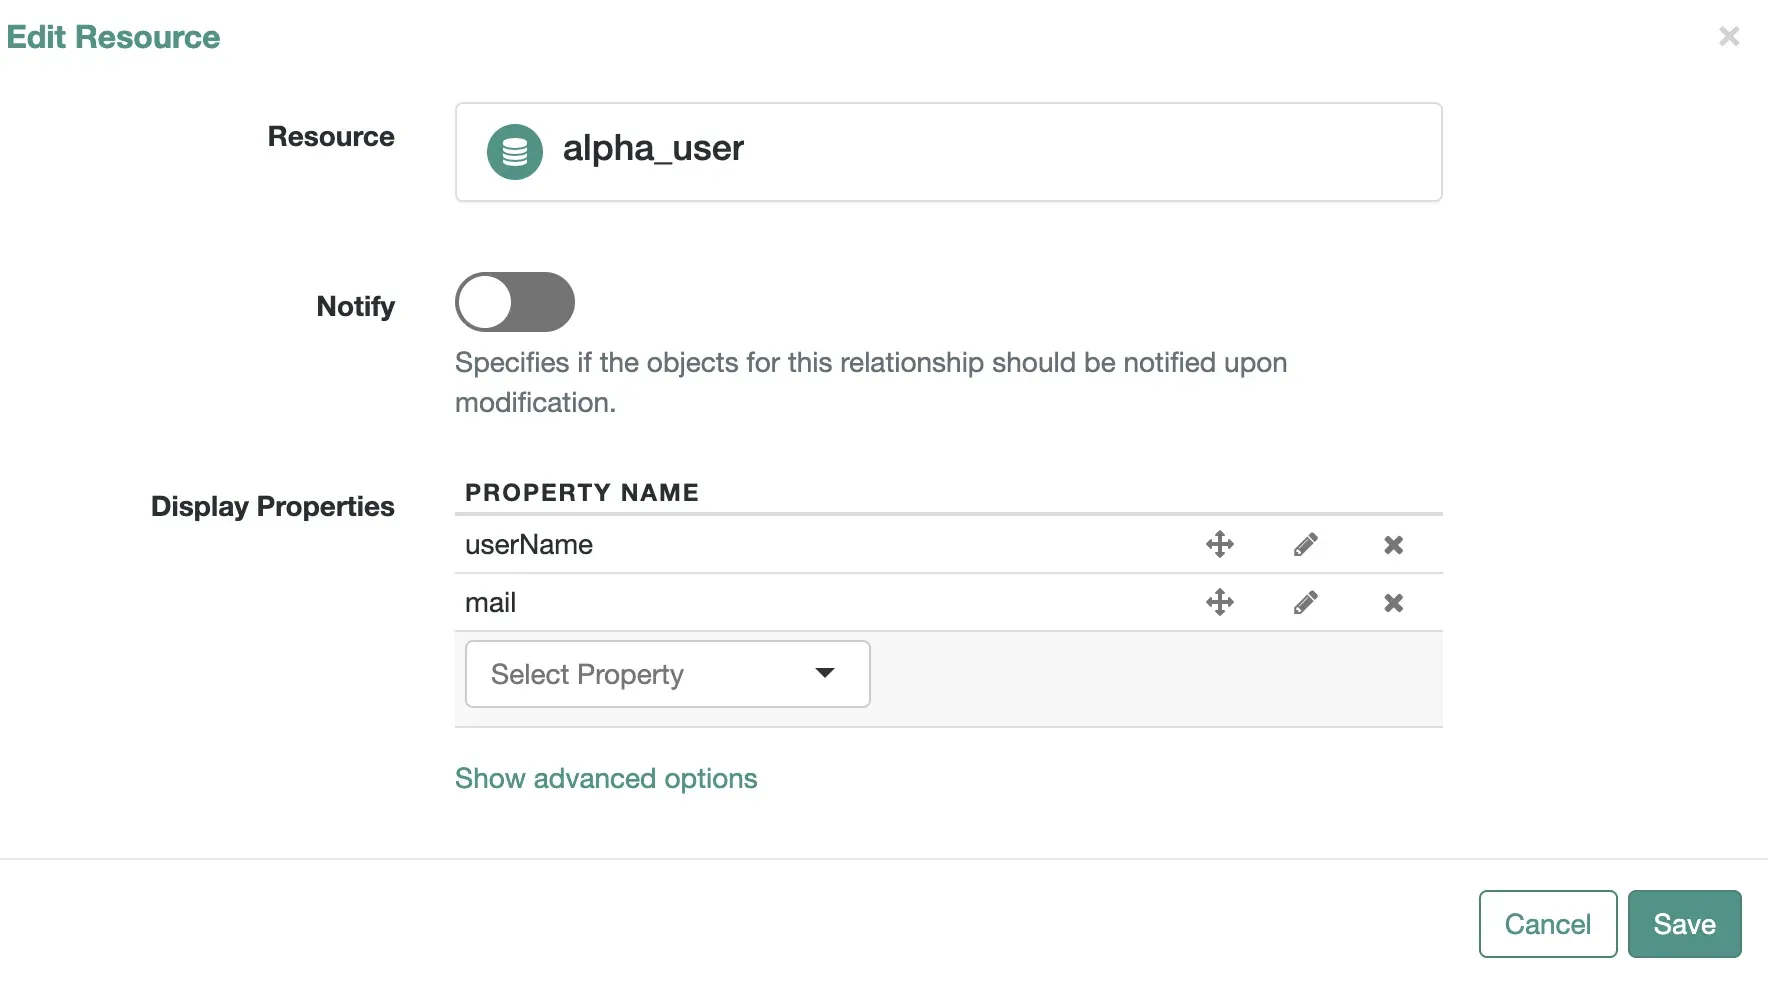 The Employees Relationship Resource Linkage
The center of the relationship property uses arrows to define how the relationship links one property to another. Right now you should see a connection from department to employee with a bubble in the middle that says “Has one employees”. A department can have more than one employee, so click that bubble and change the relationship from “one” to “many”. Hit Save.
Currently your relationship is unidirectional: only the department object is aware of the linkage to the user. It’s likely that you need to be able to reference this relationship from the user as well, just as it’s likely that the relationship should be assignable from the user. Select the “Two-way Relationship” bubble that’s over the arrow pointing from your user object to your department object and select the “Has one” option. Create a reverse property with the name custom_department, giving it the display property of name. Hit save, and then save again on the property page.
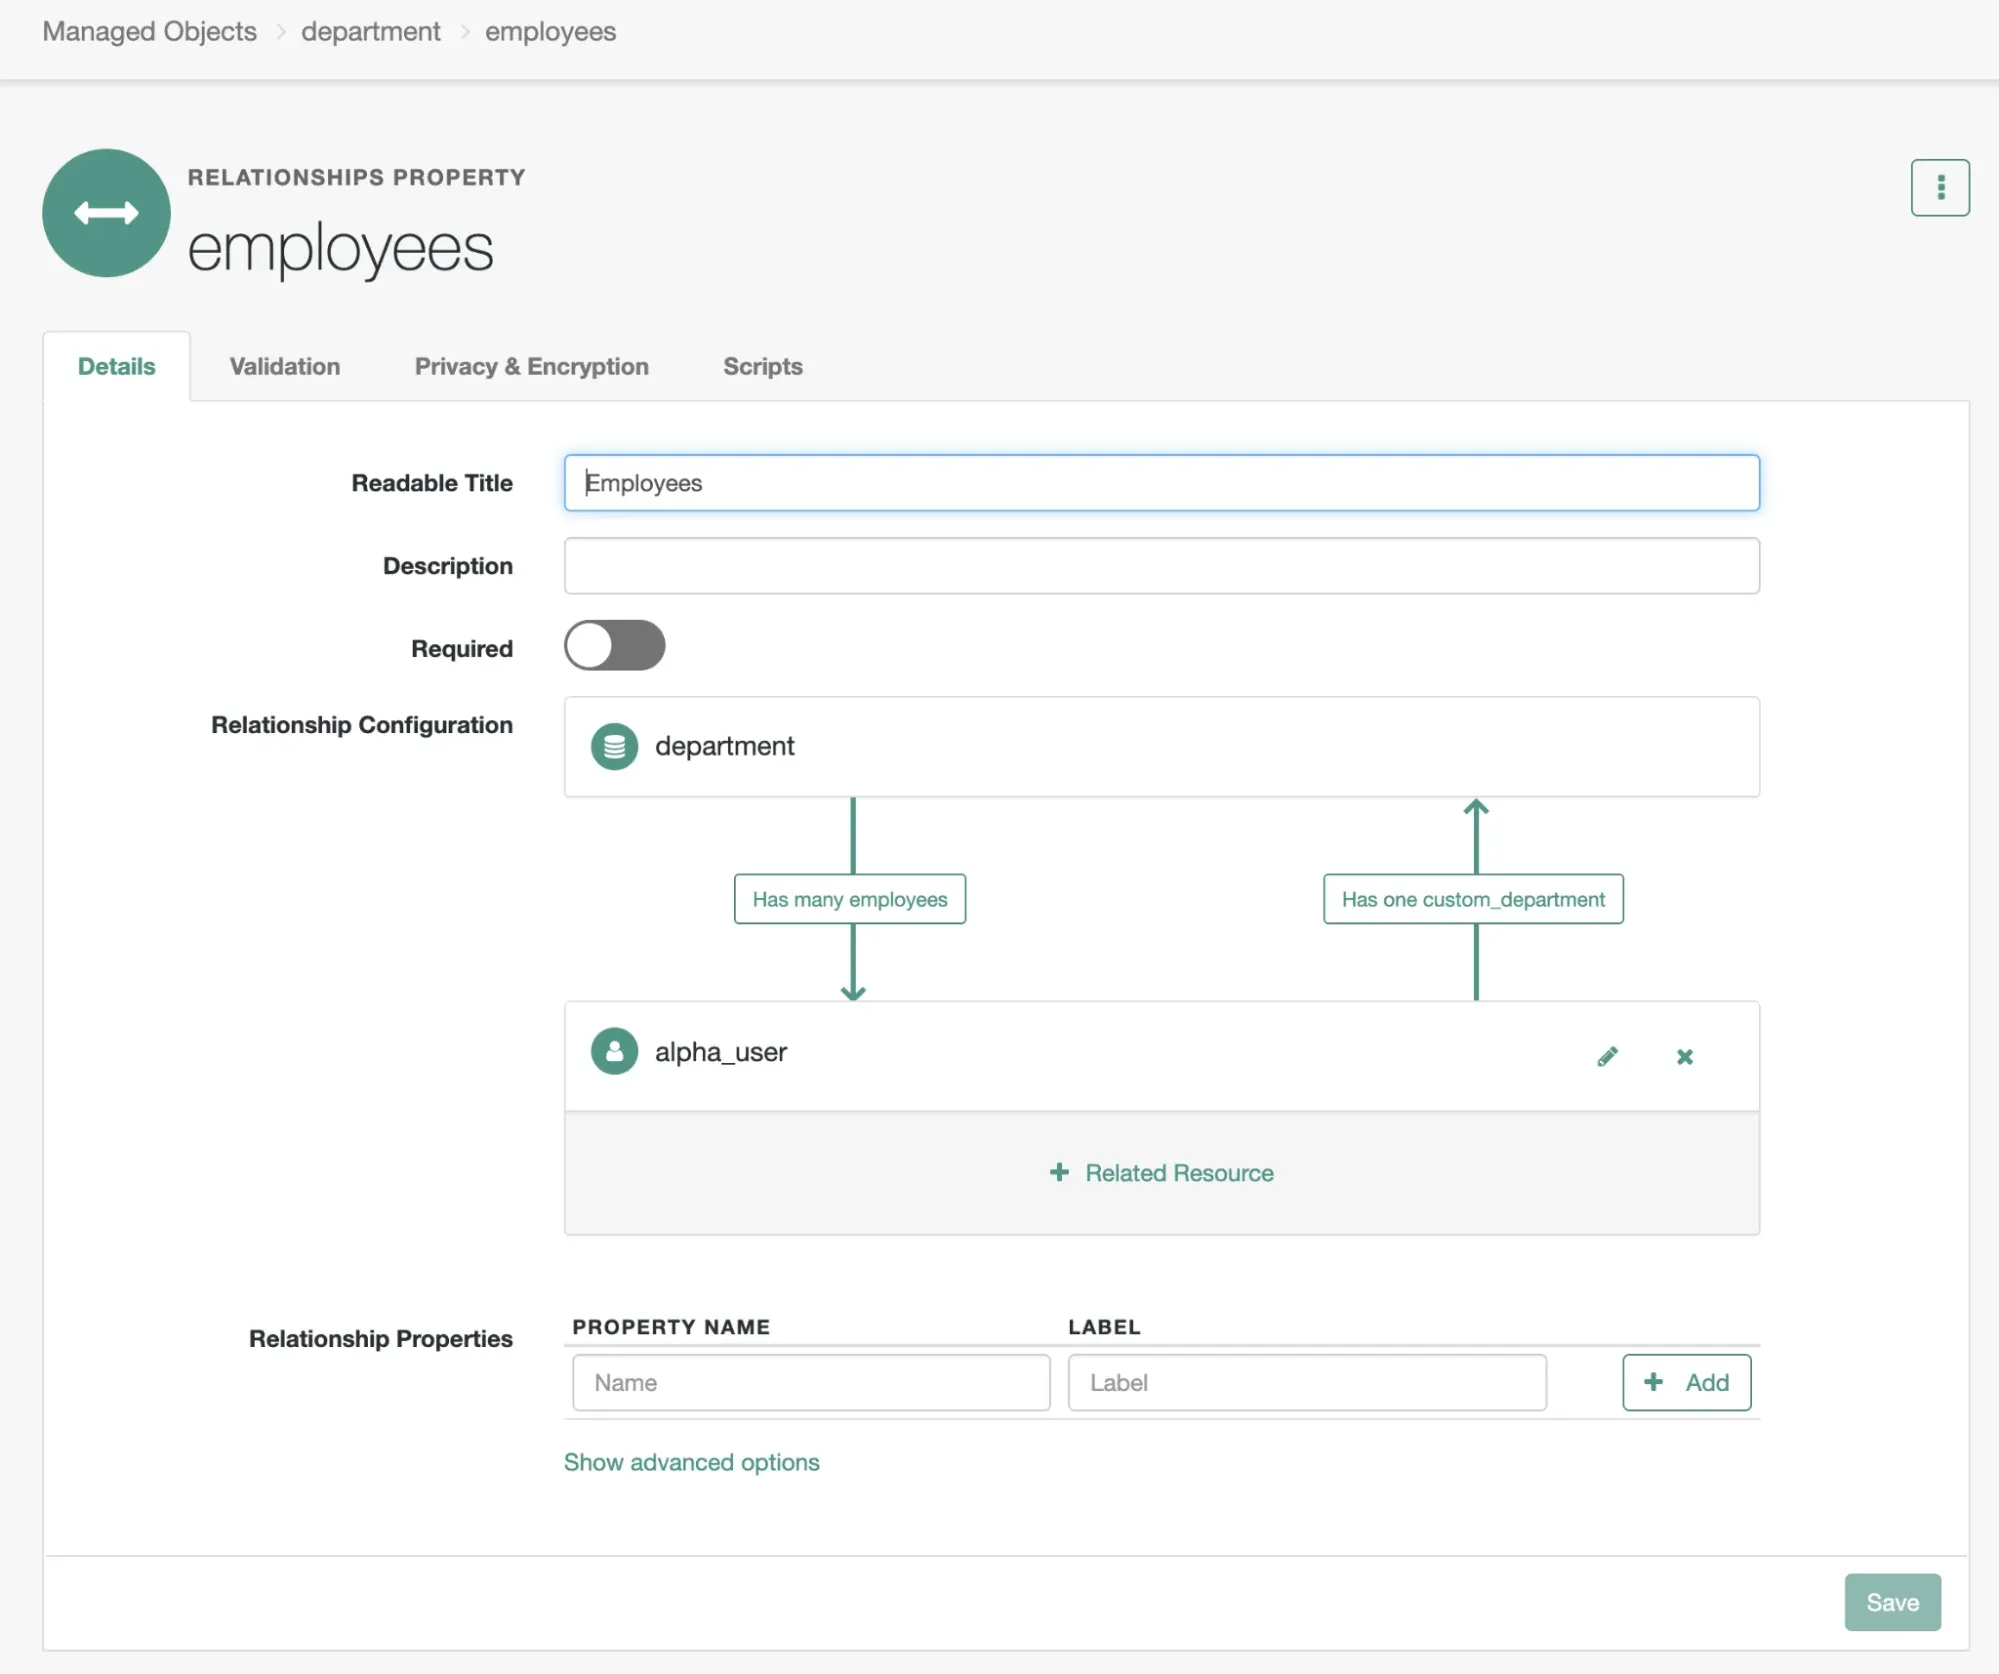 The Employee/Department Relationship
Note: You’ll probably notice that your reverse relationship will by default set the Readable Title to the name of the relationship property. To change, go to the relationship definition and update the property directly.
We are going to create one more relationship: the concept of a parent department and children departments. This will give us the nesting that we outlined at the beginning of this example.
Create a new relationship entitled parent with the resource of department and the display property of name. Make it a bidirectional relationship, has many, with the reverse property name of children and the same display property as the other direction (name). This new relationship indicates that a department can have many children but only one parent.
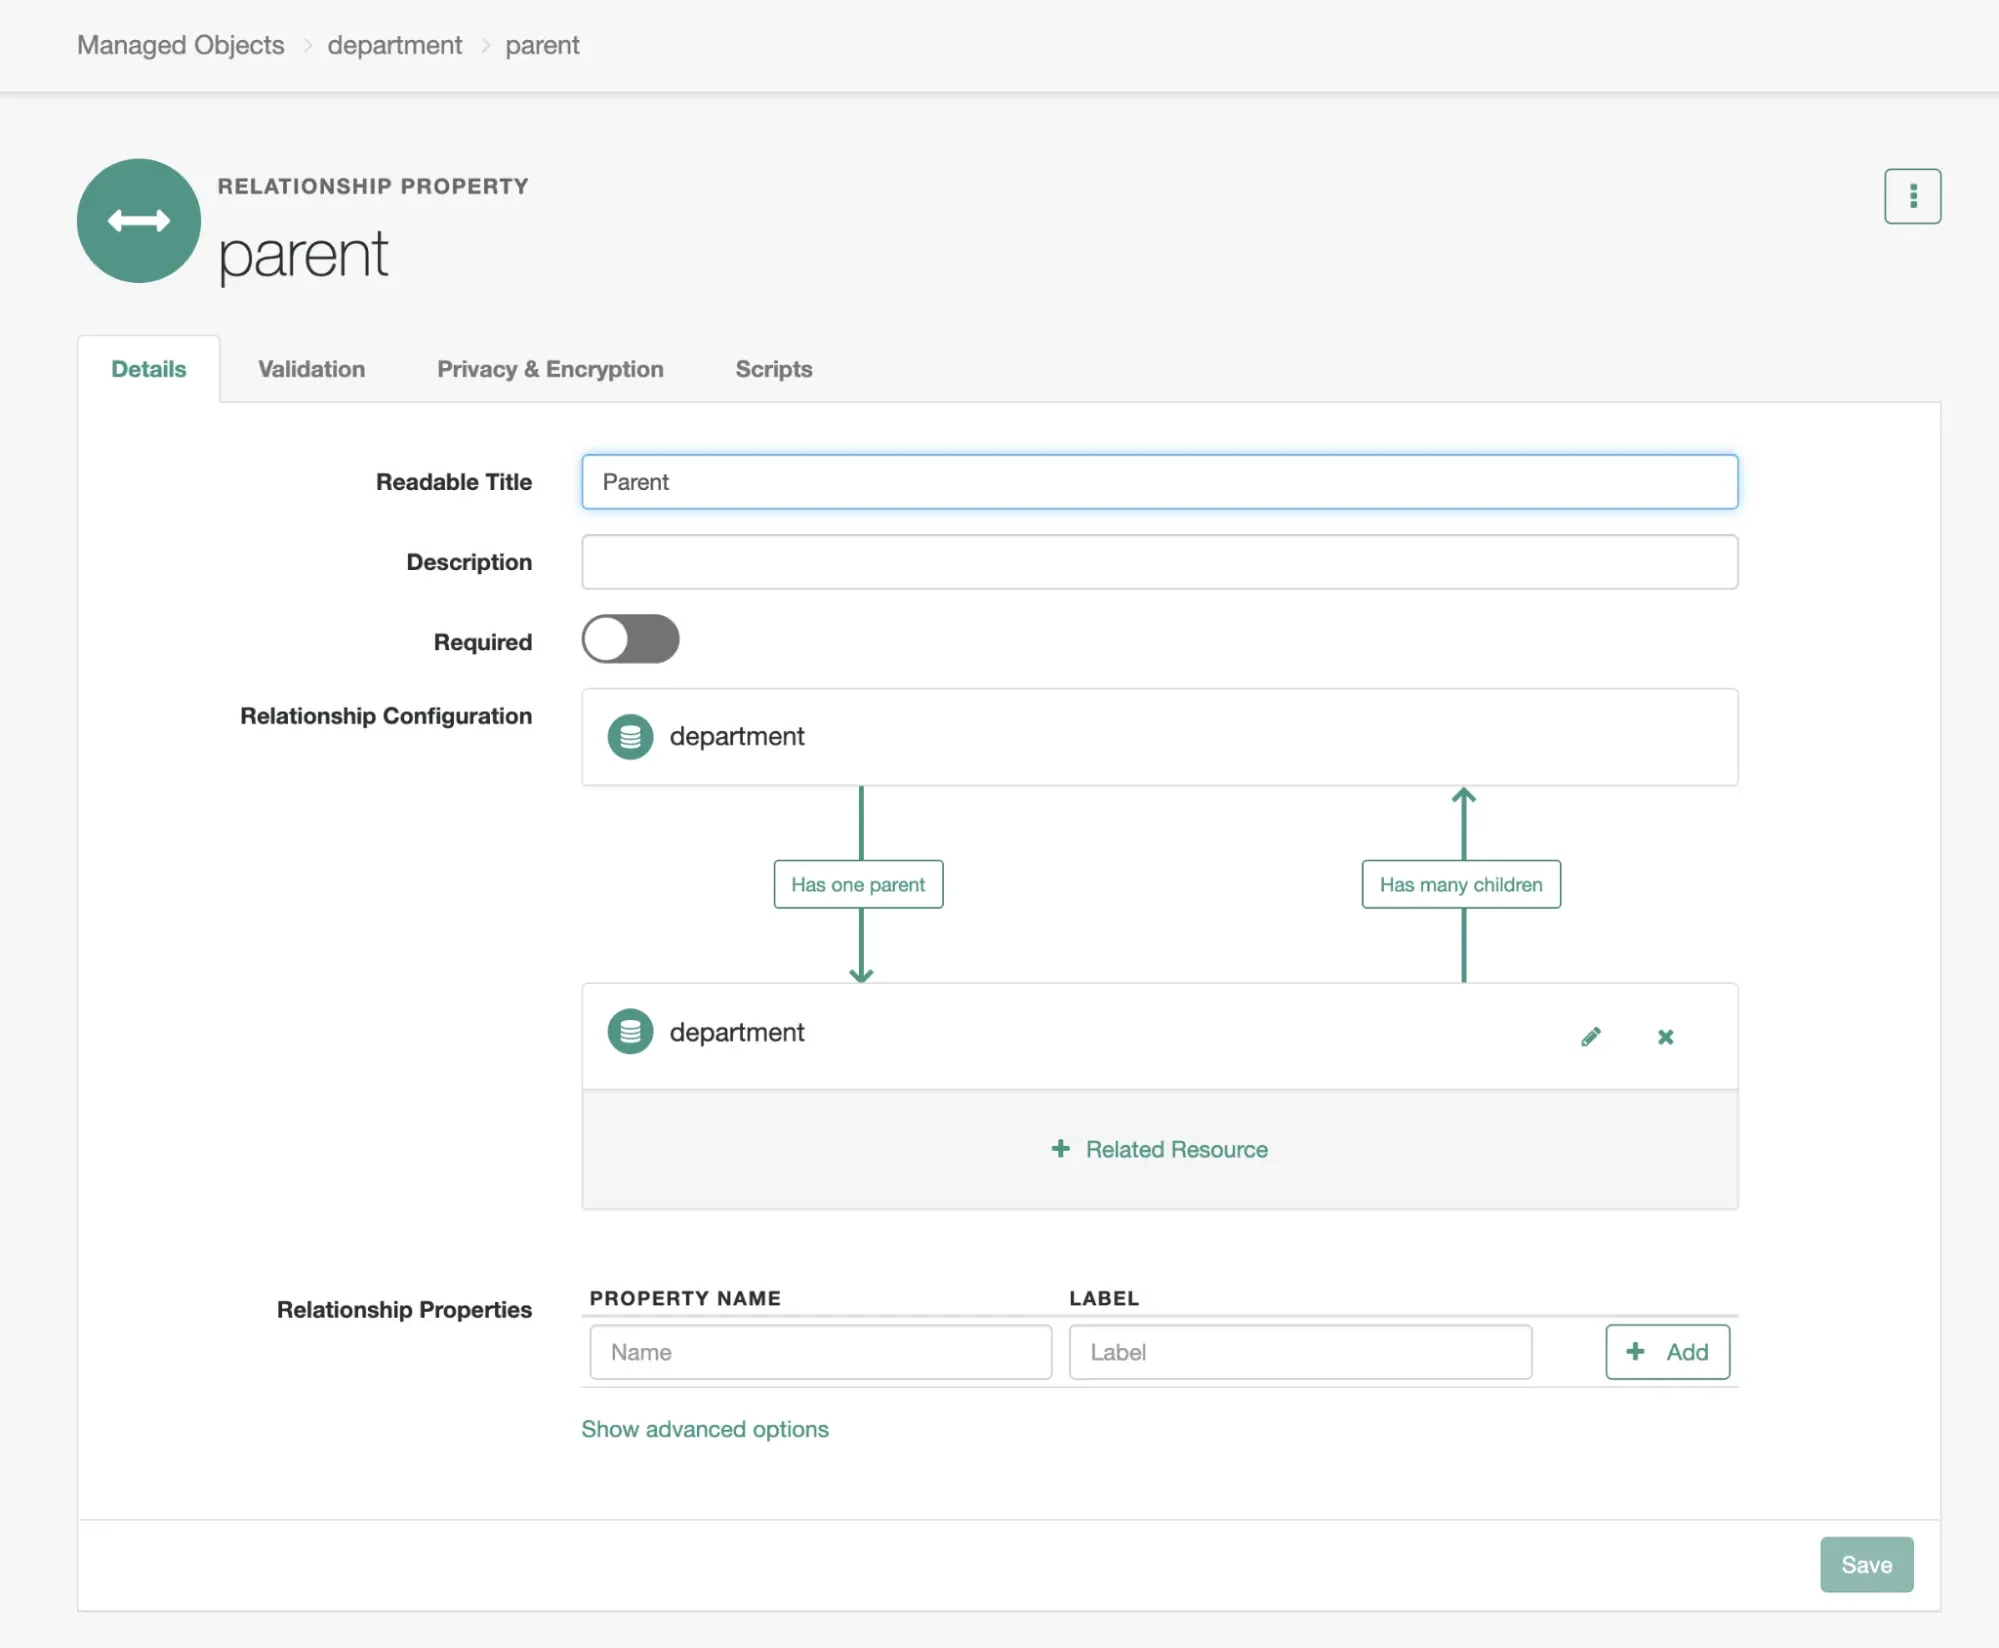 The Parent/Children Relationship
Go back to the platform UI where you defined your Example organization. You’ll see two new tabs - one that lets you set Employees and another where you can set Children, as well as a dropdown that lets you select another Department as the Parent of the Department you’re on.
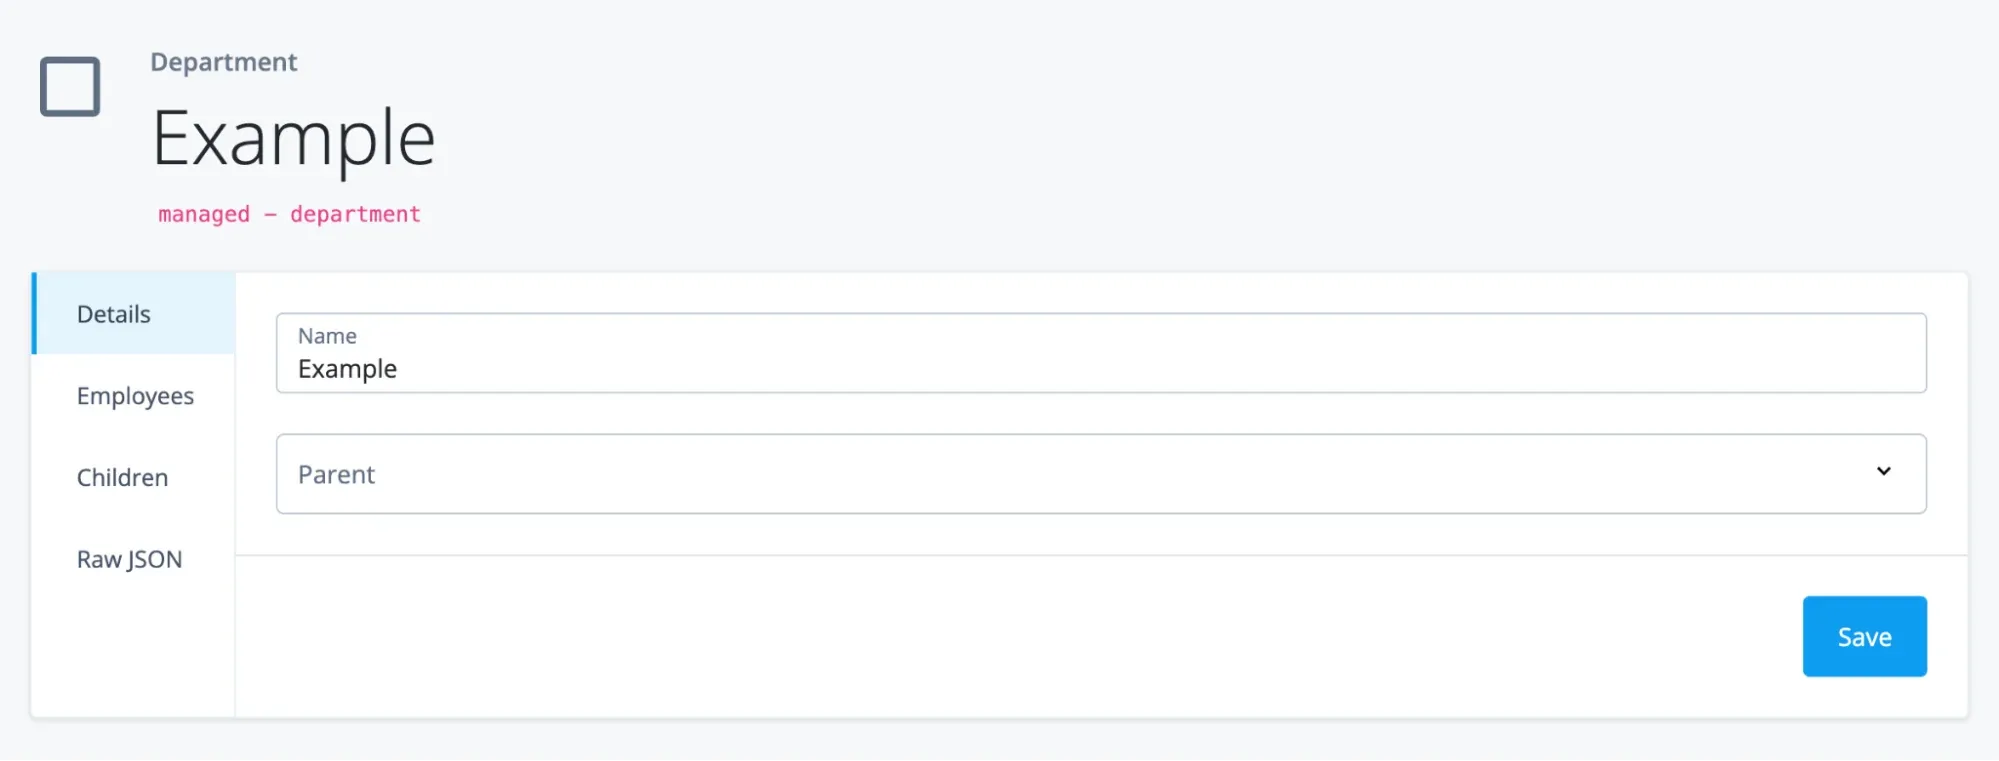 The Updated Department Object, with Relationships
Alright, we’ve created our example relationship with some bidirectional linkages that branch across more than one object. Let’s create some RDVPs to make referencing nested data easier.
Example: Single-Level Linkage
A department can be a parent of one or more departments. As an administrator, be it HR, management, or otherwise, you likely want to quickly understand what departments are children of your department.
Let’s create an RDVP that lists the names of all of the children departments of the parent.
Inside the department object, create an Array property with the name of childNames and label of Names of Children. Click into that property, unset User Editable, and set Virtual and Return By Default (we need that still for the Platform UI). Next, go to the Query Configuration and set the referenced relationship field as ["children"] and the referenced object field as name. Hit save.
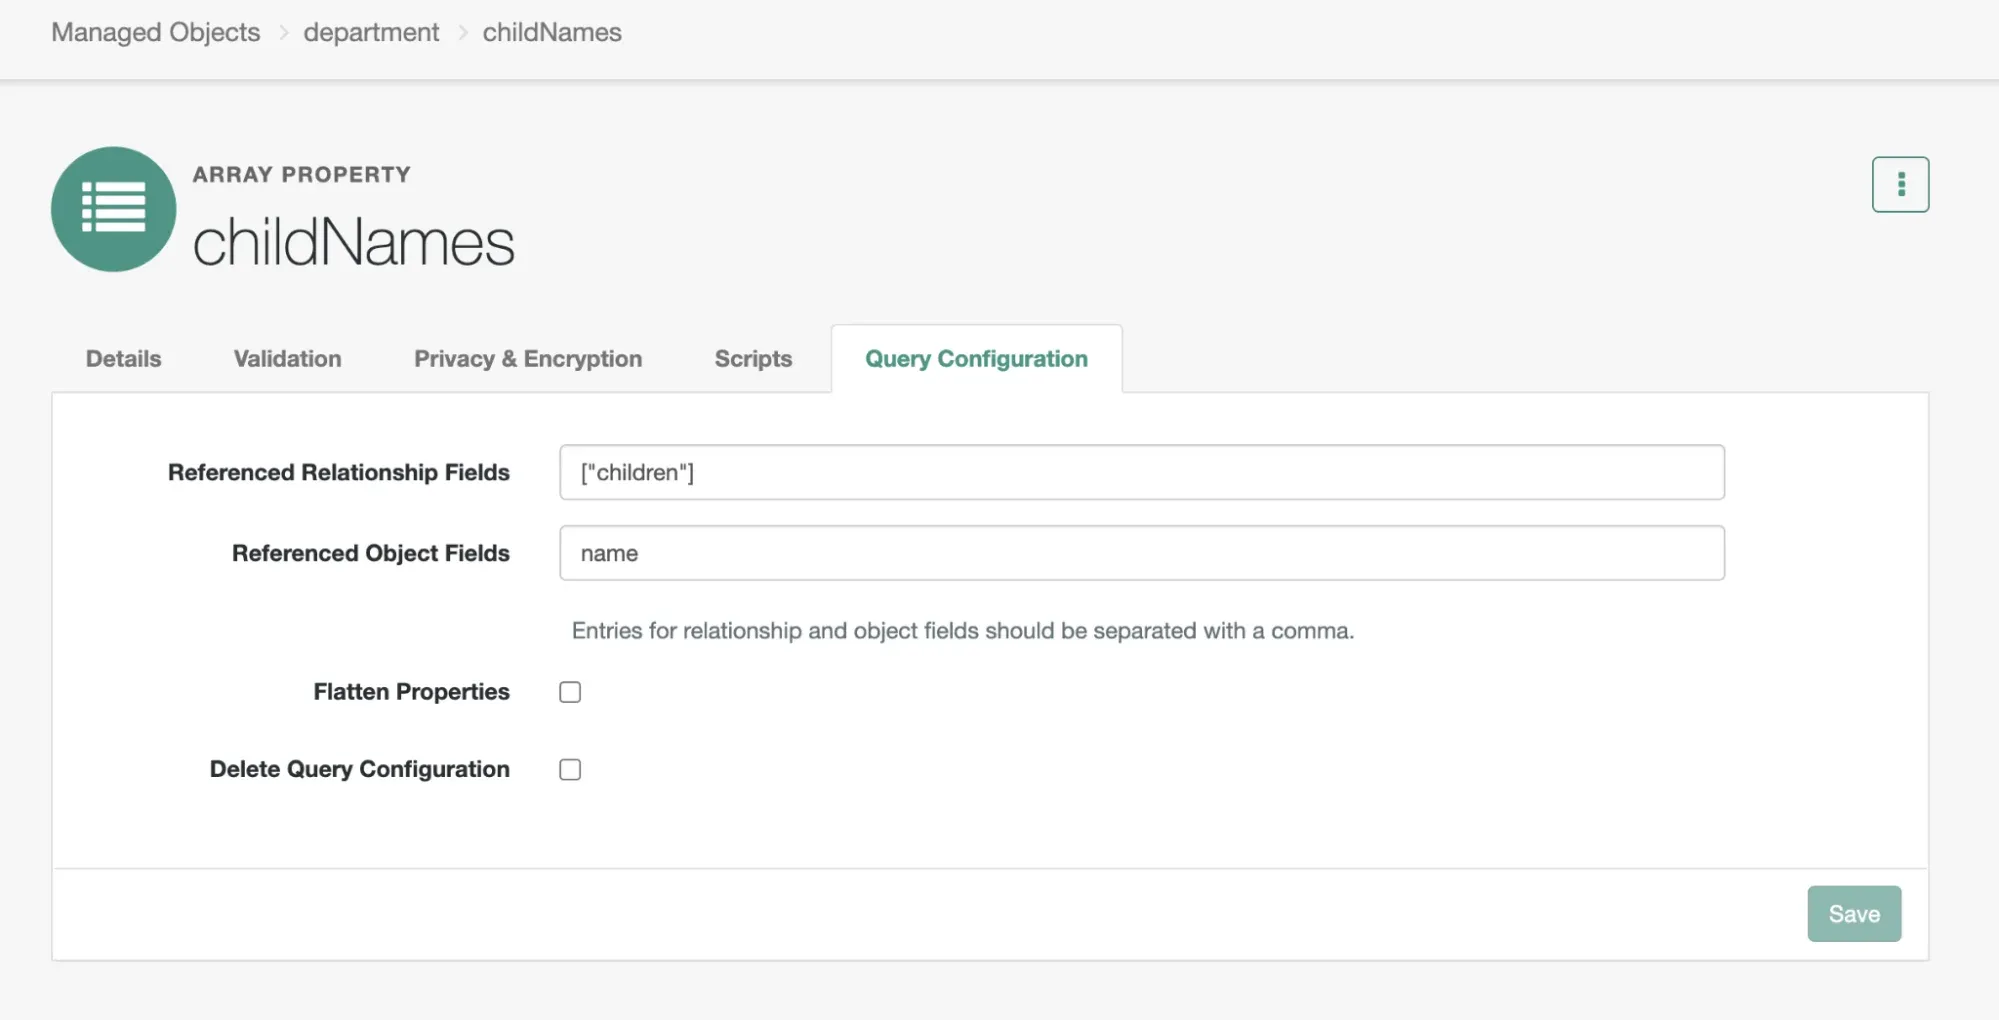 The ChildNames Property
Create a brand-new department (I’m naming mine Child1) and assign your Example department as a parent. Go back to your Example department and…
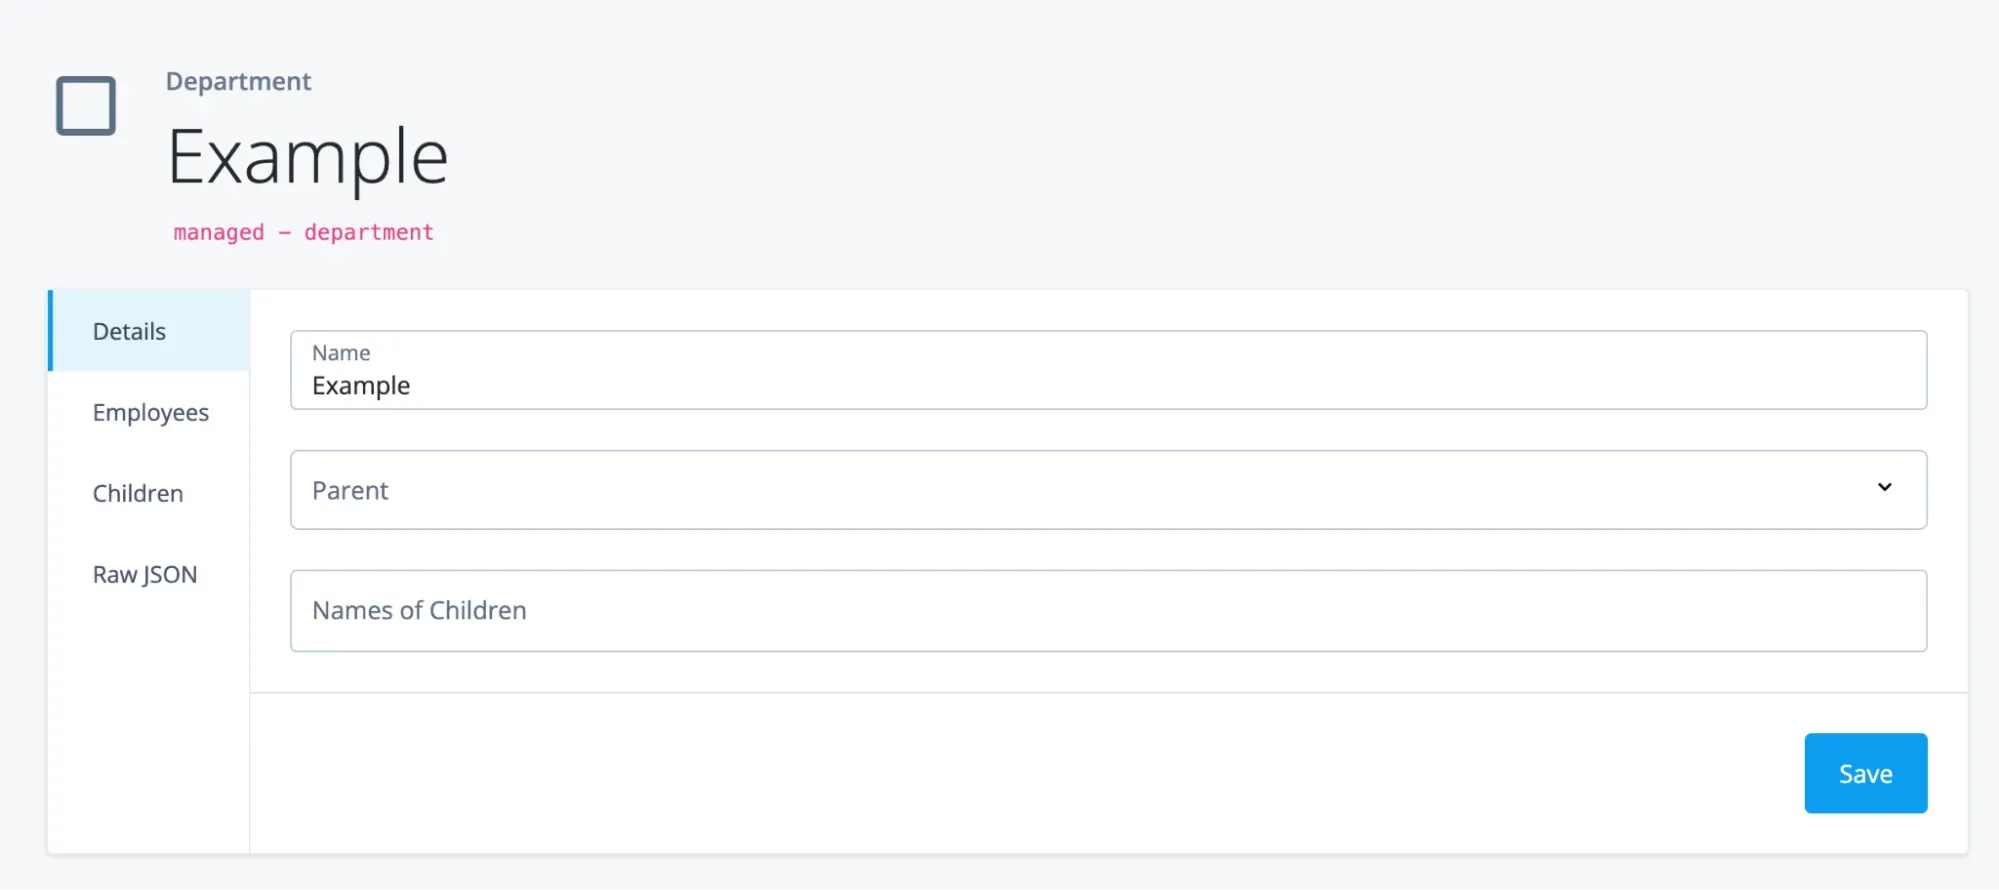 Something Seems Off
…wait, where’s the Child Name?
While the RDVP’s query is configured to get the data we need, we haven’t configured any way to notify the RDVP to update.
The department will need to be notified in the following locations:
- When the parent has added/removed a child
- When the child has assigned/unassigned a parent.
First, in the parent relationship enable Notify. This tells the children to notify their parent to update when their relationship has changed.
Warning: Never set Notify on a non-reverse relationship. This will corrupt your managed JSON.
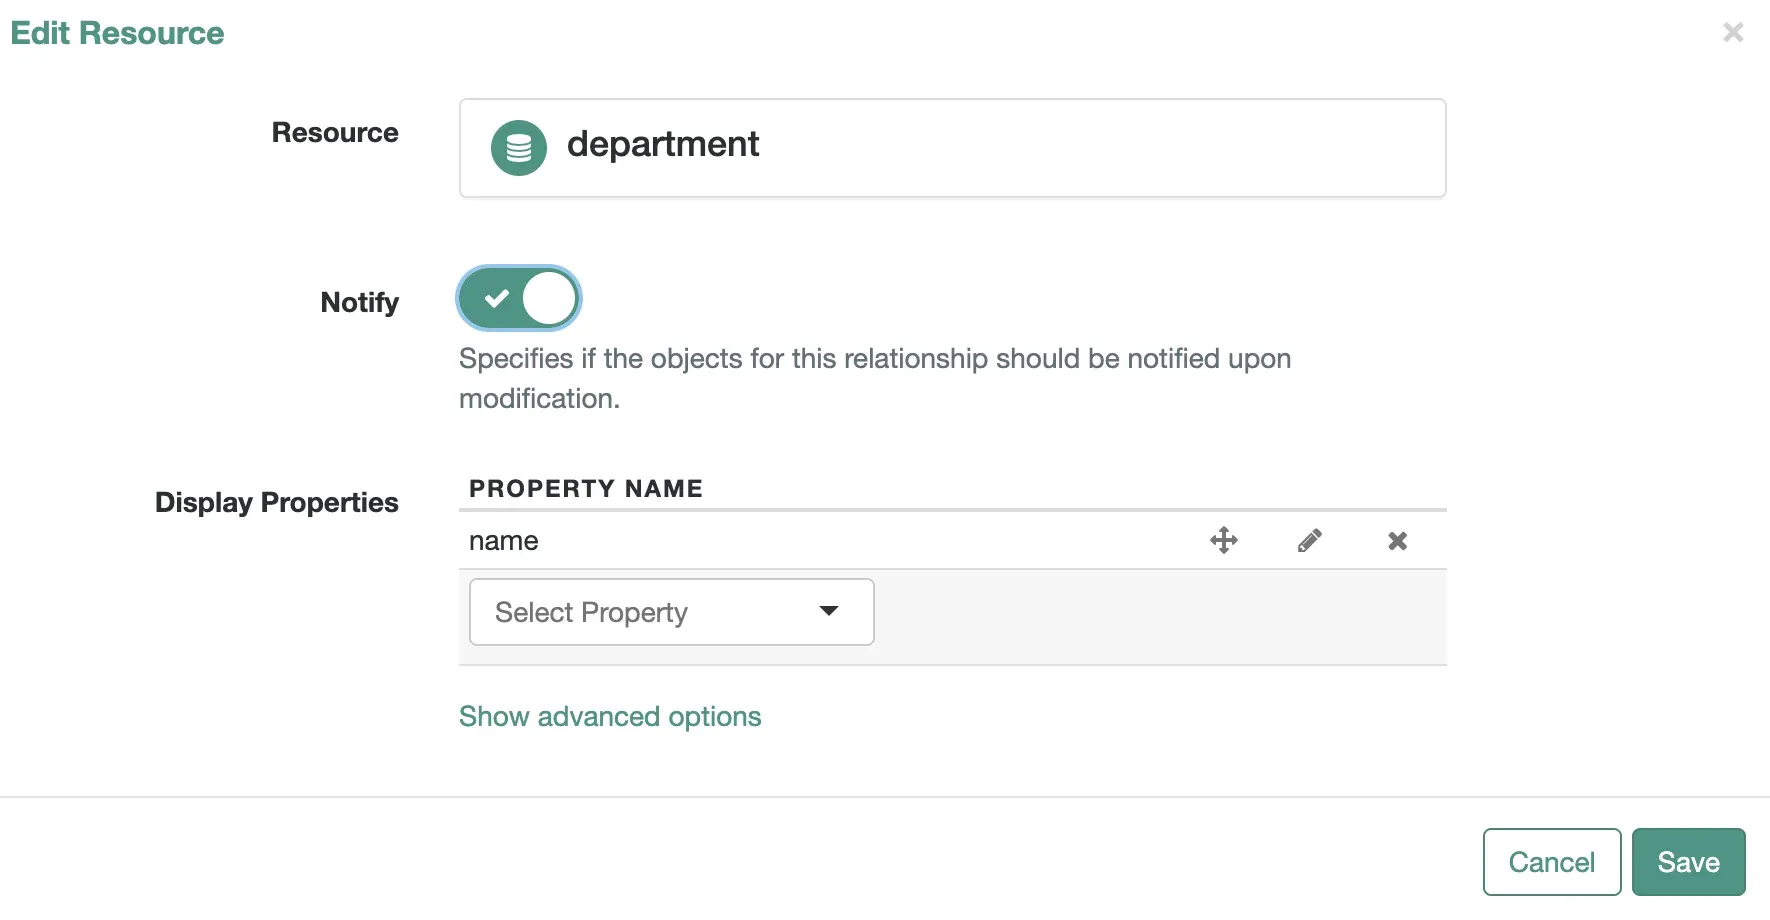 Notify on the Parent Department Relationship
Next, in the children relationship enable Notify Self. This tells the parent that it should update when the parent/child relationship has been changed, which it needs to update the Child Names.
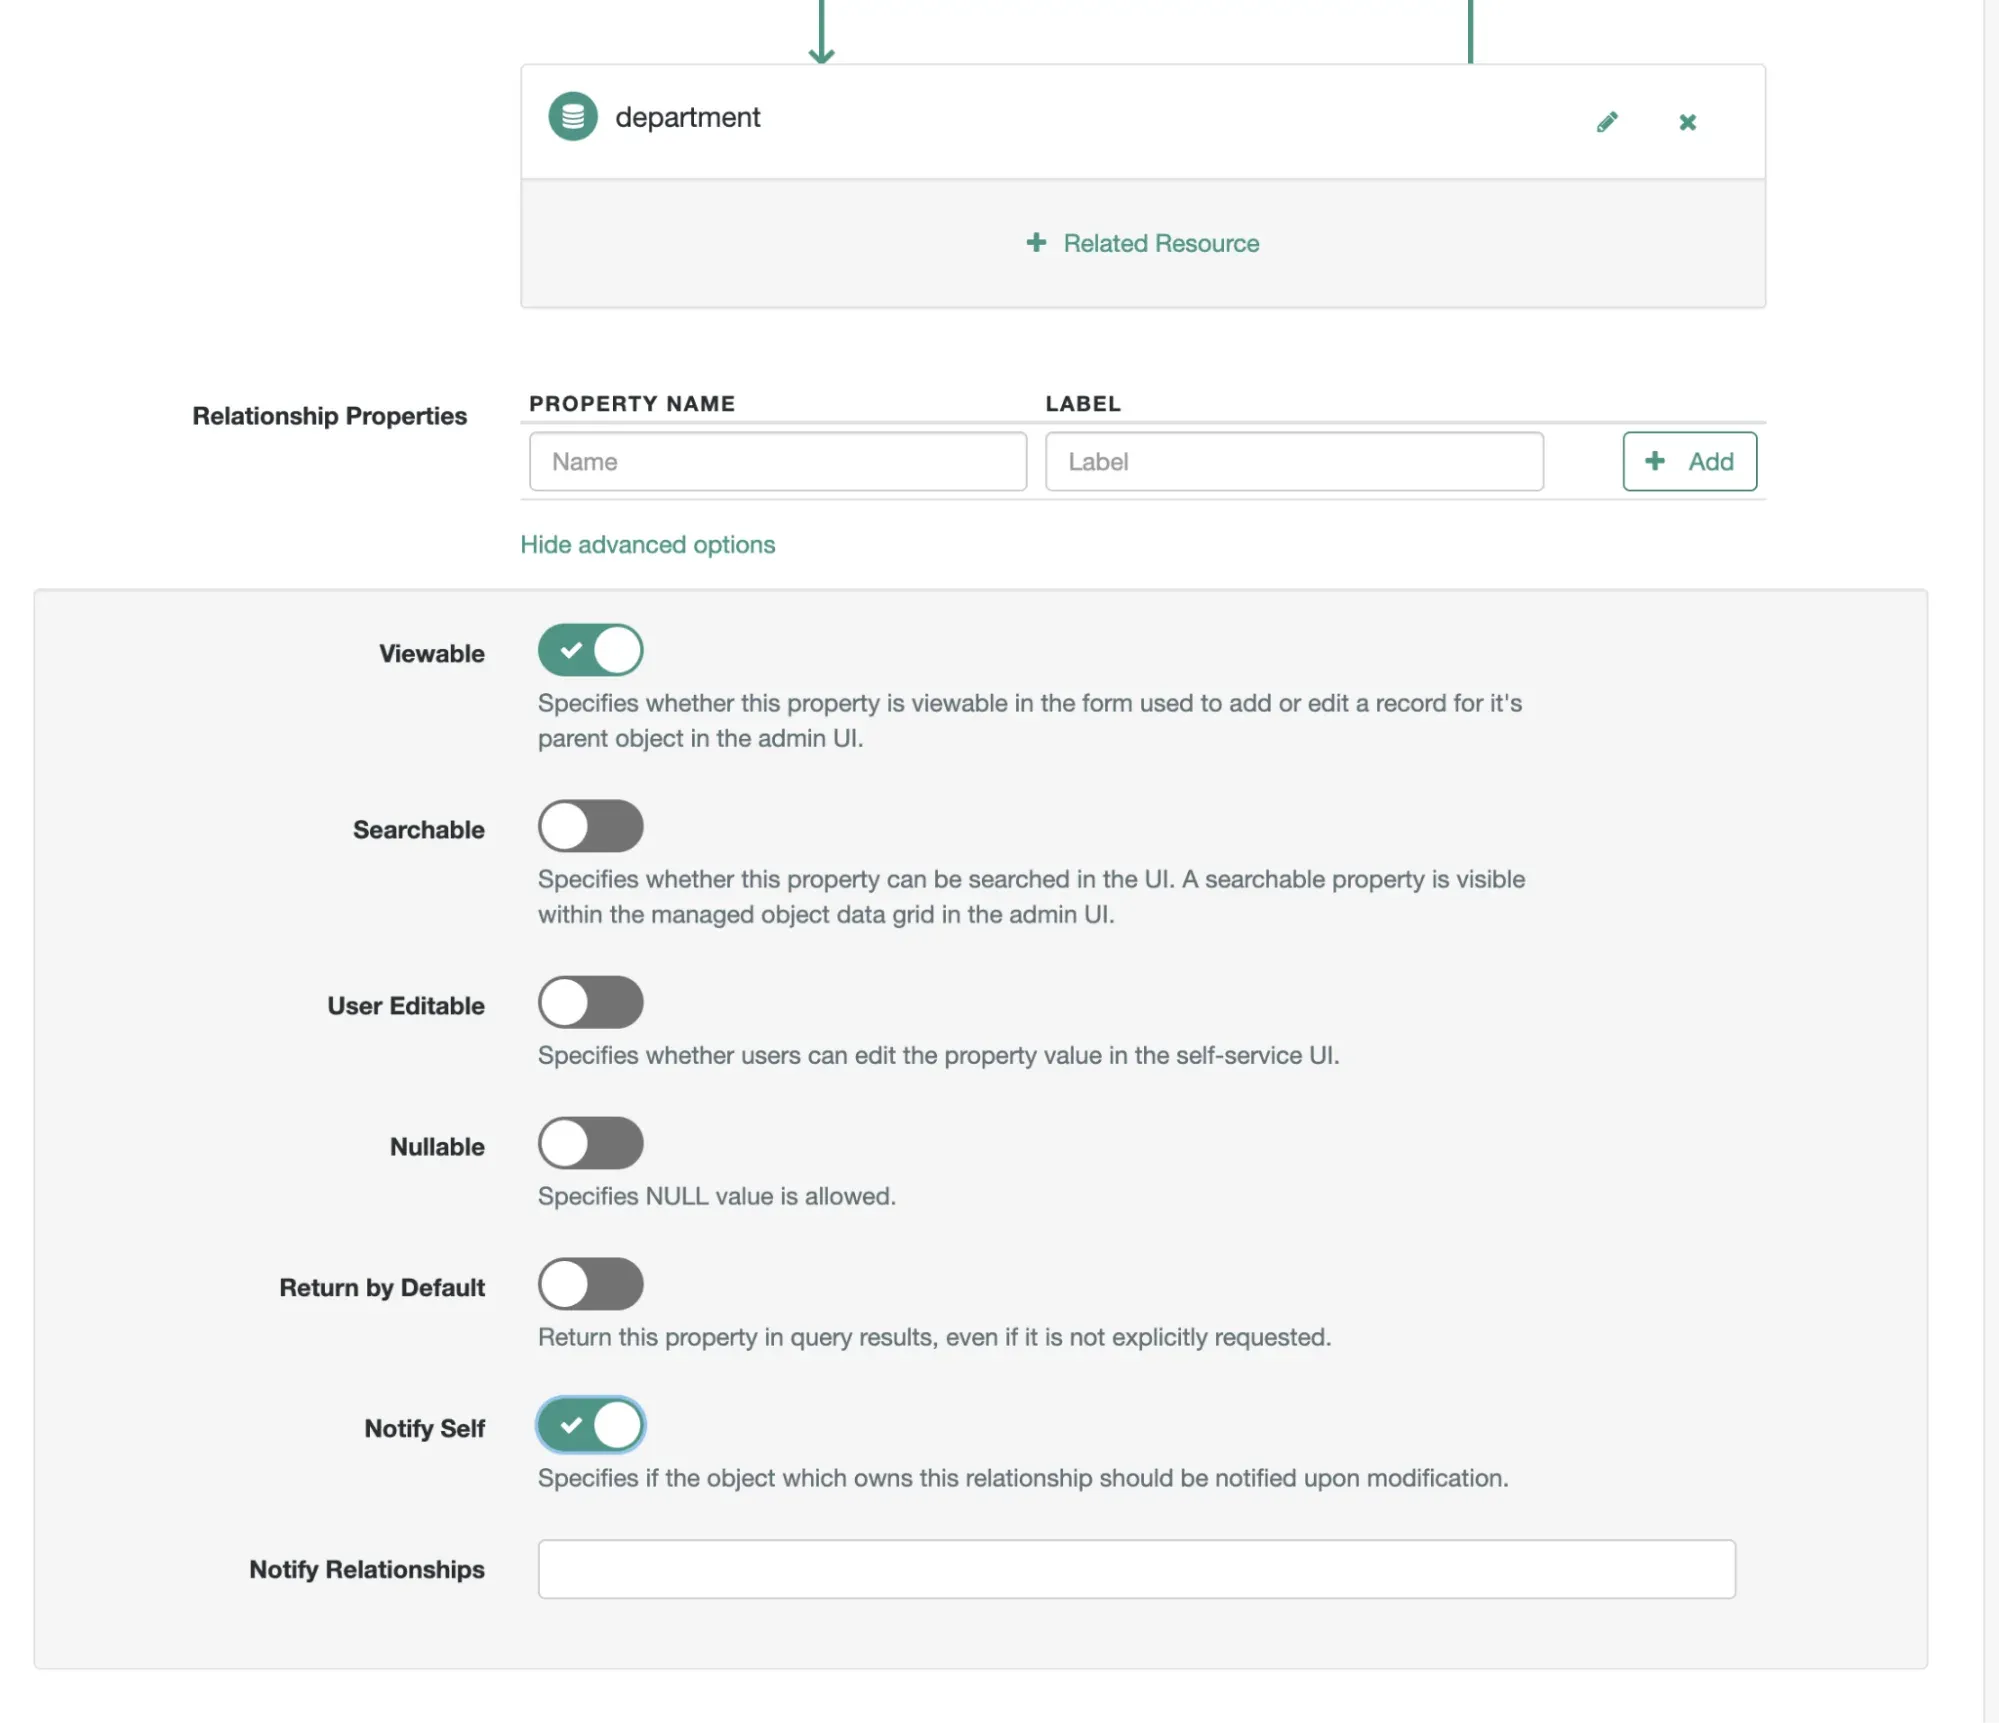 Notify Self on the Children Department Relationship
Head back to your Example department. You’ll now see that… the child names still aren’t there?
Remember, RDVPs update only when they are notified to update. Since that child relationship was set before we created our notifications, nothing informed the RDVP to update.
In your Example department, remove Child1 from your Children and then re-add them. Go back to your details page (you may need to refresh the page afterwards, too, to see the change) and you’ll see an odd jumble of JSON.
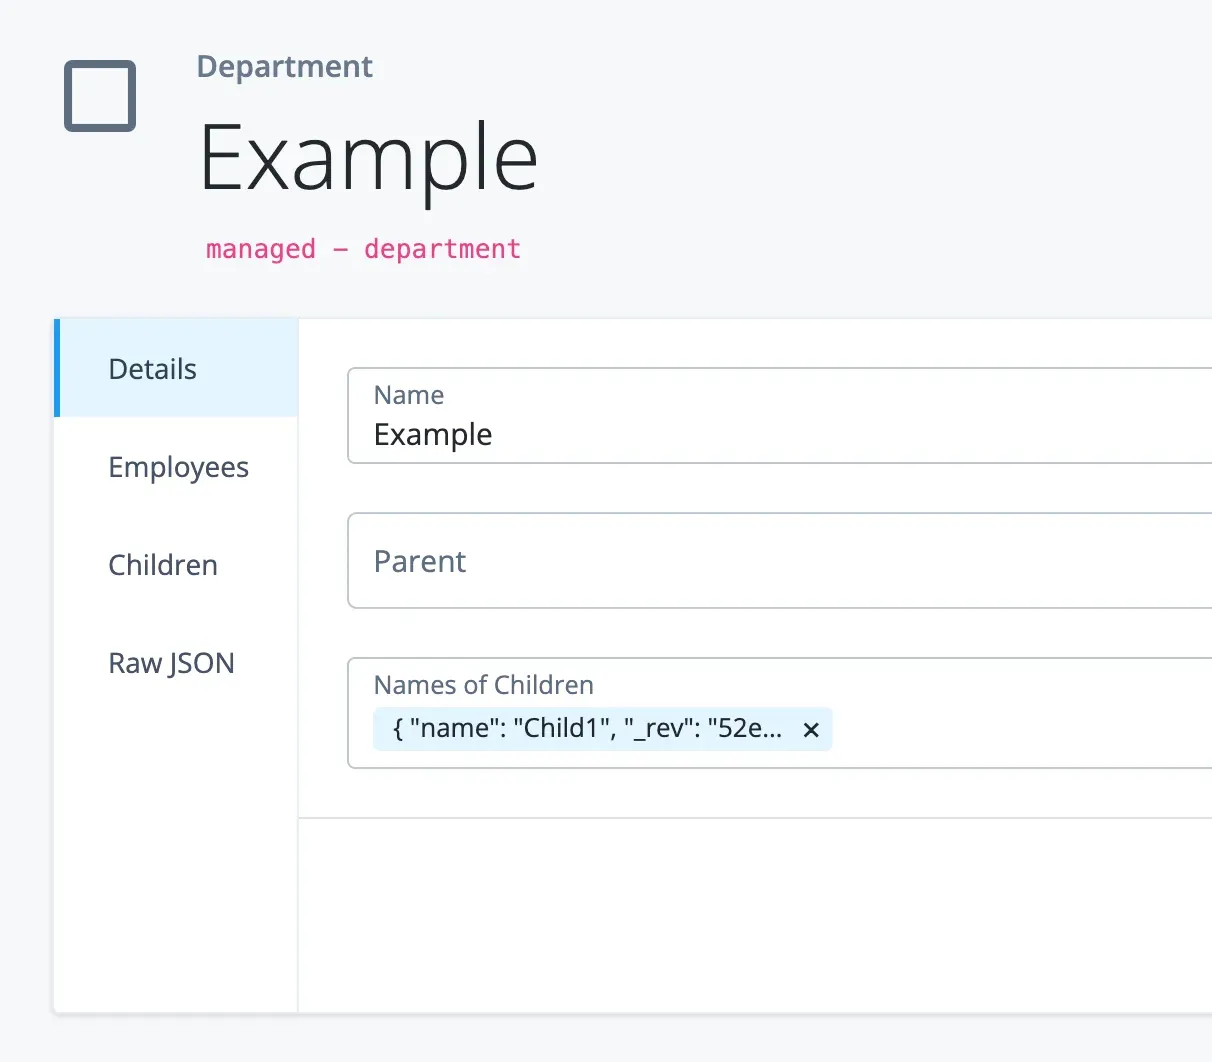 The Raw RDVP
The Raw JSON will give you a better sense of what’s going on here. Your RDVP is returning the relationship details along with the value you’re requesting from the object (i.e. the name).
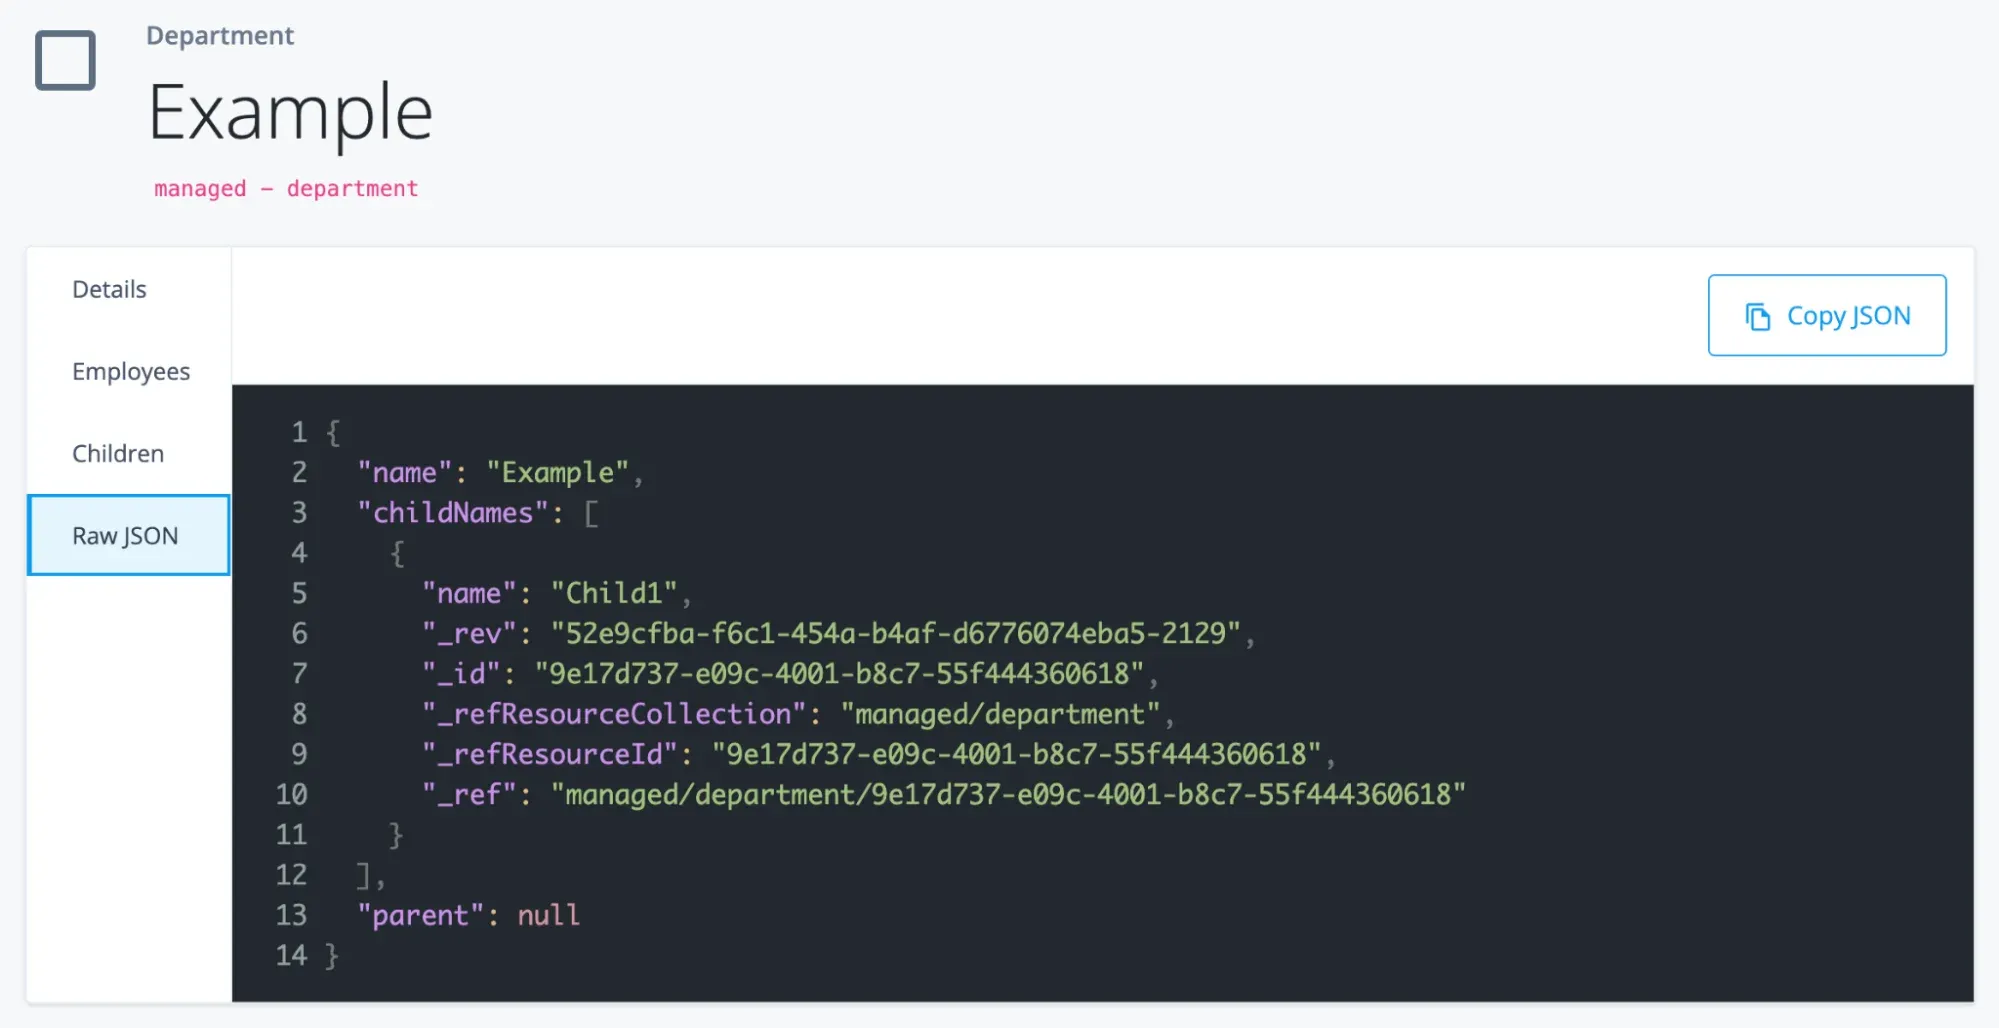 The RDVP JSON Output
In some cases, this level of detail is exactly what we want - it gives us the extra information we need to perform additional analysis like relationship querying. In the case of our name list, though, it’s probably unnecessary.
Head back to your Query Configuration for the childNames property and check “Flatten Properties”, then unassign and reassign the child relationship (if you want, try to assign the parent from Child1 to show that your notifications are working from both sides of the relationship). Your results are now returning as an array of just the child names.
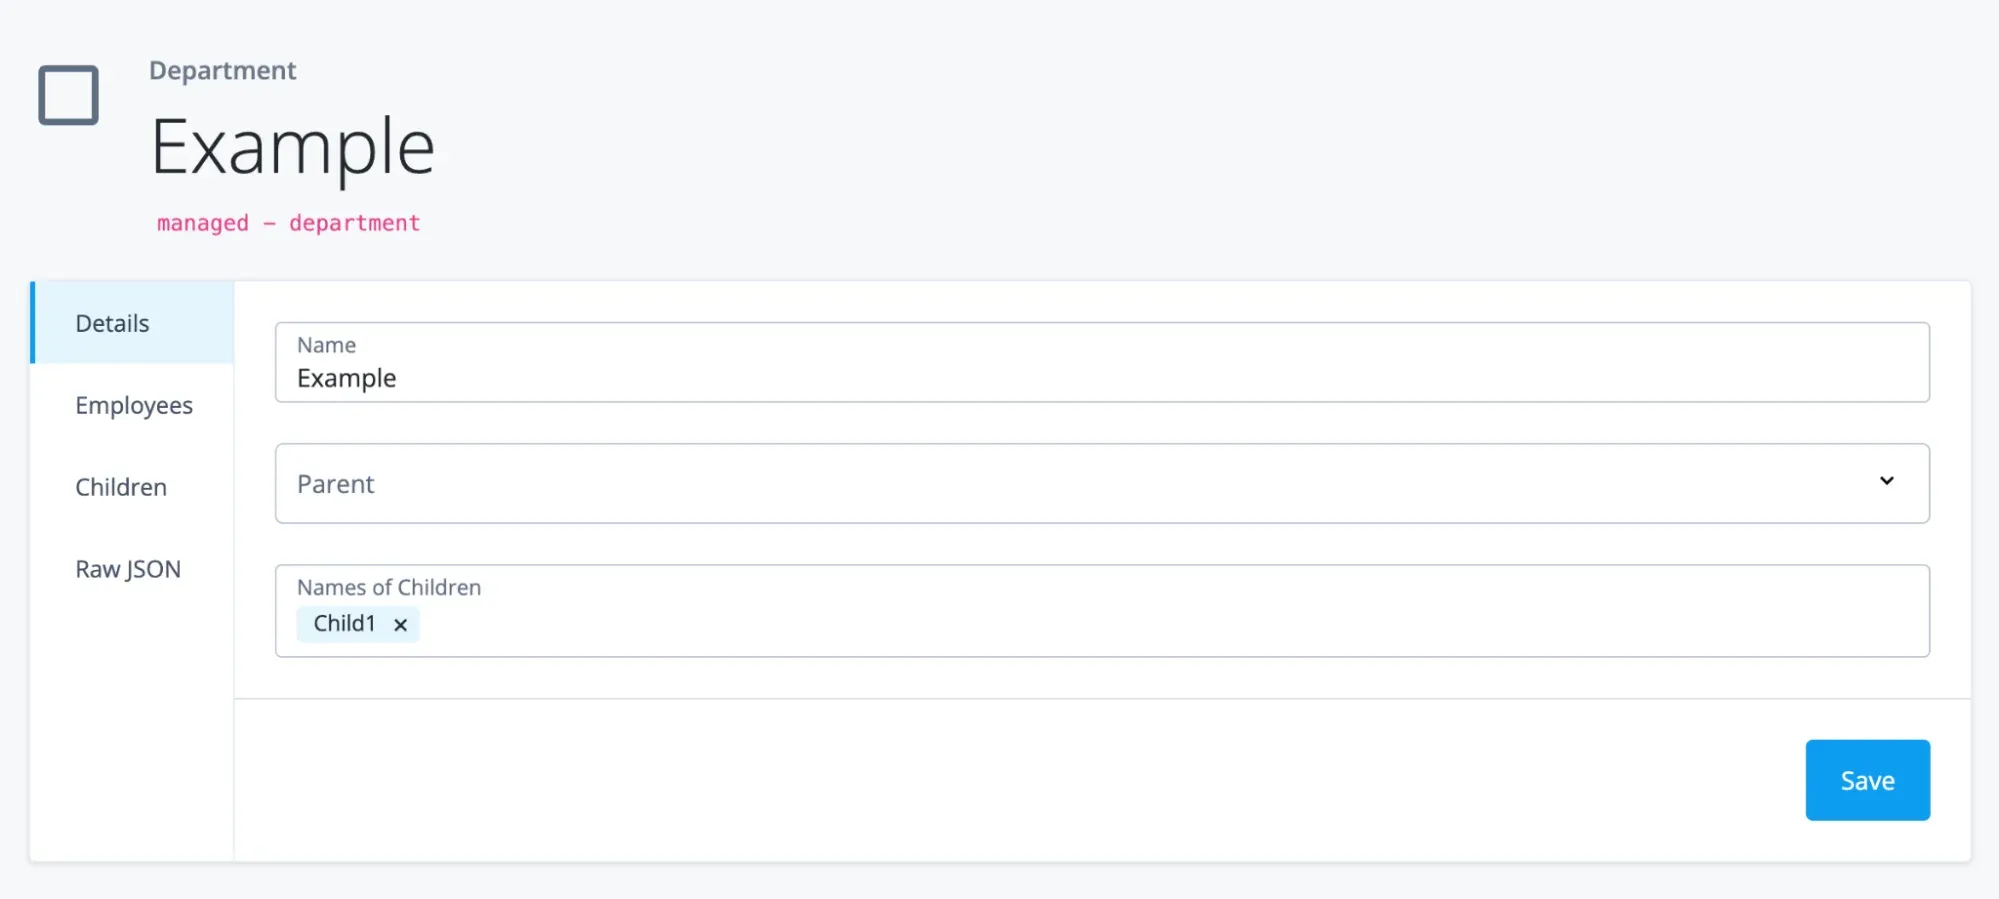 Much Better
But what if you change the name of the child? Right now, nothing would happen - your parent is only getting notified if the relationship changes, not if the property changes.
In the name property of your department object, add the parent relationship to Notify Relationships.
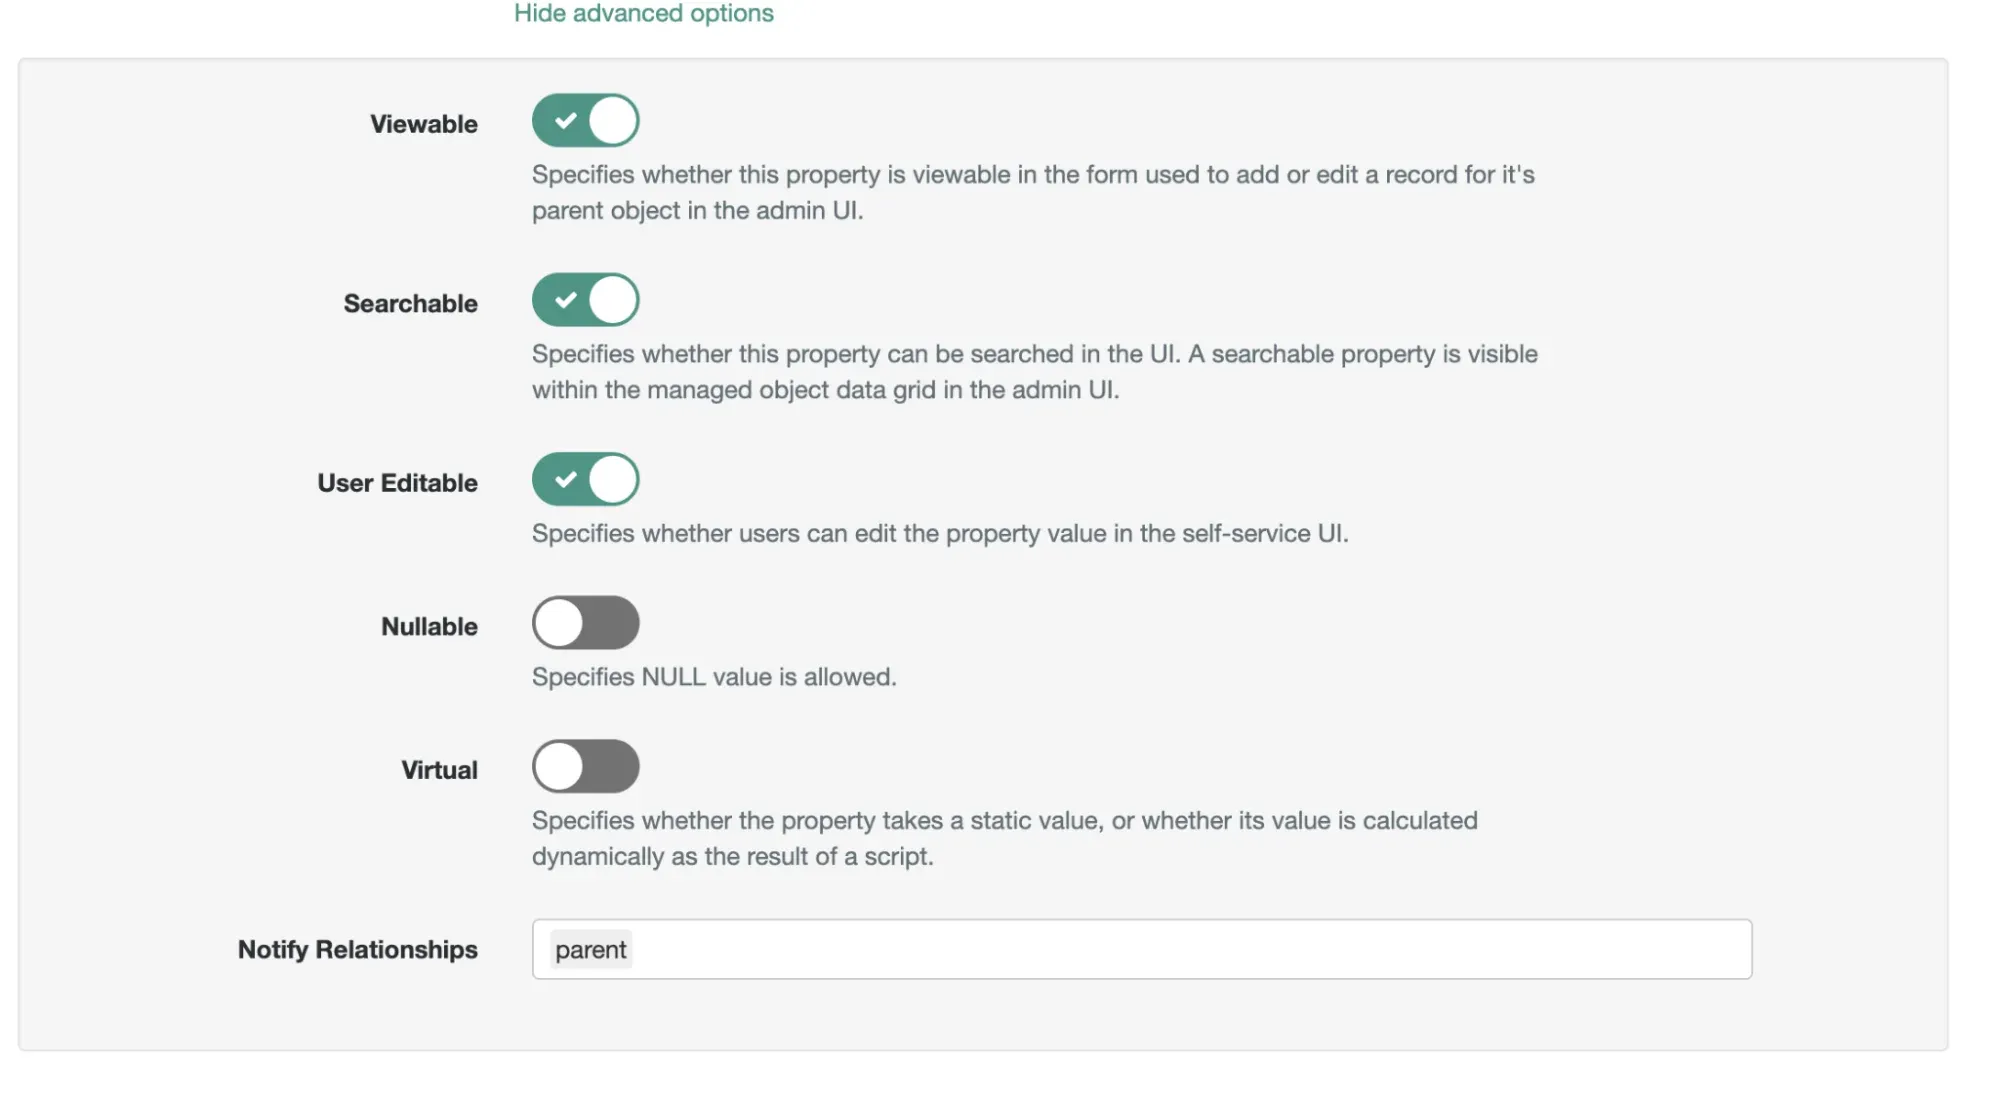 Notifying the Parent if the Name Changes
With that notification in place, if your department changes their name they immediately let their parent know to update their RDVP accordingly.
You now have an RDVP that gives you an easy glance into the direct descendants of your department. But what if your sub-departments can go a level deeper?
Example: Multi-Level Linkage
Create a new department named Grandchild1 and assign its parent to Child1. You’ll see that the Child can see the Grandchild but the Parent (the Example department) has no visibility into the grandchild. If you’ve created a property that is meant to give visibility into all of the sub-departments that your department oversees, it’s likely that you want to see all of them, not just the first layer of direct assignments.
Back in your childNames RDVP, update the referenced object fields to be name,childNames. This tells the RDVP to not only reference the name of your children, but the childNames property on your children.
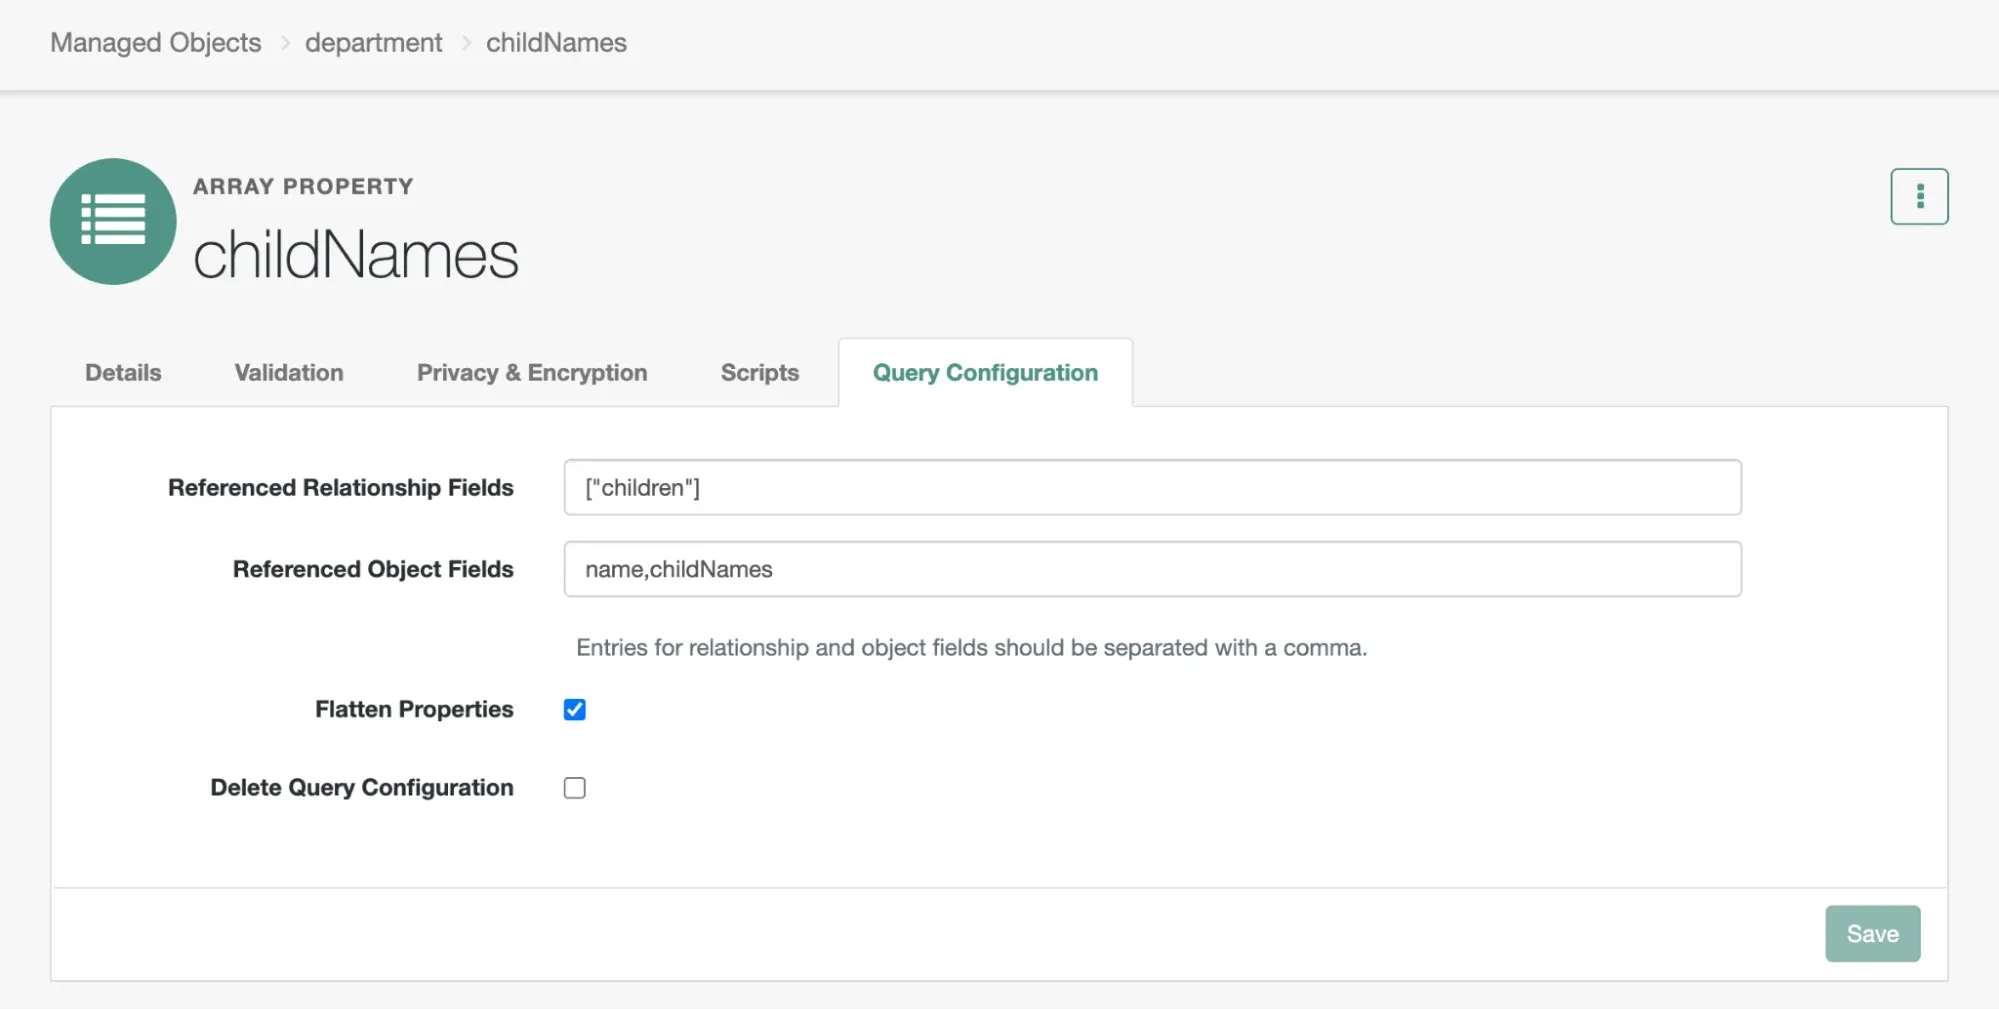 The Nested Referenced Object Fields
Unassign and reassign the grandchild from the child. The parent (example) department should have the grandchild, right?
Nope! Right now we are letting our direct relationships know when changes have been made but we aren’t propagating that information farther along the hierarchy. In other words: our parents know when they’ve changed children, and our children are letting our parents know when they’ve changed their parents, but our children aren’t letting our parents know when they’ve changed their children.
Back in the children property, set Notify Relationships to parent. This says that when you’ve modified your children you will let your parent know that something has changed and that they need to update their own information accordingly.
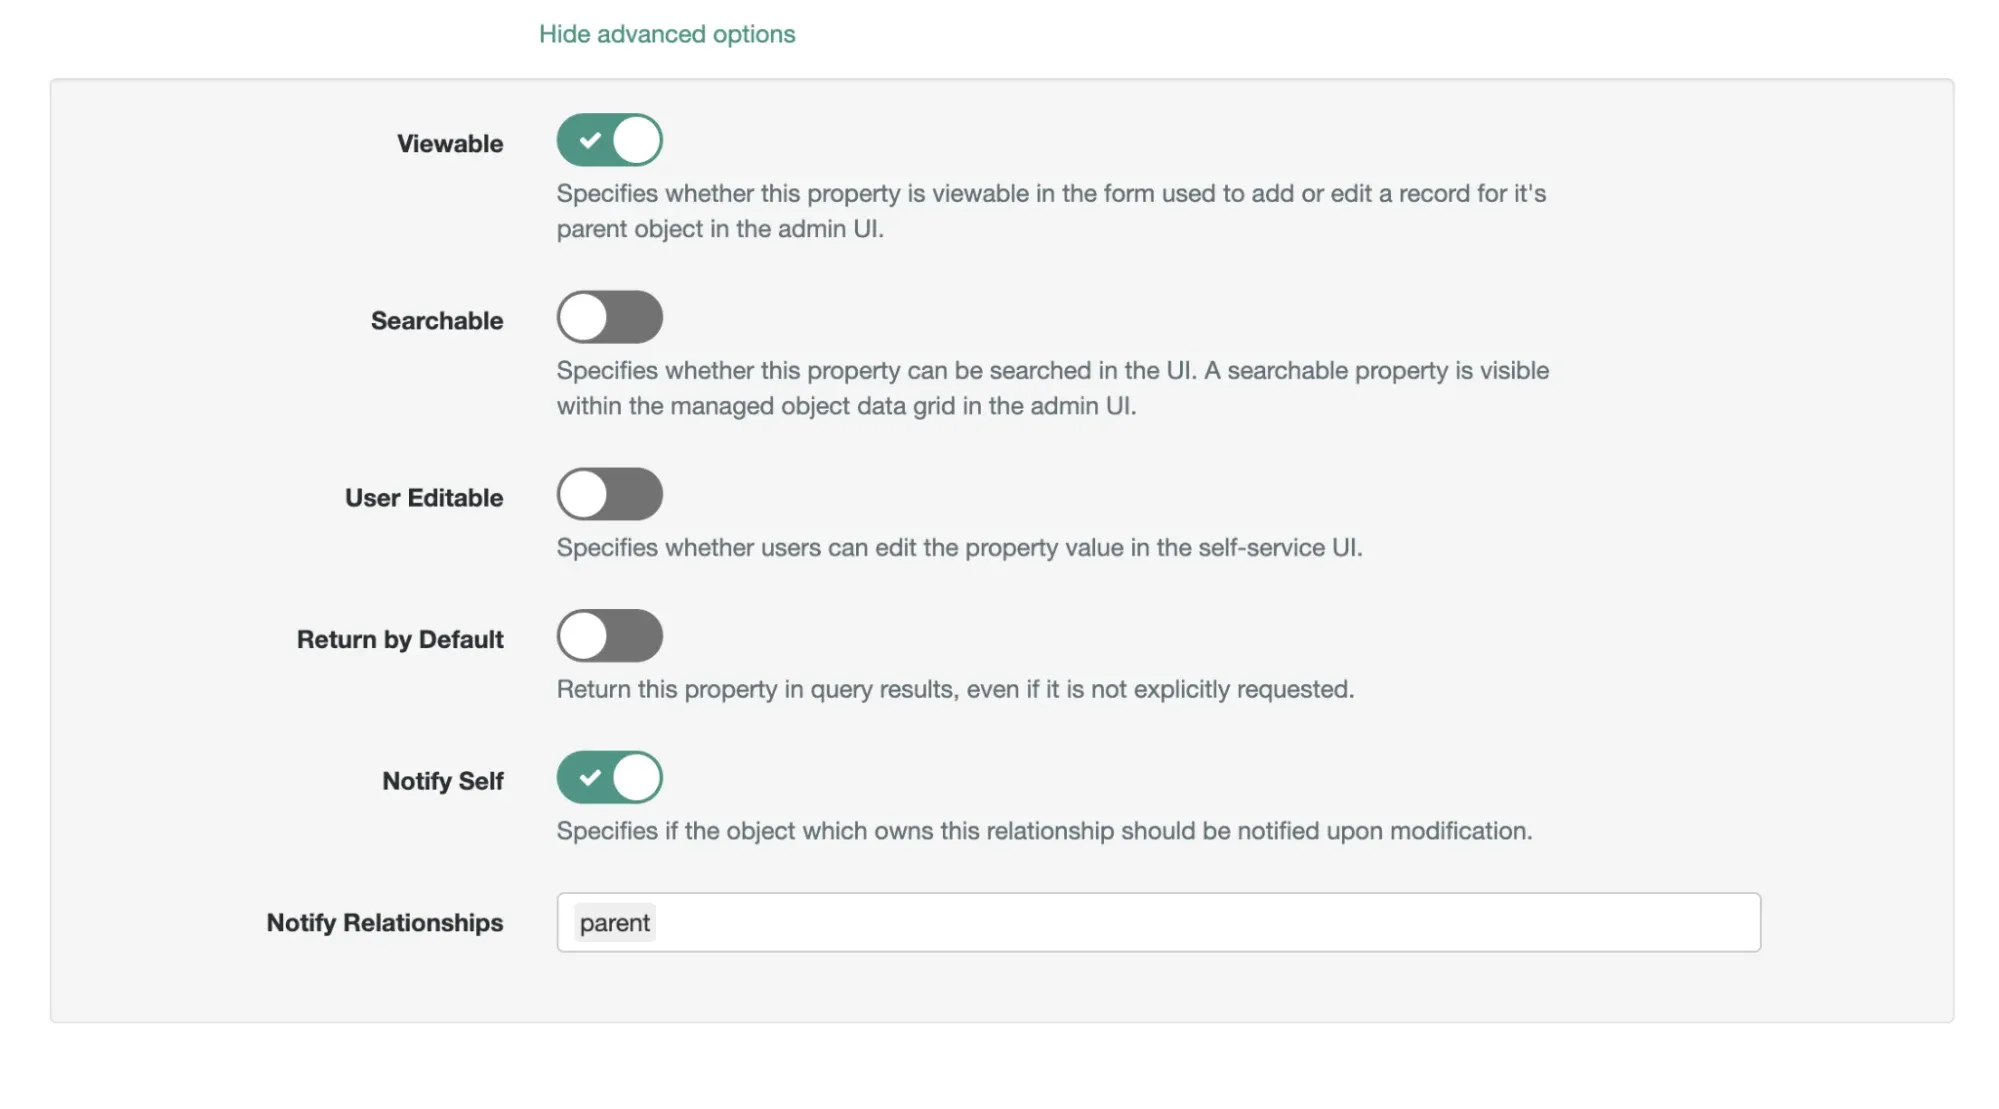 Notifying the Parent from the Children Relationship
From Child1, unassign and reassign Grandchild1 again. Going back to Example, you’ll see both the child and grandchild in your RDVP.
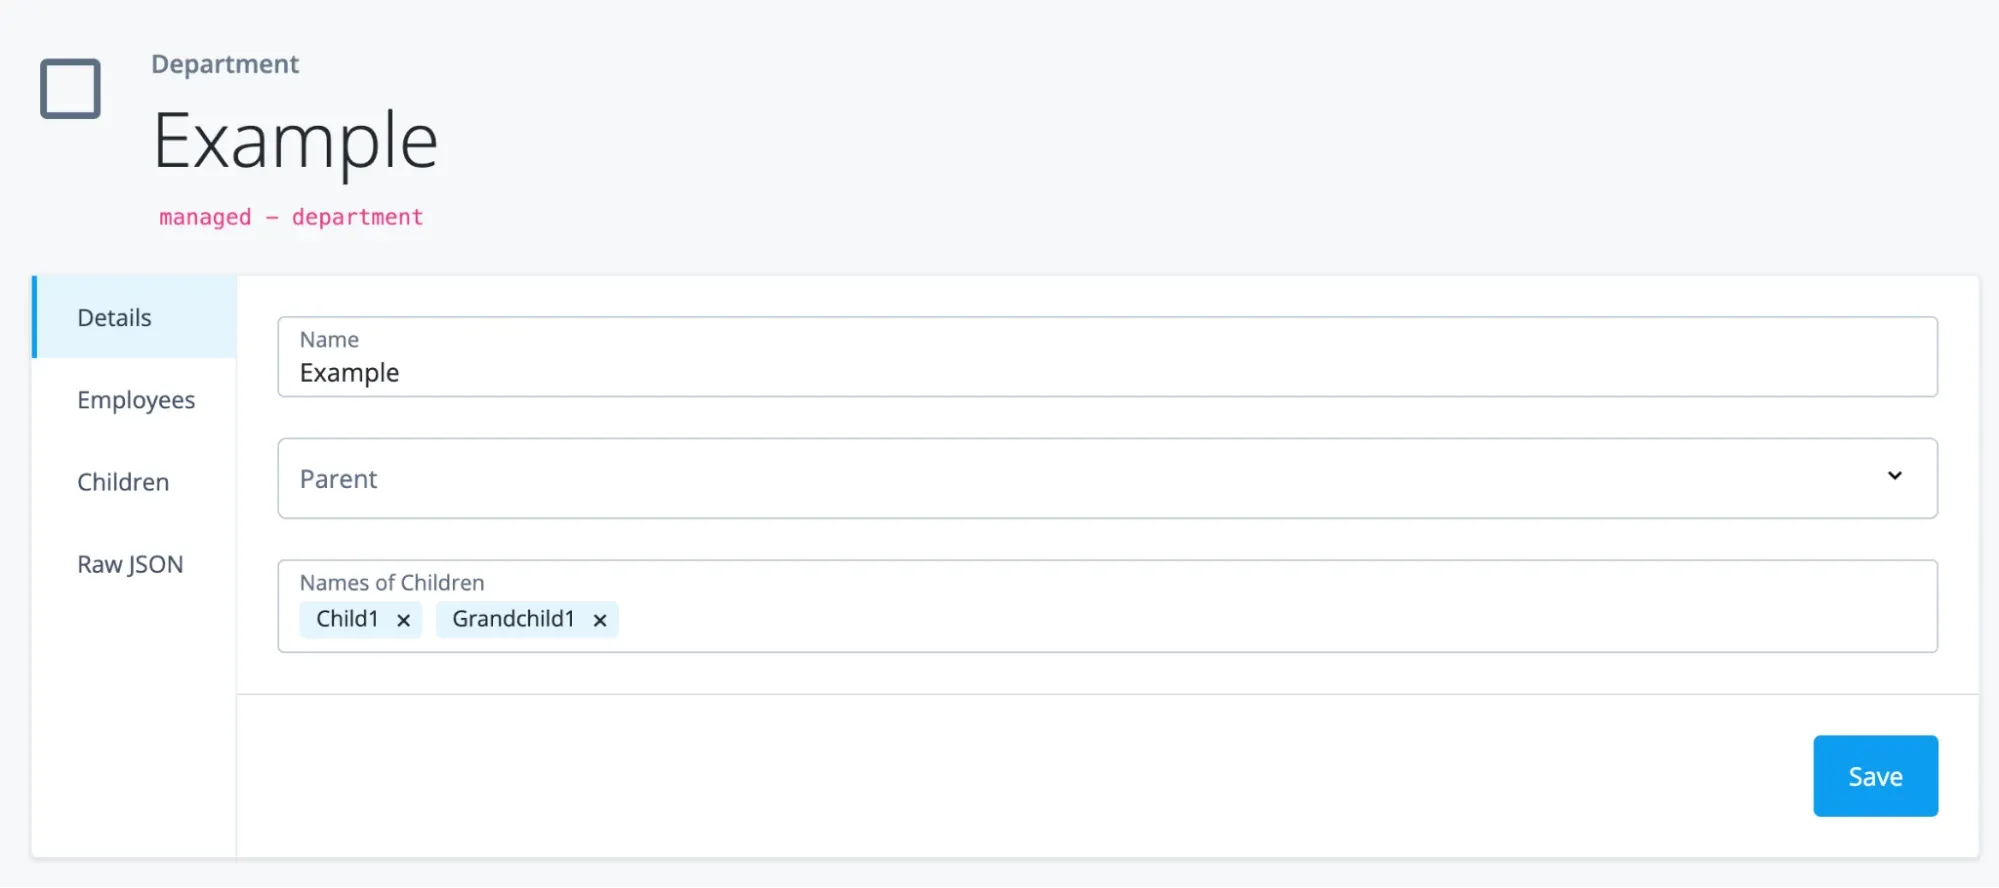 The Multi-Level RDVP
Now we have a way to see nested relationship data in a handy-dandy, easy-to-reference array. Let’s take this a step further and get data from another relationship in our department: the employees.
Example: Multi-Relationship Linkage
If you’re getting the names of the departments you cover, you may want to also get some details on the employees that work across those departments.
Create a new Array property called employeeEmails with the label Emails of Employees. Like before, disable “User Editable” and enable both “Virtual” and “Return by Default”.
Your query configuration will now have to reference two different relationships: your department’s employees as well as their children. The employees relationship will give us the data for the employees that work directly for this department and the children will give us information about the employees that work in the child departments.
Set your referenced relationship fields to [["employees"],["children"]], your referenced object fields to mail,employeeEmails, and enable Flatten Properties. This query is stating that we are looking for the mail and employeeEmails properties on both the employees relationship and the children relationship. Since mail only exists on employees and employeeEmails only exist on children we’ll get a running list of email addresses across the direct and indirect assignments.
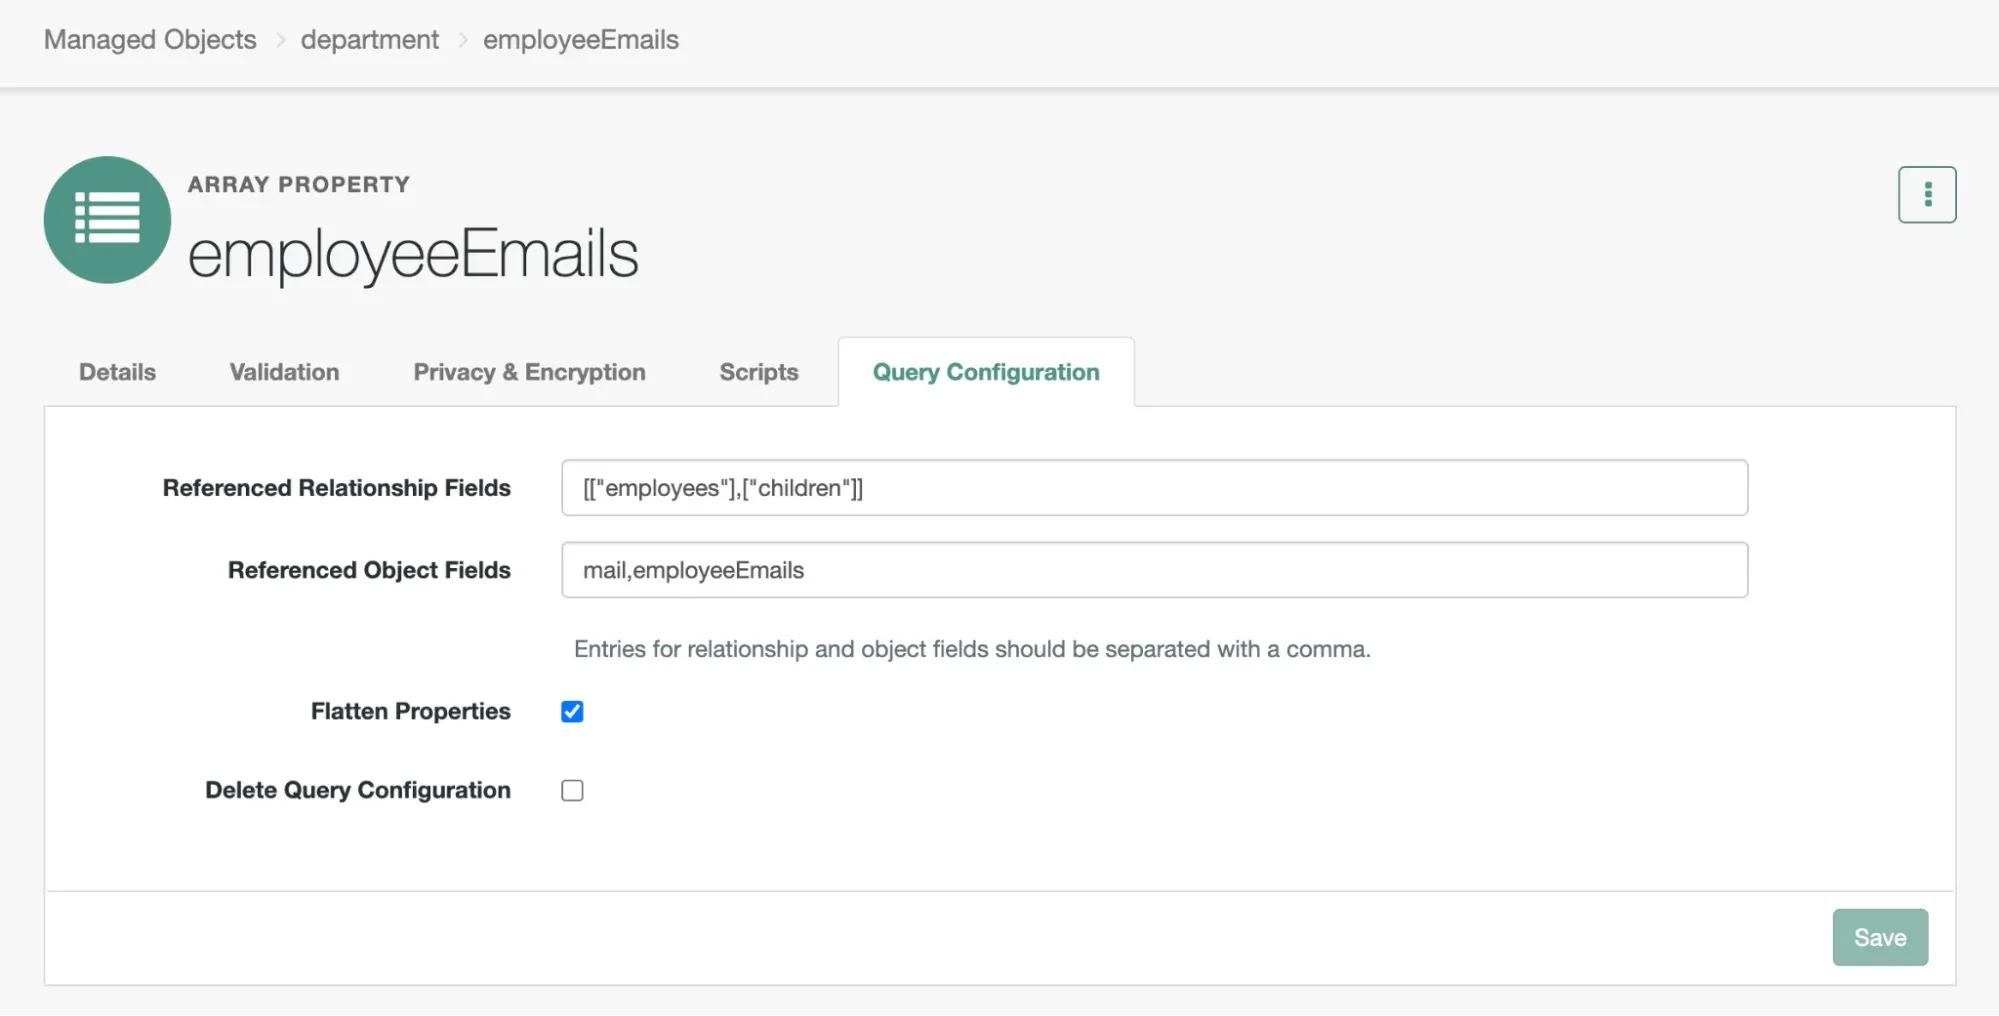 The Employee Emails Query Configuration
Taking what we’ve learned from the prior examples, we should know that while the children of the department are notifying the department when changes are made, we’ll need to additionally notify the department about the employees to keep this RDVP up to date. If you want to test your understanding, try to set up the notifications yourself before checking your work below.
Solution (Click to View)
- In the department managed object:
- Set Notify Self to true on the
employeesrelationship - Set Notify Relationships to
parenton theemployeesrelationship
- Set Notify Self to true on the
- In the user managed object:
- Set Notify to true on the
custom_departmentsrelationship - Set Notify Relationships to
custom_departmentson themailproperty
- Set Notify to true on the
Create three users: parentEmployee, childEmployee, and grandchildEmployee. Then, either via the admin interface for the user or the department, assign the users accordingly. You should see their emails pass upward to your parent department.
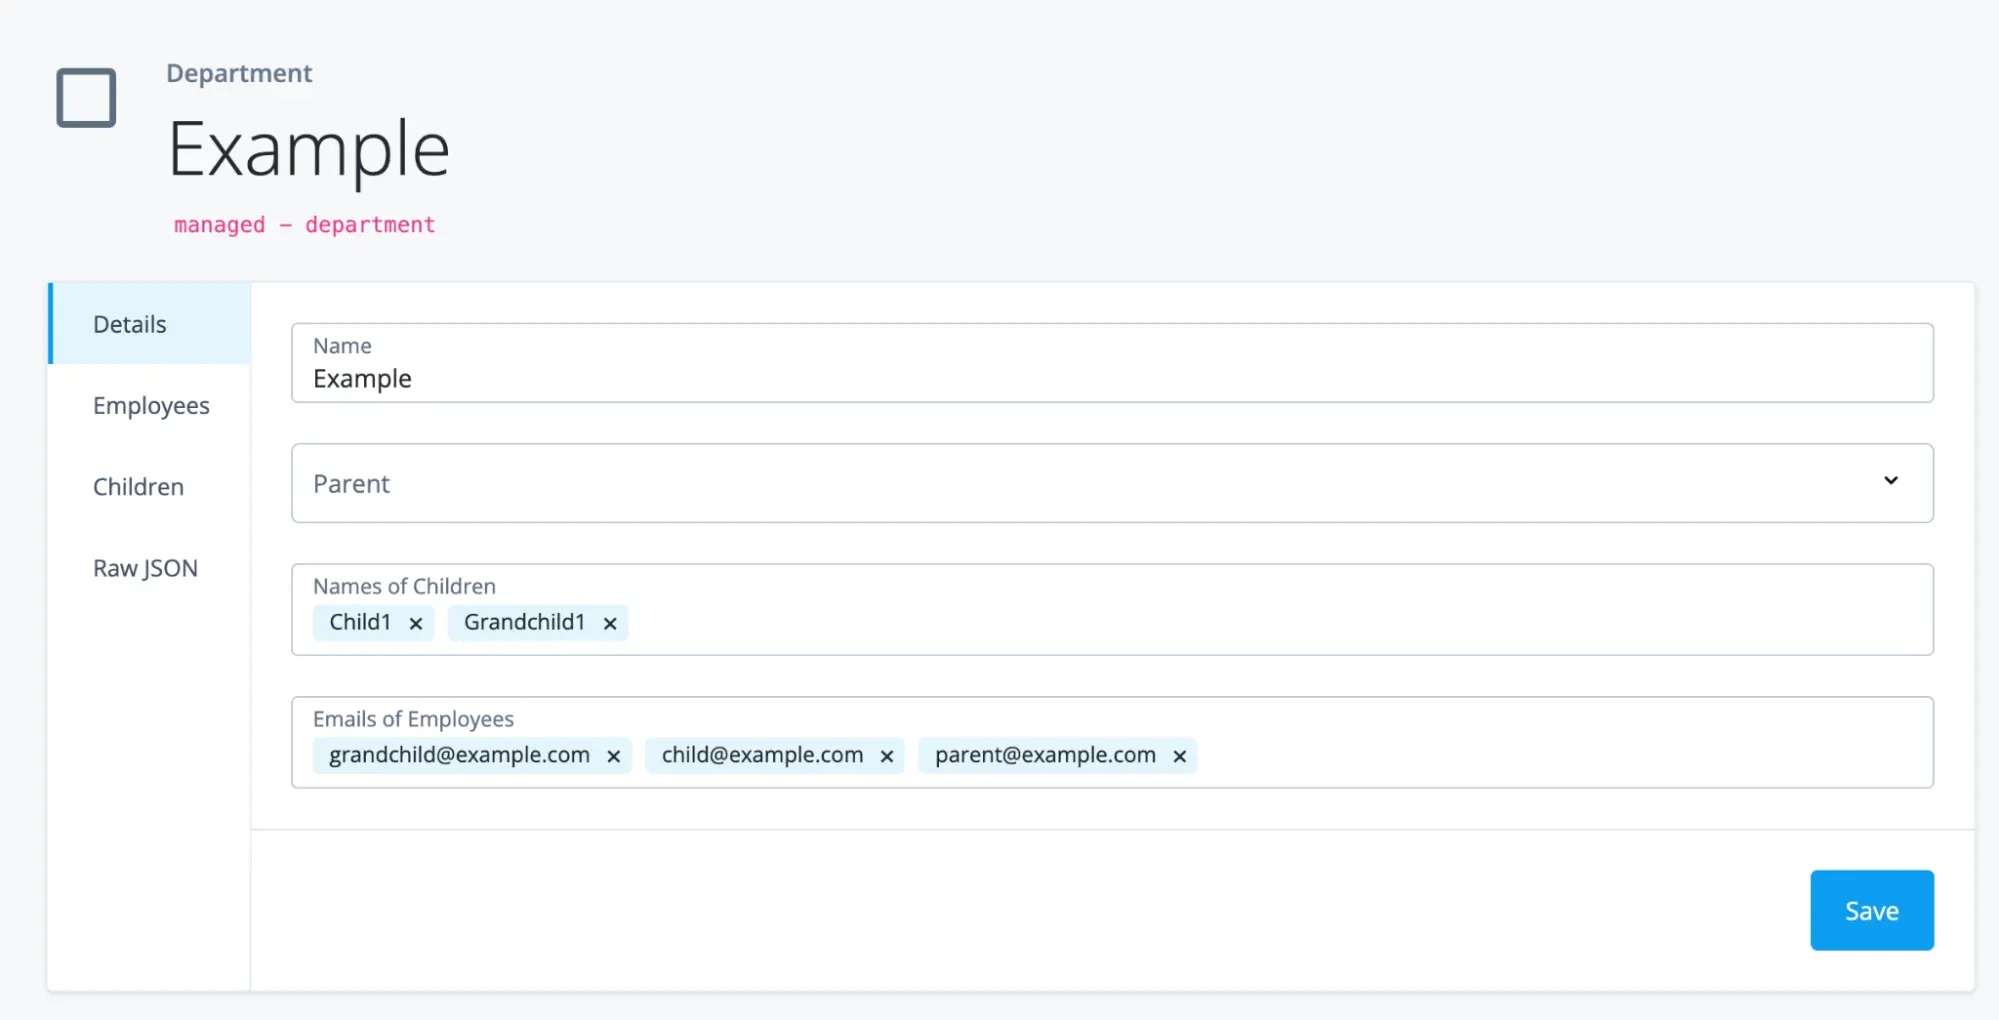 The Multi-Relationship RDVP in Action
Example: The Organization Model
You may have noticed something familiar about the model we created. In essence, the hierarchy we built and the RDVPs we designed are a slightly-modified, rudimentary implementation of the Organization Model in AIC. On top of the RDVPs we built, Organizations have two additional User/Organization relationships with their own RDVPs gathering those relationships to be used in the platform for things like delegated administration. Relationships, and RDVPs, are the foundational principles that the Organization structure is built upon - and you now know how it works and how to expand upon it!
Conclusion
By completing this Guide, you’ve learned:
- What are Virtual Properties and Relationship-Derived Virtual Properties
- How to choose between the two types
- Once chosen, how to configure the property
Outside of just Virtual Properties, you’ve additionally learned:
- Common IDM scripting techniques
- The basics of Relationships and a detailed understanding of configuring notifications from those relationships
Armed with this knowledge, you should be able to design and build complex, dynamic properties that match the requirements you need for your business and applications.
Join the discussion on the Ping Identity developer community.