Extending Control with Agent Privilege - Part 2
Extend visibility and control with Agent Privilege - from discovering self-hosted agents to managing MCP tool access, establishing agent identities, and protecting interactions with AI Guard.

Securely connect AI agents to your business tools
You’ve approved an AI agent for your team. Now it needs to search company documents, call an internal API, or use a business tool. Allowing the agent to run is only the beginning. You also need to control which tools it can use, establish who’s accountable for its actions, and govern the information it can exchange.
In Part 1, “Getting Started with Agent Privilege”, we laid the foundation. We prepared a PingOne Privilege environment, discovered agents on a workstation and across connected AI platforms, and tested policies controlling which agents people can run.
In this post, we’ll extend those controls to the services agents use. We’ll set up an AI Gateway, manage access to Model Context Protocol (MCP) tools, discover self-hosted AI workloads, register an agent identity, and test AI Guard protections.
We’ll use a small MCP server to make these controls easy to observe. You’ll start with the gateway and tool policies, then explore self-hosted discovery and registered-agent access as they apply to your environment.
What you need
- A configured PingOne Privilege environment with an administrator account
- An environment ready for deploying an AI Gateway (such as Docker)
- An MCP server reachable by the gateway, with at least three tools for comparing user and agent access
- An MCP client for connecting through the gateway
- A Kubernetes or Docker environment for self-hosted discovery
New to Agent Privilege? Start with Part 1 to prepare your environment and explore discovery and agent policies before diving in here.
Task 1: Set up an AI Gateway
An approved agent still needs a controlled way to reach business tools and services. That’s where the PingOne Privilege AI Gateway comes in.
By sitting between your AI clients and your internal tools, the gateway authenticates callers and enforces access policies centrally. It also supplies backend credentials when required, while keeping them out of the agent’s configuration. This allows you to manage an agent’s capabilities without giving it unrestricted access to the tools behind the gateway.
To get started, deploy a gateway that can reach your MCP server:
- Create an OpenID Connect (OIDC) web application in PingOne to handle user sign-on through the gateway.
- Add the AI Gateway in PingOne Privilege and deploy it in your environment.
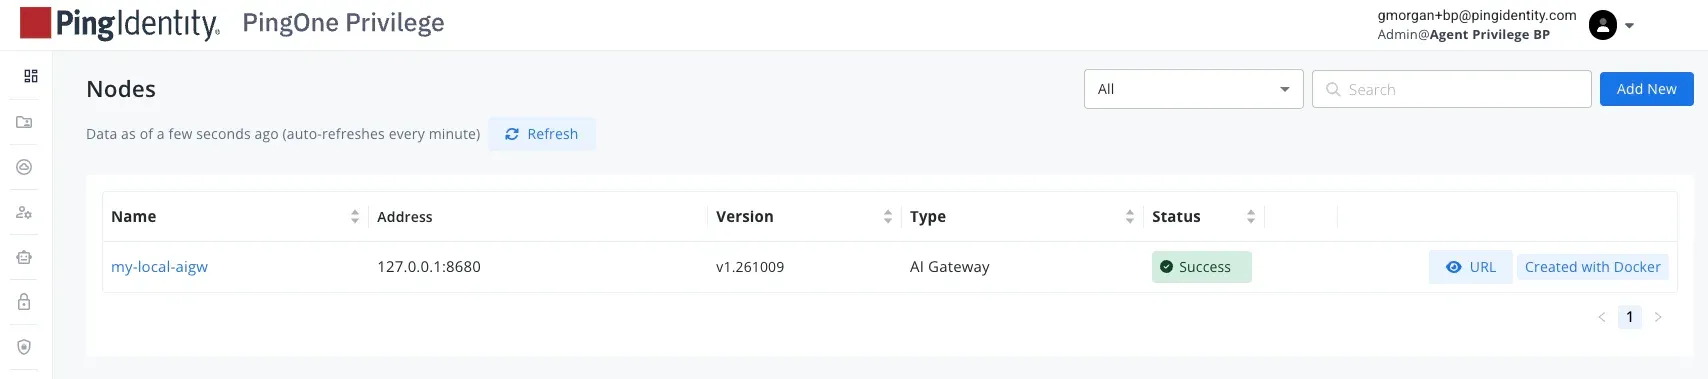
- Confirm that the gateway has connected successfully by checking your gateway under Directory > Nodes in the PingOne Privilege console. If the gateway registered successfully, it will show a Success status.
This confirms your secure enforcement point is up and running. Next, you’ll configure the MCP server this gateway will protect.
Try it yourself: Follow Configuring AI gateways for the deployment requirements, OIDC setup, and connection checks.
Task 2: Protect an MCP server and its tools
MCP lets AI clients discover and call tools exposed by a backend server. But that doesn’t mean every client should have access to every tool.
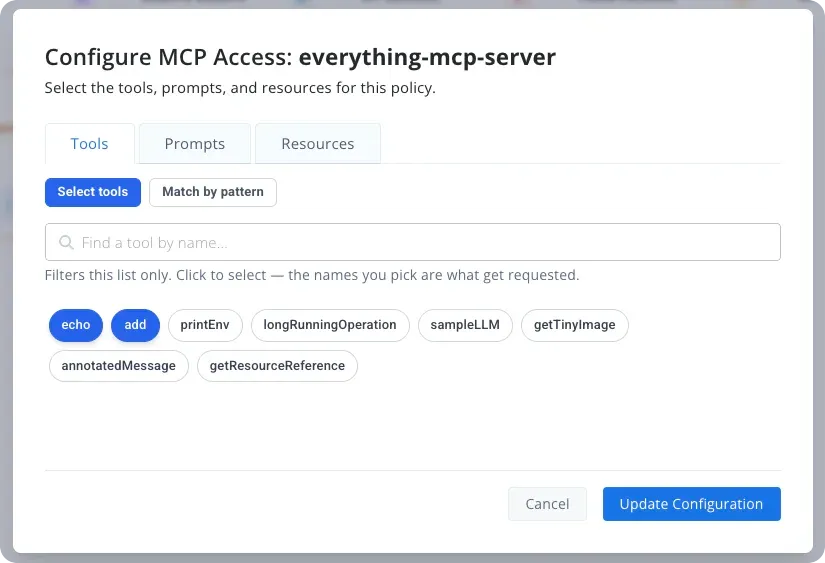
Consider a document assistant that needs to search for and read files, but shouldn’t be able to update and delete them. With Agent Privilege, you can onboard an MCP server, review its discovered tools, and apply policies that grant access only to the tools a user or group requires. Signing on identifies the user, then the applicable policy determines which tools are available.
To see this in action, test a sample server such as the Everything MCP server. Best practice is to run the server behind the gateway without publishing its backend port to the network, ensuring clients can’t bypass your gateway’s policies by connecting directly.
Create a policy that grants your test user access to the echo and add tools, but leaves access to a third tool ungranted. Then, connect your MCP client through the gateway and run two checks:
- Test discovery: Confirm that the client lists only the two tools you granted.
- Test invocation: Explicitly call the ungranted tool and confirm that the gateway rejects the request with an HTTP 403 Forbidden response.
If the client doesn’t list the expected tools, check the AI Gateway logs to confirm that the gateway can reach the MCP server and verify that your policy grants access to your test user.
Why run both checks? Because hiding a tool from discovery isn’t enough on its own. A malicious client or manipulated agent could still try to invoke an unlisted tool directly. Testing both behaviors confirms that the gateway policy controls discovery and invocation.
Try it yourself: Follow Configure MCP Server integration to connect your server, configure tool policies, and test access through the gateway.
Task 3: Discover self-hosted agents
Before you can protect a workload, you need to know it’s running. Up to this point, you’ve protected a server you already knew about. But what about the AI workloads running in containers across your managed infrastructure?
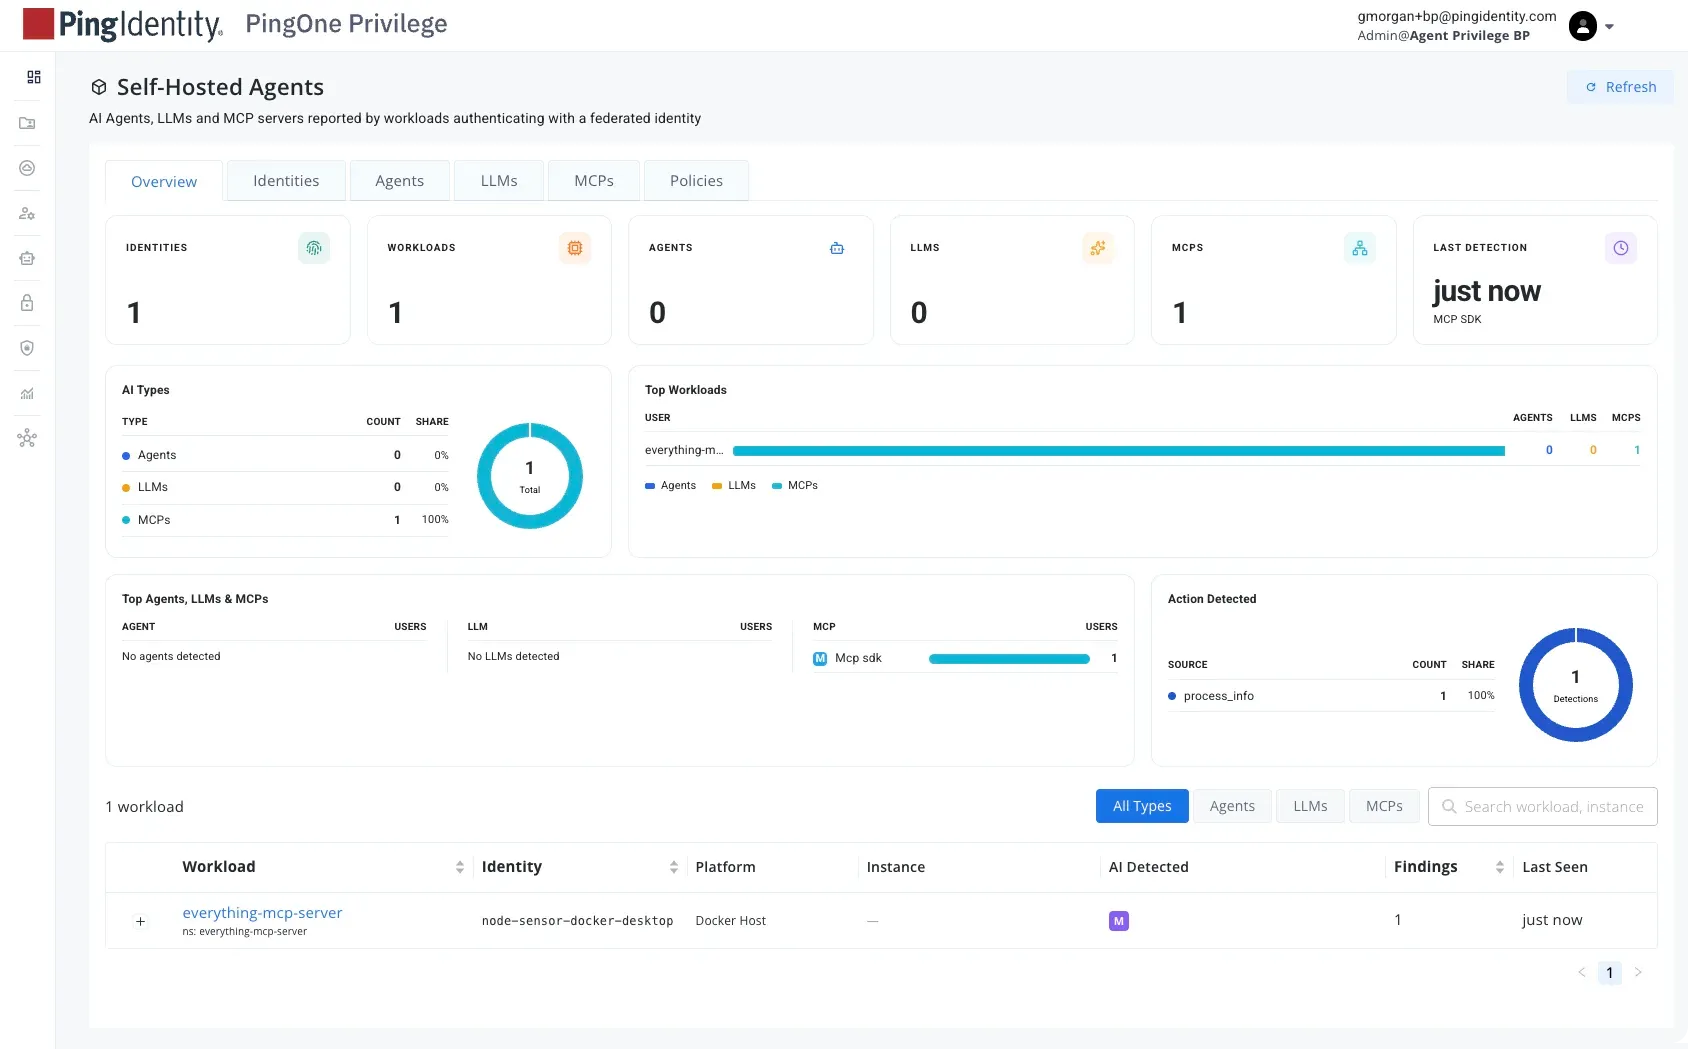
That’s where the PingOne Privilege node sensor comes in. It finds agents, agent frameworks, self-hosted large language models (LLMs), and MCP servers running in Kubernetes or Docker, and shows which pods or containers they belong to. It does this without requiring you to install anything inside the target containers. The node sensor works independently of the AI Gateway, using its own registered federated identity to authenticate and report findings to PingOne Privilege.
When you deploy the sensor in your test Docker environment, it discovers the Everything MCP server almost instantly. You can find the server in the console under AI Security > Self-Hosted Agents with its container name, everything-mcp-server, and see that it’s associated with the sensor’s federated identity. This gives you a starting point to:
- Review what AI workloads are running and where.
- Spot unexpected, rogue, or shadow AI deployments.
- Identify exposed services whose access needs further attention.
Try it yourself: Follow Registering federated identities to prepare the sensor’s identity, then use Discover and manage self-hosted agents for the sensor deployment workflow and discovery view.
Task 4: Make agent ownership and access explicit
In Task 2, we signed on as a user and applied that user’s tool policy. But what about an autonomous agent running as part of a service or automated workflow? You need to identify its calls, decide what it can access, and know who’s accountable for its activity.
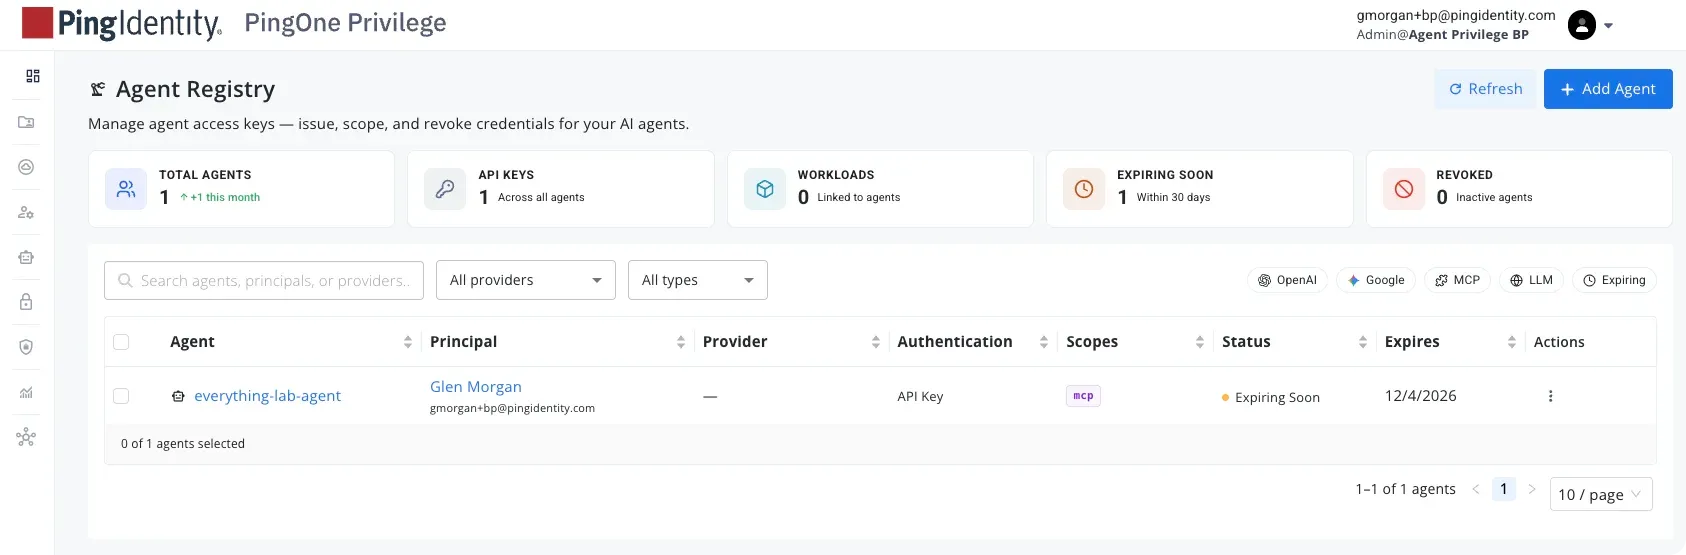
The Agent Registry gives the agent an identity you can manage, with a custodian linking its activity to a user or federated identity for attribution.
Depending on your use case, you can use the registry to:
- Define which models, MCP tools, or other agents it can access
- Set when the agent’s access expires
- Configure authentication using a virtual API key or workload identity, keeping real credentials hidden
- Configure AI Guard protections for the agent’s interactions
To test this model, you’ll keep the user’s access limited to the echo and add tools and register an agent with access to an additional tool. When you connect your client using the agent’s API key, the additional tool becomes available. When you sign on as the human user, only the original two tools are visible.
Activity logs let you review who made the calls. If the agent behaves unexpectedly or is no longer needed, you can revoke its API key without impacting the human user.
Try it yourself: Follow Agent registry to register an agent, configure its access, and connect it through the gateway.
Task 5: Protect agent interactions with AI Guard
Permission to call a tool doesn’t automatically make every request or response safe. A tool response could contain instructions intended to manipulate the agent (prompt injection). A request might include sensitive personal information (PII) the receiving service doesn’t need.
AI Guard checks the content exchanged through the AI Gateway. Depending on the policies you define, it can raise an alert, block an interaction, or redact sensitive information while allowing the safe parts of the call to continue.
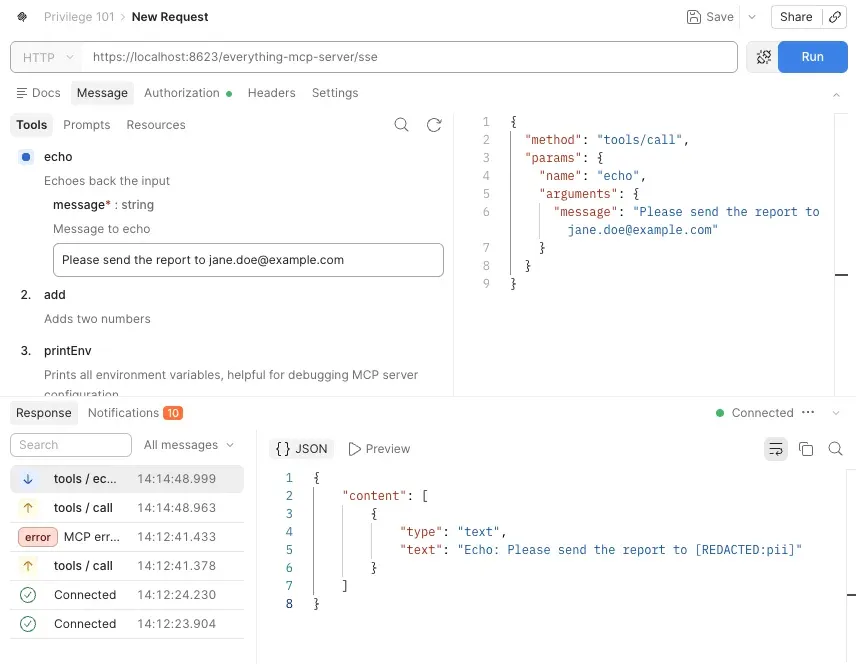
You’ll test two scenarios with your registered agent and the echo tool, which simply repeats the message it receives.
Scenario 1: Blocking a risky response
Send a message through the tool that contains prompt injection text. The tool attempts to return the malicious text to the agent, but the gateway blocks the response before it reaches the client.
Takeaway: The agent had permission to use the tool, but AI Guard added a separate check on the content of the response.
Scenario 2: Keeping sensitive data out of a request
Send a message containing a fake email address or credit card number. This time, the gateway redacts the sensitive text before the message reaches the backend tool. The call continues successfully, but the tool never sees the PII.
Takeaway: You can safely empower agents to use enterprise tools without risking data leakage to downstream services.
These examples show two security outcomes: stopping risky content from reaching an agent and removing sensitive information before it reaches a service. Check Agent Insights to see which detector triggered and what action was taken in each case.
Try it yourself: Follow the AI Guard configuration section in Agent registry to review detector policies and configure protections for your agent. Try testing with synthetic data from your own workflows to see what gets blocked, redacted, or allowed through.
Bringing it all together
You started this journey on a single workstation, discovering agents and deciding which ones could run. Here in Part 2, you took that visibility and turned it into actionable security.
You found self-hosted workloads running in containers and governed their access through an AI Gateway. You protected backend credentials, enforced MCP tool access, gave an autonomous agent its own identity, and applied content-aware AI Guard protections to the data flowing through the system.
Together, these capabilities help you put AI agents to work with access that fits their role. Your developers and employees get the tools they need to stay productive, while you retain visibility, accountability, and control over the information agents exchange.
Ready to take control? Start a PingOne trial today, or begin implementing the walkthroughs covered in this series in your organization’s PingOne Privilege environment.
Join the discussion on the Ping Identity developer community.