Login Widget Customization, from CLI to Chat Prompt
A firsthand look at how building custom login UI on the Ping Login Framework has evolved, from hand-written Svelte components to CLI scaffolding to AI-assisted generation via MCP.


We spend a lot of our time in the Ping Login Framework, the Svelte-based toolkit behind our Login Widget. Building a custom login screen is always the same task at heart, but lately we’ve watched our own process for doing it evolve through three distinct stages.
Each stage streamlines things a bit more than the last, and by the third one we’re barely writing any code ourselves. We want to walk through that evolution, and why building each tool led us straight to building the next one.
One thing up front: everything past the first section is experimental. The APIs might change as we refine things, and none of it is officially supported yet.
If you like seeing where things are headed before everyone else, though, read on.
Building custom components
The Login Framework ships with a full set of built-in Svelte components that render every stage and callback type out of the box, so most apps built with the Login Widget never need to touch any of this. But sooner or later you’ll want to break away from the defaults.
Maybe you need a different look and feel: your own branding, layout, or validation messaging. Or maybe you need functionality the built-ins just don’t offer, like an extra field on a login form, or a bespoke UX for a particular callback type. That’s what custom components are for.
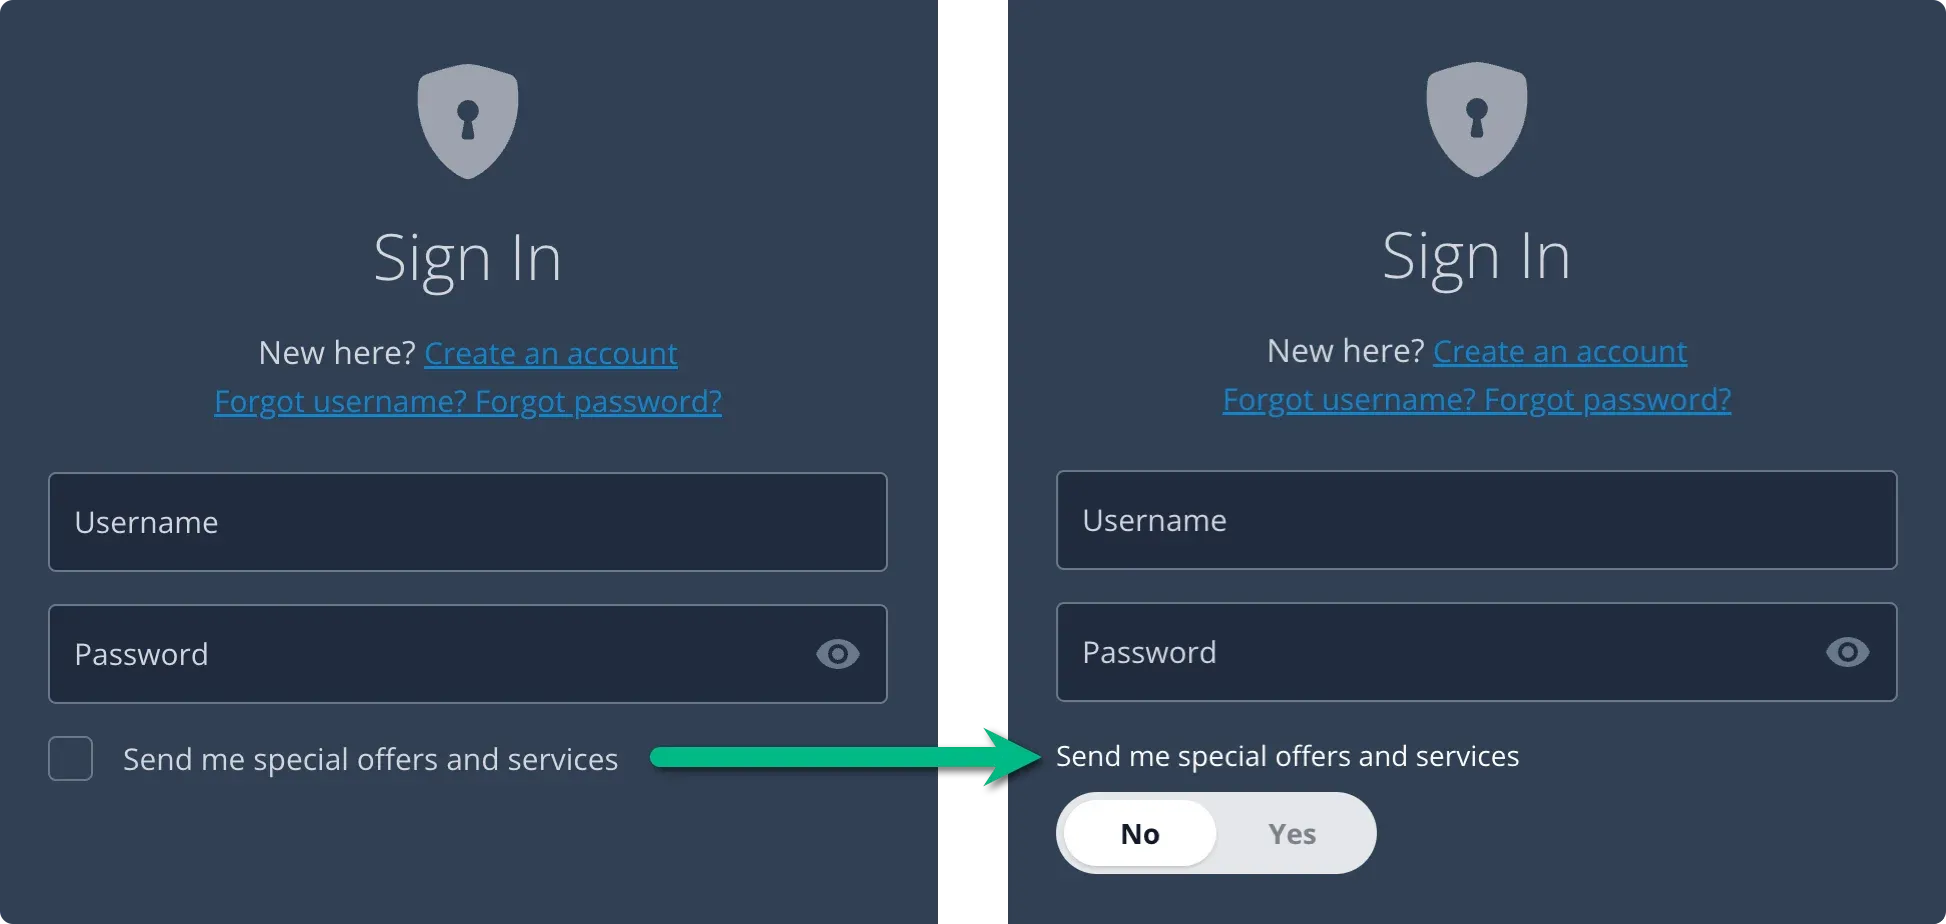 Implementing a custom callback component for boolean attributes
The framework supports two kinds:
-
Stage components: Replace an entire form layout for a specific stage.
Think a fully custom
DefaultLoginscreen with your own branding, layout, and validation messaging. -
Callback components: Override how a specific callback type renders, globally, wherever it shows up in any journey.
To build either one, you drop a .svelte file into experimental/custom/stages/ or experimental/custom/callbacks/.
It has to start with a metadata header that the framework’s Vite plugin uses to auto-register it during the build:
<!--
@component
Type: stage
Name: DefaultLogin
-->

<script>
  export let form, journey, step;
</script>

<main>
  <!-- your custom layout -->
</main>
The framework reads that header at build time to auto-register the component, so no manual wiring needed.
This is still the most powerful option. You get full control over markup, styling, and behavior, and it’s where we still land for anything with unusual design requirements.
Scaffolding with the ping-lf CLI
The thing is, the header syntax has to be exact. A typo or a missing field, and the build fails without much to tell you why.
Add in the directory conventions and the prop contract for each component type, and it’s the kind of detail you tend to get right the second time, not the first.
So we wrote a CLI, ping-lf, to take care of the boilerplate.
You can install the ping-lf tool as follows:
npm install -g @forgerock/login-framework-cliNote: You must be running Node 20 for the following
ping-lfcommands to work.
After installing the CLI, you’ll have the following tools available:
init: Initialize a new project from a published framework release or a local framework directory.generate callback: Scaffold a new custom callback component underexperimental/custom/callbacks/.generate stage: Scaffold a new custom stage component underexperimental/custom/stages/.releases: List the framework releases available on GitHub.update: Update an existing project to a newer framework version while preserving your custom components and configuration.
For example, you can initialize a new Login Widget project as follows:
ping-lf init ./MyCustomWidget
cd MyCustomWidget
pnpm install
Now you’re ready to scaffold your custom stage component:
ping-lf generate stage MyCustomLoginThat one command creates the file in the right directory, with a correctly formed metadata header, matching the naming convention the framework expects.
The generate command also scaffolds Storybook stories, a mock journey step, utility functions, and a unit test.
Best Practice: Over time you’ll want to keep your project up to date, and again the
ping-lftool can help.Use
ping-lf updateto pull in framework changes while leaving your custom components and config alone.
What we like about the CLI isn’t that it saves keystrokes. It’s that it removes an entire category of mistakes.
You can’t misspell Type: in the header if the CLI writes it for you. You get the directory structure right by construction. It turns “read the docs carefully” into “run a command”, which is a much better place for a team to be once you’ve got more than one or two people touching custom components.
Still, at this point you’re the one driving. You decide what to build, you run the command, and then you go write the actual component logic and layout by hand. The CLI just clears the path to that part.
Supercharged components: adding an MCP for use by LLMs
Once the CLI existed with a clean set of typed commands behind it, it was a short step to ask: why not expose those same commands as tools an AI assistant can call directly? So ping-lf can also run as an MCP server, the same protocol that tools like Google Gemini and Claude Code use to call out to external tools.
Pass ping-lf the mcp parameter to run it in MCP mode. Point your AI assistant at it, and every one of those CLI commands becomes something the assistant can call directly, in the middle of a conversation, without you touching a terminal.
Wiring it up is just a config entry:
{
  "mcpServers": {
    "ping-lf": {
      "type": "stdio",
      "command": "npx",
      "args": [
        "-y",
        "@forgerock/login-framework-cli",
        "mcp"
      ]
    }
  }
}
After connecting to an assistant, you’ll have the exact same operations the CLI exposes, just callable directly from your assistant instead of typed as a CLI option.
In practice, that means we can describe what we want in plain language, something like:
Using the ping-lf MCP server, add a custom component for
BooleanAttributeInputCallbackthat has a nice toggle effect between the two options, where a pill moves left or right to highlight the option and dim the unselected one.
The assistant scaffolds the component and fills in a first pass at the markup, using the framework’s own conventions, because it can see and call the same tools we would.
The interesting part isn’t that it saves typing. What it actually does is collapse the whole loop, by giving the LLM a declarative way to create the scaffolded code, rather than guessing at making the files directly.
You describe the outcome, get a working starting point, and iterate in conversation instead of switching between docs, terminal, and editor.
It doesn’t replace the first section of this post. You still need to understand stages and callbacks to know what to ask for, but you can focus on the result you want, rather than the details of how to build it.
It turns the CLI usage from earlier into something closer to “just tell it what you want”.
Where this leaves things
This is early-access, experimental tooling, and it’ll keep changing shape as we get feedback. But the trajectory is clear enough that we think it’s worth sharing now: from hand-writing metadata headers, to a CLI that writes them for you, to an AI assistant that can use that CLI on your behalf.
If you’re building on the Login Framework and want to try any of this, especially the MCP piece, grab the CLI and give it a spin!
Join the discussion on the Ping Identity developer community.