Implementing secure session transfer: a field guide using the PingOne platform
A hands-on field guide to wiring up a secure app-to-web session transfer on Android — walking through PingOne DaVinci flows, Pushed Authorization Requests, and PKCE to deliver seamless, token-validated SSO from a native mobile app to a web browser.
This post was originally published on Medium.
In my previous article, I established the conceptual blueprint for a hardened, standards-based mobile session transfer pattern. We identified that relying on shared browser cookies is a fragile strategy, often breaking under the weight of modern tracking prevention like Apple’s ITP or Google’s Privacy Sandbox. The alternative is a robust “bridge” architecture, moving beyond basic OAuth flows to integrate Pushed Authorization Requests (PAR, RFC 9126) with Identity Orchestration for a secure session transition.
In this field guide, I am moving beyond the “why” and deep into the “how, to provide a technical, domain-by-domain breakdown of the actual implementation.
Pre-requisites
This article is designed as a direct sequel, moving straight into the implementation mechanics. As such, I am assuming you have:
- A fundamental understanding of the PAR and IP binding concepts established in part 1.
- Access to a PingOne environment with SSO and DaVinci enabled.
- A basic proficiency with Kotlin/JetPack Compose (Android) although what is described here could be implemented in any other mobile platform with little difficulty
Initial PingOne configuration
For this setup, we need the following to be configured in PingOne:
- A Native Application client (this represents our mobile app and allows that app to obtain an access token using the SDK)
- A Session Transfer Application client (a stripped down client that exists only to trigger the PAR process)
- Some other “OIDC Web App” (I will be using the preconfigured “PingOne Self Service — MyAccount” application that is automatically bootstrapped with any environment)
- A user account for testing
The Native Application client (1) should be configured as follows:
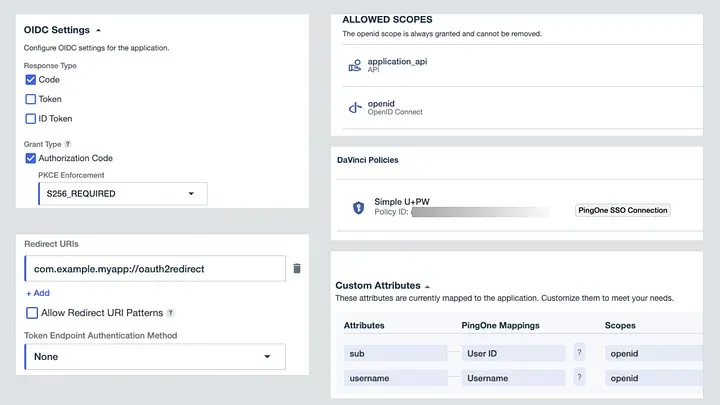
Note here that “API” is a custom Resource defined in PingOne with a corresponding “application_api” scope. This represents access to native application backend API’s that will be granted via the application access token.
We configure a “Simple U+PW” DaVinci flow to enable native user authentication using the Ping SDK. This flow will be described later.
The Session Transfer Application client (2) should be configured as follows:
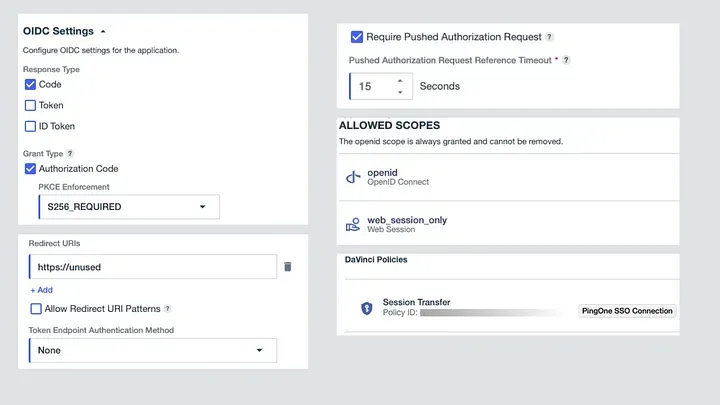
This client is also a public client (hence Token Endpoint Authentication Method = None) but note that here we specify an invalid/unused Redirect URI since this client will only be used for PAR initiation, not token issuance. We require a Pushed Authorization Request with a short timeout and also define a custom scope of web_session_only. The combination of the invalid Redirect URI, the custom scope and the PKCE enforcement should provide sufficient (and redundant) protection against this client being misused for token issuance.
The “Session Transfer” DaVinci Flow will be described later.
The first DaVinci flow
In order to deliver a fully-native login experience within our application, we will implement the PingSDK with the DaVinci Client module. This approach requires us to define a PingOne DaVinci authentication flow for initial authentication of the user within our application (the step that allows us to obtain an access token).
For this example we will use a trivially simple DaVinci flow, shown below. We use the bootstrapped “Example — Sign On” form from the PingOne Forms service.
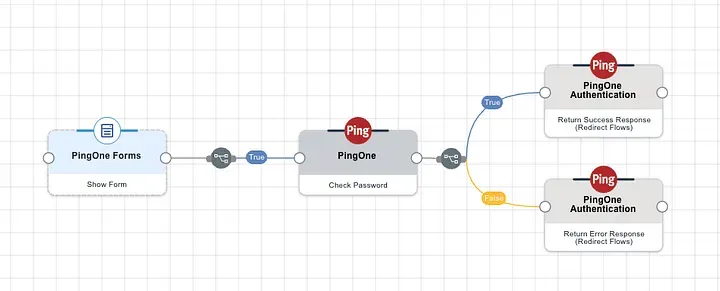
A more detailed explanation of how to use DaVinci to enable authentication is well beyond the scope of this discussion, but should the above prove insufficient, help is always available via the comments section!
Using the Ping SDK to get a user access token
Paul Simon told us that there are 50 ways to leave your lover — what I will add to this insight is that there are at least twice as many ways to obtain an access token within a native application! I’m going to provide some very simple sample code below showing just one of these, using Android with Kotlin and JetPack Compose. Here, we use the PingSDK to trigger the above DaVinci flow to perform simple username and password authentication.
class MainActivity : ComponentActivity() {
sealed class DaVinciState {
object Idle : DaVinciState()
data class Waiting(val text: String) : DaVinciState()
data class ShowForm(val collectors: List<Collector<*>>) : DaVinciState()
data class Error(val message: String) : DaVinciState()
data class Success(val user: User?) : DaVinciState()
}
var currentState by mutableStateOf<DaVinciState>(DaVinciState.Idle)
var userID: String? = null
var username: String? = null
var accessToken: String? = null
val CLIENT_ID = "<PingOne Client ID for Native Application Client>"
val P1_BASE_URL = "https://auth.pingone.eu/<PingOne Environment ID>/"
val daVinci = DaVinci {
module(Oidc) {
clientId = CLIENT_ID
discoveryEndpoint = P1_BASE_URL + "as/.well-known/openid-configuration"
scopes = mutableSetOf("openid", "application_api")
redirectUri = "com.example.myapp://oauth2redirect"
}
}
var node: Node? = null;
override fun onCreate(savedInstanceState: Bundle?) {
super.onCreate(savedInstanceState)
enableEdgeToEdge()
setContent {
SessionTransferTheme {
MainLayout()
}
}
}
suspend fun startNativeLogin() {
node = daVinci.start()
handleNode()
}
suspend fun submitCreds() {
val submitCollector = ((node as ContinueNode).collectors[3]) as SubmitCollector
submitCollector.value = submitCollector.key
currentState = DaVinciState.Waiting("")
node = (node as ContinueNode).next()
handleNode()
}
suspend fun handleNode() {
when (node) {
is ContinueNode -> {
currentState = DaVinciState.ShowForm((node as ContinueNode).collectors)
}
is ErrorNode -> {
currentState = DaVinciState.Error("Login Error")
}
is FailureNode -> {
currentState = DaVinciState.Error("Login Failure")
}
is SuccessNode -> {
val user = daVinci.user()
val userInfo: Result<JsonObject, OidcError>? =
user?.userinfo(true)
if (userInfo is Result.Success) {
userID = userInfo.value["sub"]?.jsonPrimitive?.content
username = userInfo.value["username"]?.jsonPrimitive?.content
}
val tokenResponse = user?.token()
if (tokenResponse is Result.Success) {
val token = tokenResponse.value
accessToken = token.accessToken
currentState = DaVinciState.Success(user)
}
}
else -> {}
}
}
@Composable
fun MainLayout(modifier: Modifier = Modifier) {
val scope = rememberCoroutineScope()
Column(
modifier = modifier
.fillMaxSize()
.padding(24.dp),
horizontalAlignment = Alignment.CenterHorizontally,
verticalArrangement = Arrangement.Center
) {
when (val state = currentState) {
is DaVinciState.Idle -> {
// LOGGED OUT STATE
Text(
text = "Secure Session Transfer",
style = MaterialTheme.typography.headlineMedium
)
Spacer(modifier = Modifier.height(8.dp))
Text(
text = "Authenticate to begin the app-to-web flow.",
style = MaterialTheme.typography.bodyMedium,
color = MaterialTheme.colorScheme.onSurfaceVariant
)
Spacer(modifier = Modifier.height(32.dp))
Button(
onClick = {
scope.launch {
startNativeLogin()
}
},
modifier = Modifier
.fillMaxWidth()
.height(56.dp)
) {
Text("Login with PingOne")
}
}
is DaVinciState.Waiting -> {
CircularProgressIndicator()
}
is DaVinciState.Error -> {
Text(
text = "Error",
style = MaterialTheme.typography.headlineMedium
)
Spacer(modifier = Modifier.height(8.dp))
Text(
text = "$state.message",
style = MaterialTheme.typography.bodyMedium,
color = MaterialTheme.colorScheme.onSurfaceVariant
)
Spacer(modifier = Modifier.height(8.dp))
Button(onClick = { currentState = DaVinciState.Idle}) {
Text("Restart")
}
}
is DaVinciState.ShowForm -> {
Text(
text = "Secure Session Transfer",
style = MaterialTheme.typography.headlineMedium
)
Spacer(modifier = Modifier.height(8.dp))
Text(
text = "Enter your login details.",
style = MaterialTheme.typography.bodyMedium,
color = MaterialTheme.colorScheme.onSurfaceVariant
)
val collectors = state.collectors
// USERNAME
val textCollector = collectors[1] as TextCollector
val usernameText =
remember() { mutableStateOf(TextFieldValue(textCollector.value)) }
TextField(
value = usernameText.value,
modifier = modifier
.wrapContentWidth(Alignment.CenterHorizontally)
.fillMaxWidth()
.padding(top = 14.dp),
shape = RoundedCornerShape(8.dp),
onValueChange = {
usernameText.value = it
textCollector.value = it.text
},
label = {
Text(
text = textCollector.label,
)
}
)
// PASSWORD
val passwordCollector = collectors[2] as PasswordCollector
val passwordText =
remember { mutableStateOf(TextFieldValue(passwordCollector.value)) }
TextField(
value = passwordText.value,
modifier = modifier
.wrapContentWidth(Alignment.CenterHorizontally)
.fillMaxWidth()
.padding(top = 4.dp),
onValueChange = {
passwordText.value = it
passwordCollector.value = it.text
},
label = {
Text(
text = passwordCollector.label
)
},
visualTransformation = PasswordVisualTransformation(),
keyboardOptions =
KeyboardOptions(
keyboardType = KeyboardType.Password,
)
)
// BUTTON
Button(onClick = { scope.launch { submitCreds() } }) {
Text("Submit")
}
}
is DaVinciState.Success -> {
Text(
text = "Logged in",
style = MaterialTheme.typography.headlineMedium
)
Text(
text = "Hi $username",
style = MaterialTheme.typography.bodyMedium,
color = MaterialTheme.colorScheme.onSurfaceVariant
)
Spacer(modifier = Modifier.height(32.dp))
}
else -> {}
}
}
}
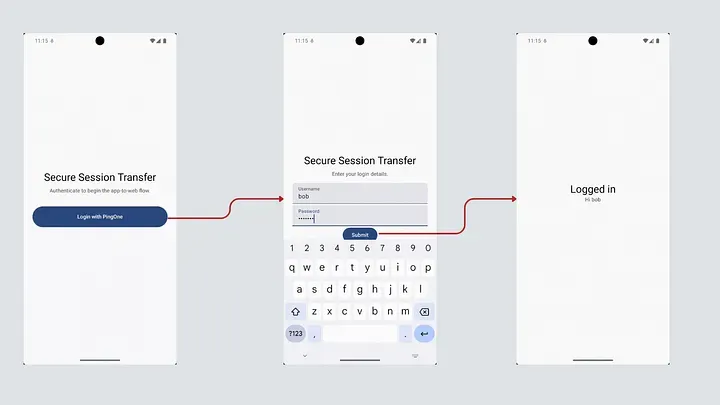
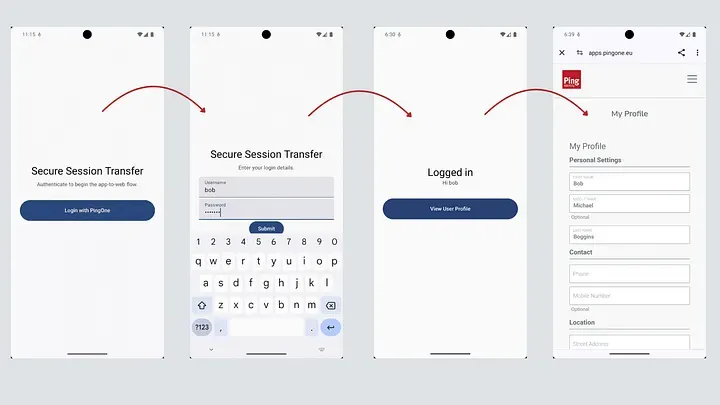
}The code above should be “more or less” directly usable to build an example application, as long as you first follow the prerequisites required by the Ping SDK. It is, of course, provided with no warranties of any kind and must be used for your own education only. Right now, our app is pretty simple, as shown below.
Extending the app to launch web content
Before we dive into the magic of the DaVinci flow that makes our final goal achievable, let’s extend the app code from above to launch the PingOne MyAccount web console in a browser view.
First, we add a button to the UI by modifying the MainLayout compose function as below
@Composable
    fun MainLayout(modifier: Modifier = Modifier) {
/* SNIP */
            when (val state = currentState) {
/* SNIP */
                is DaVinciState.Success -> {
                    Text(
                        text = "Logged in",
                        style = MaterialTheme.typography.headlineMedium
                    )
                    Text(
                        text = "Hi $username",
                        style = MaterialTheme.typography.bodyMedium,
                        color = MaterialTheme.colorScheme.onSurfaceVariant
                    )
                    Spacer(modifier = Modifier.height(32.dp))
//Start of new code
                    Button(
                        onClick = {
                            scope.launch {
                                launchUserProfileInBrowser()
                            }
                        },
                        modifier = Modifier
                            .fillMaxWidth()
                            .height(56.dp)
                    ) {
                        Text("View User Profile")
                    }
// End of new code
                }
                else -> {}
            }
        }
    }
Next we add a function to perform the PAR initiation and launch the browser with the received request_uri value.
suspend fun launchUserProfileInBrowser() {
        val client = HttpClient(Android) {}
        val verifier = PkceGenerator.generateVerifier()
        val challenge = PkceGenerator.generateChallenge(verifier)
        val myIP = getPublicIp(client)
        val requestTimestamp = System.currentTimeMillis()
        val expiresAt = requestTimestamp + 10000 // 10 seconds leeway
        val response: HttpResponse = client.submitForm(
            url = "https://auth.pingone.eu/<PingOne Environment ID>/as/par",
            formParameters = parameters {
                append("client_id", "<PingOne Client ID for Session Transfer Application Client>")
                append("response_type", "code")
                append("scope", "openid web_session_only")
                append("redirect_uri", "https://unused")
                append("request_token", accessToken ?: "")
                append("code_challenge", challenge)
                append("code_challenge_method", "S256")
                append("ip_address", myIP?:"")
                append("exp", "$expiresAt")
                append("application_URL", "https://apps.pingone.eu/<PingOne Environment ID>/myaccount/")
            }
        )

        if (response.status.isSuccess()) {
            val responseBody = response.bodyAsText()
            val jsonResponse = JSONObject(responseBody)
            val requestUri = jsonResponse.getString("request_uri")

            val authorizeUrl = Uri.parse("https://auth.pingone.eu/<PingOne Environment ID>/as/authorize")
                .buildUpon()
                .appendQueryParameter("client_id", "<PingOne Client ID for Session Transfer Application Client>")
                .appendQueryParameter("request_uri", requestUri)
                .build()

            val customTabsIntent = CustomTabsIntent.Builder().build()
            customTabsIntent.launchUrl(this, authorizeUrl)

        } else {
            // Handle HTTP errors (e.g. 400 Bad Request)
            println("PAR Error: ${response.status}")
        }

    }
Lastly, we need a bit of utility code, as below:
// A utility method to figure out our own IP
suspend fun getPublicIp(client: HttpClient): String? {
        return try {
            // Use a lightweight reflector
            client.get("https://api.ipify.org").bodyAsText()
        } catch (e: Exception) {
            null
        }
    }

//A utility object to help with PKCE
object PkceGenerator {
    fun generateVerifier(): String {
        val secureRandom = SecureRandom()
        val code = ByteArray(32)
        secureRandom.nextBytes(code)
        return Base64.encodeToString(code, Base64.URL_SAFE or Base64.NO_WRAP or Base64.NO_PADDING)
    }

    fun generateChallenge(verifier: String): String {
        val bytes = verifier.toByteArray(Charsets.US_ASCII)
        val messageDigest = MessageDigest.getInstance("SHA-256")
        val digest = messageDigest.digest(bytes)
        return Base64.encodeToString(digest, Base64.URL_SAFE or Base64.NO_WRAP or Base64.NO_PADDING)
    }
}
What we have done above is to create a Pushed Authorization Request, where the following have been added as custom parameters:
- request_token: the user’s access token
- ip-address: the current (external) IP address of the device
- exp: a timestamp for 10 seconds from now
- application_URL: the URL of the actual application the user needs to be redirected to once the session has been created.
Next is to craft a DaVinci flow that can use these inputs to deliver the desired outcome.
The second (and far more interesting) DaVinci flow
Before we dive into flow logic, we need to understand a bit about how PingOne SSO and DaVinci work together to handle pushed authorisation requests. In this case, because our Session Transfer Application client has been configured to require PAR and because it has the required flow linked via a DaVinci Policy, any PAR request (once validated to protocol correctness) will be passed to the DaVinci flow as a standard PingOne Flow invocation, with any custom parameters provided via the {{global.parameters.authorizationRequest}} object. Hence to obtain the access token in the flow, we would use {{global.parameters.authorizationRequest.request_token}} and so on.
Our example flow then looks as follows:
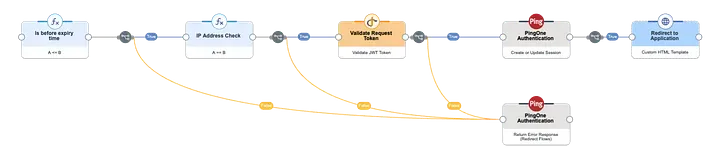
The steps are as follows:
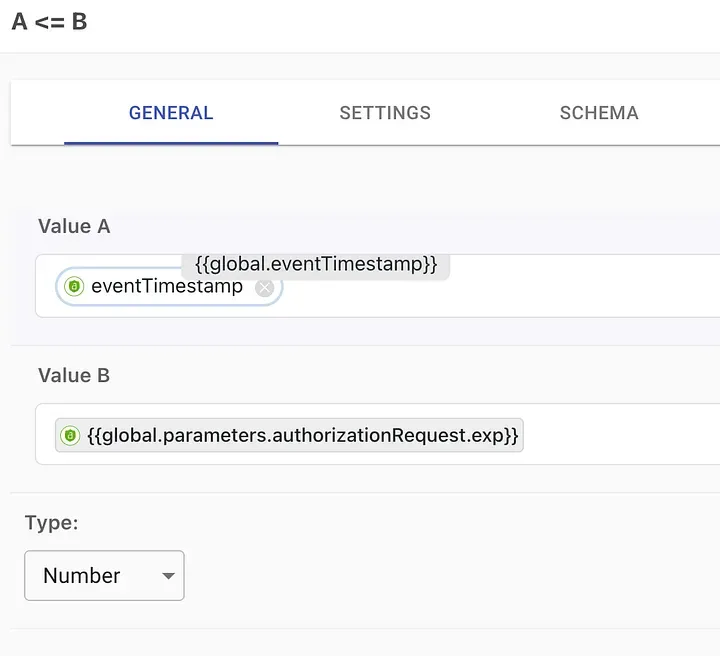
- Check expiry of the request. This is done by using a Function node to compare the exp claim in the authorisation request to the current timestamp. Note that this check is perhaps not entirely necessary, since the PAR functionality in Ping One already constrains the validity of the request_uri, but it is included here as just one of any number of additional security checks that could be added to the flow.
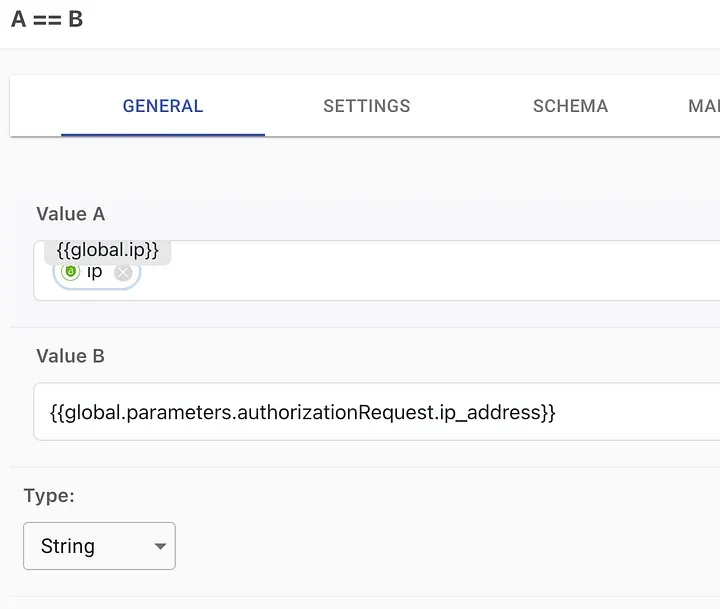
- Check IP address: Again we use a function node to check the current IP address as seen by DaVinci against the address that was included in the PAR payload.
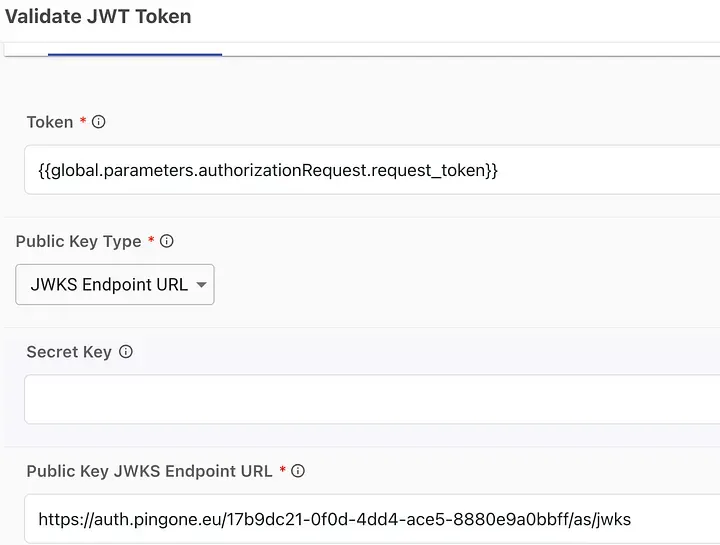
- Validate request token: this is the critical step where we ensure that the access token passed in the PAR payload is valid before extracting the token subject to create a session. In this example, I am using DaVinci’s Token Management -> Validate JWT Token capability and using the PngOne’s environment’s JWKS endpoint to provide the public key for validation. An alternative approach would be to make a REST call to the token introspection endpoint.
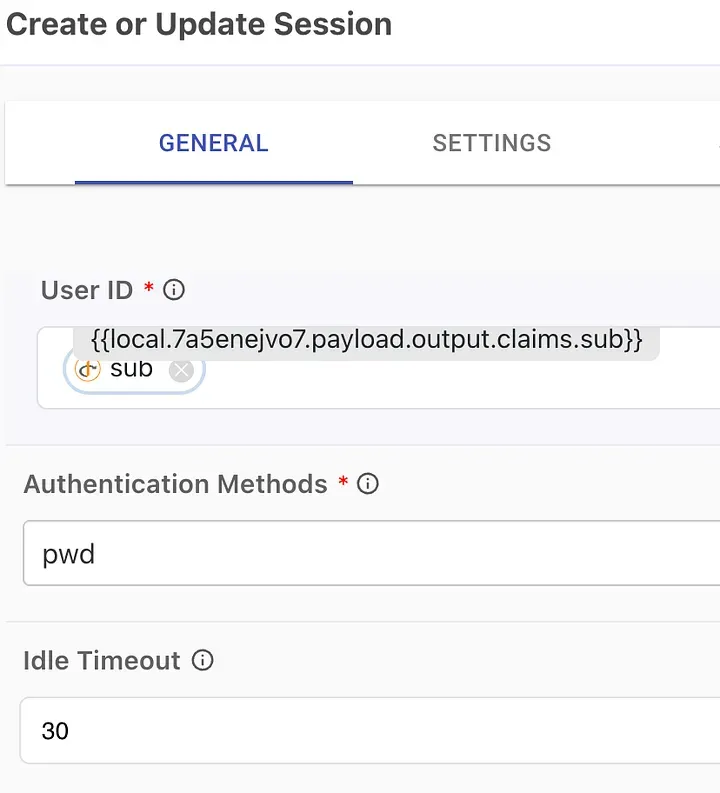
- Create a (web) session for the user: having ensured that a valid token has been provided, we are free to create the necessary session, represented by the PingOne ST cookie in the user’s browser. The simplest way to do this is to use the PingOne Authentication -> Create or Update Session capability
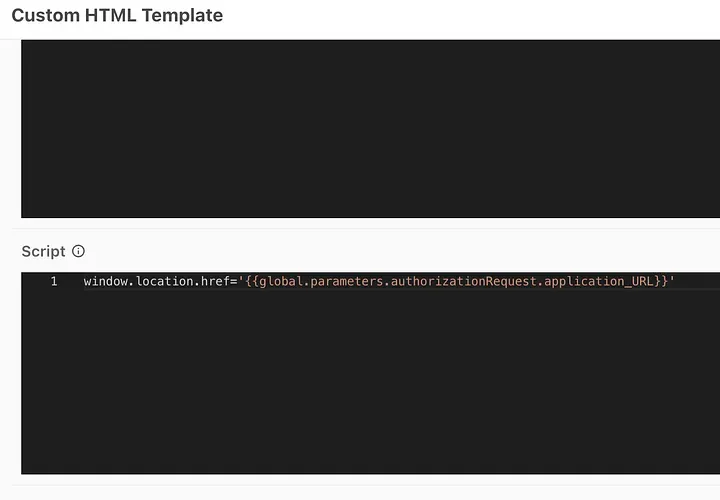
- Redirect to the target application: The final step is to generate a redirect so that the actual application (in our example the MyAccount app) can start its own OIDC flow to transparently log the user in based on the session cookie we just created. I’m using a simple Custom HTML template node in DaVinci with a Javascript redirect.
A final test
We should have everything we need and our application experience now looks as follows:
In our final episode…
In the next article, I will build on this approach and look at a number of advanced techniques we could use to make this hand-off process even more secure.
Do you have thoughts or questions on this article? Join the discussion on the Ping Identity developer community.