---
title: Configuring React Native apps for OIDC sign-on
description: Configure React Native apps to use OIDC centralized sign-on with PingOne, PingOne Advanced Identity Cloud, PingAM, or any OIDC-compliant authorization server
component: orchsdks
page_id: orchsdks:oidc:usage/react-native-centralized-login
canonical_url: https://developer.pingidentity.com/orchsdks/oidc/usage/react-native-centralized-login.html
llms_txt: https://developer.pingidentity.com/orchsdks/llms.txt
docs_for_agents: https://developer.pingidentity.com/build-with-ai/docs-for-agents.md
keywords: ["OAuth 2.0", "OpenID Connect", "Setup & Configuration", "Source Code", "Integration", "SDK", "React Native"]
section_ids:
rn_oidc_server_config: Before you begin
rn_oidc_redirects: Step 1. Configuring your app to handle redirects
rn_oidc_modules: Step 2. Installing modules
rn_oidc_properties: Step 3. Configuring connection properties
configuring_token_storage: Configuring token storage
configuring_logging: Configuring logging
rn_oidc_start_oauth2: Step 4. Starting the OAuth 2.0 flow
using_the_react_provider_and_hook: Using the React provider and hook
rn_oidc_access_token: Step 5. Obtaining an Access Token
rn_oidc_user_info: Step 6. Obtaining user info
rn_oidc_logout: Step 7. Revoking tokens and signing out
rn_oidc_browser: Customizing browser behavior
android: Android
ios: iOS
---
# Configuring React Native apps for OIDC sign-on
[icon: circle-check, set=far]PingOne [icon: circle-check, set=far]PingOne Advanced Identity Cloud [icon: circle-check, set=far]PingAM [icon: circle-check, set=far]OIDC-compliant servers [icon: react, set=fab]React Native
You can configure your React Native apps to use your authorization server's UI, or your own web application, for sign-on requests.
When a user attempts to sign on to your app it redirects them to the central sign-on UI. After the user authenticates, the authorization server redirects them back to your application.
Changes to authentication journeys or flows on your authorization server are available to all your apps that use the OIDC sign-on method, without the need to rebuild or redistribute the app. Likewise, any rebranding applied to your central sign-on UI is reflected immediately in your client apps.
Your app doesn't need to access user credentials directly, just the result of the authentication from the server, usually an access token.
To configure a React Native app to perform OIDC sign-on, complete each of the following steps:
* [Before you begin](#rn_oidc_server_config)
* [Step 1. Configuring your app to handle redirects](#rn_oidc_redirects)
* [Step 2. Installing modules](#rn_oidc_modules)
* [Step 3. Configuring connection properties](#rn_oidc_properties)
* [Step 4. Starting the OAuth 2.0 flow](#rn_oidc_start_oauth2)
* [Step 5. Obtaining an Access Token](#rn_oidc_access_token)
* [Step 6. Obtaining user info](#rn_oidc_user_info)
* [Step 7. Revoking tokens and signing out](#rn_oidc_logout)
Optionally, you can also [customize browser behavior](#rn_oidc_browser) for the sign-on flow.
## Before you begin
You need to prepare your server for OIDC sign-on. Select your server from the options below and complete the tasks before proceeding to configure your application.
* PingOne
* Advanced Identity Cloud
* PingAM
This tutorial requires you to configure your PingOne server as follows:
> **Collapse: Task 1. Create a demo user**
>
> The samples and tutorials in this documentation often require that you have an identity set up so that you can test authentication.
>
> To create a demo user in PingOne, follow these steps:
>
> 1. Log in to your PingOne administration console.
>
> 2. In the left panel, navigate to Directory > Users.
>
> 3. Next to the Users label, click the plus icon ([icon: plus, set=fa]).
>
> PingOne displays the Add User panel.
>
> 4. Enter the following details:
>
> * **Given Name** = `Demo`
>
> * **Family Name** = `User`
>
> * **Username** = `demo`
>
> * **Email** = `demo.user@example.com`
>
> * **Population** = `Default`
>
> * **Password** = `Ch4ng3it!`
>
> 5. Click Save.
> **Collapse: Task 2. Register a public OAuth 2.0 client**
>
> To register a *public* OAuth 2.0 client application in PingOne for use with the Orchestration SDKs for Android and iOS, follow these steps:
>
> 1. Log in to your PingOne administration console.
>
> 2. In the left panel, navigate to Applications > Applications.
>
> 3. Next to the Applications label, click the plus icon ([icon: plus, set=fa]).
>
> PingOne displays the Add Application panel.
>
> 4. In Application Name, enter a name for the profile, for example `sdkNativeClient`
>
> 5. Select Native as the Application Type, and then click Save.
>
> 6. On the Configuration tab, click the pencil icon ([icon: pencil, set=fa]).
>
> 1. In Grant Type, select the following values:
>
> `Authorization Code`
>
> `Refresh Token`
>
> 2. In Redirect URIs, enter the following values:
>
> `org.forgerock.oidc://oauth2redirect`
>
> 3. In Token Endpoint Authentication Method, select `None`.
>
> 4. Click Save.
>
> 7. On the Resources tab, next to Allowed Scopes, click the pencil icon ([icon: pencil, set=fa]).
>
> 1. In Scopes, select the following values:
>
> `email`
>
> `phone`
>
> `profile`
>
> | | |
> | - | ------------------------------------------ |
> | | The `openid` scope is selected by default. |
>
> 8. Optionally, on the Policies tab, click the pencil icon ([icon: pencil, set=fa]) to select the authentication policies for the application.
>
> | | |
> | - | -------------------------------------------------------------------------------------------------------------------------------------- |
> | | Applications that have no authentication policy assignments use the environment's default authentication policy to authenticate users. |
>
> If you have a DaVinci license, you can select PingOne policies or DaVinci Flow policies, but not both. If you do not have a DaVinci license, the page only displays PingOne policies.
>
> To use a *PingOne policy*:
>
> 1. Click [icon: plus, set=fa]Add policies and then select the policies that you want to apply to the application.
>
> 2. Click Save.
>
> PingOne applies the policies in the order in which they appear in the list. PingOne evaluates the first policy in the list first. If the requirements are not met, PingOne moves to the next one.
>
> For more information, see [Authentication policies for applications](https://docs.pingidentity.com/pingone/applications/p1_auth_policies_for_applications.html).
>
> To use a *DaVinci Flow policy*:
>
> 1. You must clear all PingOne policies. Click Deselect all PingOne Policies.
>
> 2. In the confirmation message, click Continue.
>
> 3. On the DaVinci Policies tab, select the policies that you want to apply to the application.
>
> 4. Click Save.
>
> PingOne applies the first policy in the list.
>
> 9. Click Save.
>
> 10. Enable the OAuth 2.0 client application by using the toggle next to its name:
>
> 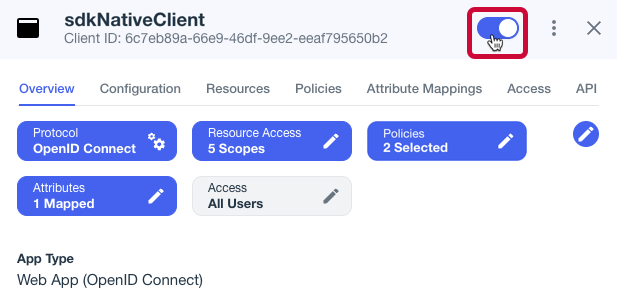Figure 1. Enable the application using the toggle.
>
> The application is now configured to accept client connections from and issue OAuth 2.0 tokens to the Android and iOS PingOne example applications and tutorials covered by this documentation.
This tutorial requires you to configure your PingOne Advanced Identity Cloud tenant as follows:
> **Collapse: Task 1. Create a demo user**
>
> The samples and tutorials in this documentation often require that you have an identity set up so that you can test authentication.
>
> To create a demo user in PingOne Advanced Identity Cloud, follow these steps:
>
> 1. Log in to your PingOne Advanced Identity Cloud tenant.
>
> 2. In the left panel, click Identities > Manage.
>
> 3. Click [icon: plus, set=fa]New Alpha realm - User.
>
> 4. Enter the following details:
>
> * **Username** = `demo`
>
> * **First Name** = `Demo`
>
> * **Last Name** = `User`
>
> * **Email Address** = `demo.user@example.com`
>
> * **Password** = `Ch4ng3it!`
>
> 5. Click Save.
> **Collapse: Task 2. Register a public OAuth 2.0 client**
>
> Public clients do not use a client secret to obtain tokens because they are unable to keep them hidden. The Orchestration SDKs commonly use this type of client to obtain tokens, as they cannot guarantee safekeeping of the client credentials in a browser or on a mobile device.
>
> To register a *public* OAuth 2.0 client application for use with the SDKs in PingOne Advanced Identity Cloud, follow these steps:
>
> 1. Log in to your PingOne Advanced Identity Cloud tenant.
>
> 2. In the left panel, click Applications.
>
> 3. Click [icon: plus, set=fa]Custom Application.
>
> 4. Select OIDC - OpenId Connect as the sign-in method, and then click Next.
>
> 5. Select Native / SPA as the application type, and then click Next.
>
> 6. In Name, enter a name for the application, such as `Public SDK Client`.
>
> 7. In Owners, select a user that is responsible for maintaining the application, and then click Next.
>
> | | |
> | - | ---------------------------------------------------------------------------------- |
> | | When trying out the SDKs, you could select the `demo` user you created previously. |
>
> 8. In Client ID, enter `sdkPublicClient`
>
> 9. Select **Configure for SDK Sample Apps**.
>
> 10. Click Create Application.
>
> PingOne Advanced Identity Cloud creates the application and displays the details screen.
>
> 11. On the Sign On tab:
>
> 1. In Sign-In URLs, ensure the following values appear, or add them if they don't:
>
> `org.forgerock.oidc://oauth2redirect`
>
> | | |
> | - | ----------------------------------------------------------- |
> | | Also add any other domains where you host SDK applications. |
>
> 2. In Grant Types, ensure the following values appear:
>
> `Authorization Code`
>
> `Refresh Token`
>
> 3. In Scopes, ensure the following values appear:
>
> `openid profile email address`
>
> 12. Click Show advanced settings, and on the Authentication tab, confirm the following properties:
>
> 1. In Token Endpoint Authentication Method, select `none`.
>
> 2. In Client Type, select `Public`.
>
> 3. Enable the Implied Consent property.
>
> 13. Click Save.
>
> The application is now configured to accept client connections from and issue OAuth 2.0 tokens to the example applications and tutorials covered by this documentation.
> **Collapse: Task 3. Configure the OAuth 2.0 provider**
>
> The provider specifies the supported OAuth 2.0 configuration options for a realm.
>
> To ensure the PingOne Advanced Identity Cloud OAuth 2.0 provider service is configured for use with the Orchestration SDKs, follow these steps:
>
> 1. In your PingOne Advanced Identity Cloud tenant, navigate to Native Consoles > Access Management.
>
> 2. In the left panel, click [icon: plug, set=fa]Services.
>
> 3. In the list of services, click OAuth2 Provider.
>
> 4. On the Core tab, ensure Issue Refresh Tokens is enabled.
>
> 5. On the Consent tab, ensure Allow Clients to Skip Consent is enabled.
>
> 6. Click Save Changes.
This tutorial requires you to configure your PingAM server as follows:
> **Collapse: Task 1. Create a demo user**
>
> The samples and tutorials in this documentation often require that you have an identity set up so that you can test authentication.
>
> To create a demo user in PingAM, follow these steps:
>
> 1. Log in to the PingAM admin UI as an administrator.
>
> 2. Navigate to [icon: address-card, set=fa]Identities, and then click [icon: plus, set=fa]Add Identity.
>
> 3. Enter the following details:
>
> * **User ID** = `demo`
>
> * **Password** = `Ch4ng3it!`
>
> * **Email Address** = `demo.user@example.com`
>
> 4. Click Create.
> **Collapse: Task 2. Register a public OAuth 2.0 client**
>
> Public clients do not use a client secret to obtain tokens because they are unable to keep them hidden. The Orchestration SDKs commonly use this type of client to obtain tokens, as they cannot guarantee safekeeping of the client credentials in a browser or on a mobile device.
>
> To register a *public* OAuth 2.0 client application for use with the SDKs in AM, follow these steps:
>
> 1. Log in to the PingAM admin UI as an administrator.
>
> 2. Navigate to [icon: list-alt, set=fa]Applications > OAuth 2.0 > Clients, and then click [icon: plus, set=fa]Add Client.
>
> 3. In Client ID, enter `sdkPublicClient`.
>
> 4. Leave Client secret empty.
>
> 5. In Redirection URIs, enter the following values:
>
> `org.forgerock.oidc://oauth2redirect`
>
> | | |
> | - | ---------------------------------------------------------------------- |
> | | Also add any other domains where you will be hosting SDK applications. |
>
> 6. In Scopes, enter the following values:
>
> `openid profile email address`
>
> 7. Click Create.
>
> PingAM creates the new OAuth 2.0 client, and displays the properties for further configuration.
>
> 8. On the Core tab:
>
> 1. In Client type, select `Public`.
>
> 2. Disable Allow wildcard ports in redirect URIs.
>
> 3. Click Save Changes.
>
> 9. On the Advanced tab:
>
> 1. In Grant Types, enter the following values:
>
> ```none
> Authorization Code
> Refresh Token
> ```
>
> 2. In Token Endpoint Authentication Method, select `None`.
>
> 3. Enable the Implied consent property.
>
> 10. Click Save Changes.
> **Collapse: Task 3. Configure the OAuth 2.0 provider**
>
> The provider specifies the supported OAuth 2.0 configuration options for a realm.
>
> To ensure the PingAM OAuth 2.0 provider service is configured for use with the Orchestration SDKs, follow these steps:
>
> 1. Log in to the PingAM admin UI as an administrator.
>
> 2. In the left panel, click [icon: plug, set=fa]Services.
>
> 3. In the list of services, click OAuth2 Provider.
>
> 4. On the Core tab, ensure Issue Refresh Tokens is enabled.
>
> 5. On the Consent tab, ensure Allow Clients to Skip Consent is enabled.
>
> 6. Click Save Changes.
## Step 1. Configuring your app to handle redirects
After completing authentication in the browser, the server redirects the user back to your application, by using the value of the `redirectUri` parameter.
The Orchestration SDK for React Native uses a custom scheme redirect URI to receive this redirect. Using this method, your redirect URI will resemble the following:
`org.forgerock.oidc://oauth2redirect`
To configure a custom scheme in a React Native application, perform the following steps:
* Android
Add the custom scheme your app will use to the `android/app/build.gradle` file:
```gradle
android {
defaultConfig {
manifestPlaceholders["appRedirectUriScheme"] = "org.forgerock.oidc"
}
}
```
| | |
| - | ------------------------------------------------------------------------------------- |
| | The custom scheme consists of the string before the colon (`:`) character in the URI. |
Add an intent filter for `com.pingidentity.browser.CustomTabActivity` to `android/app/src/main/AndroidManifest.xml`, using the `appRedirectUriScheme` placeholder and the host segment of your redirect URI:
```xml
```
* iOS
In Xcode, in the Project Navigator, double-click your application to open the Project pane.
On the Info tab, in the URL Types panel, configure your custom URL scheme:
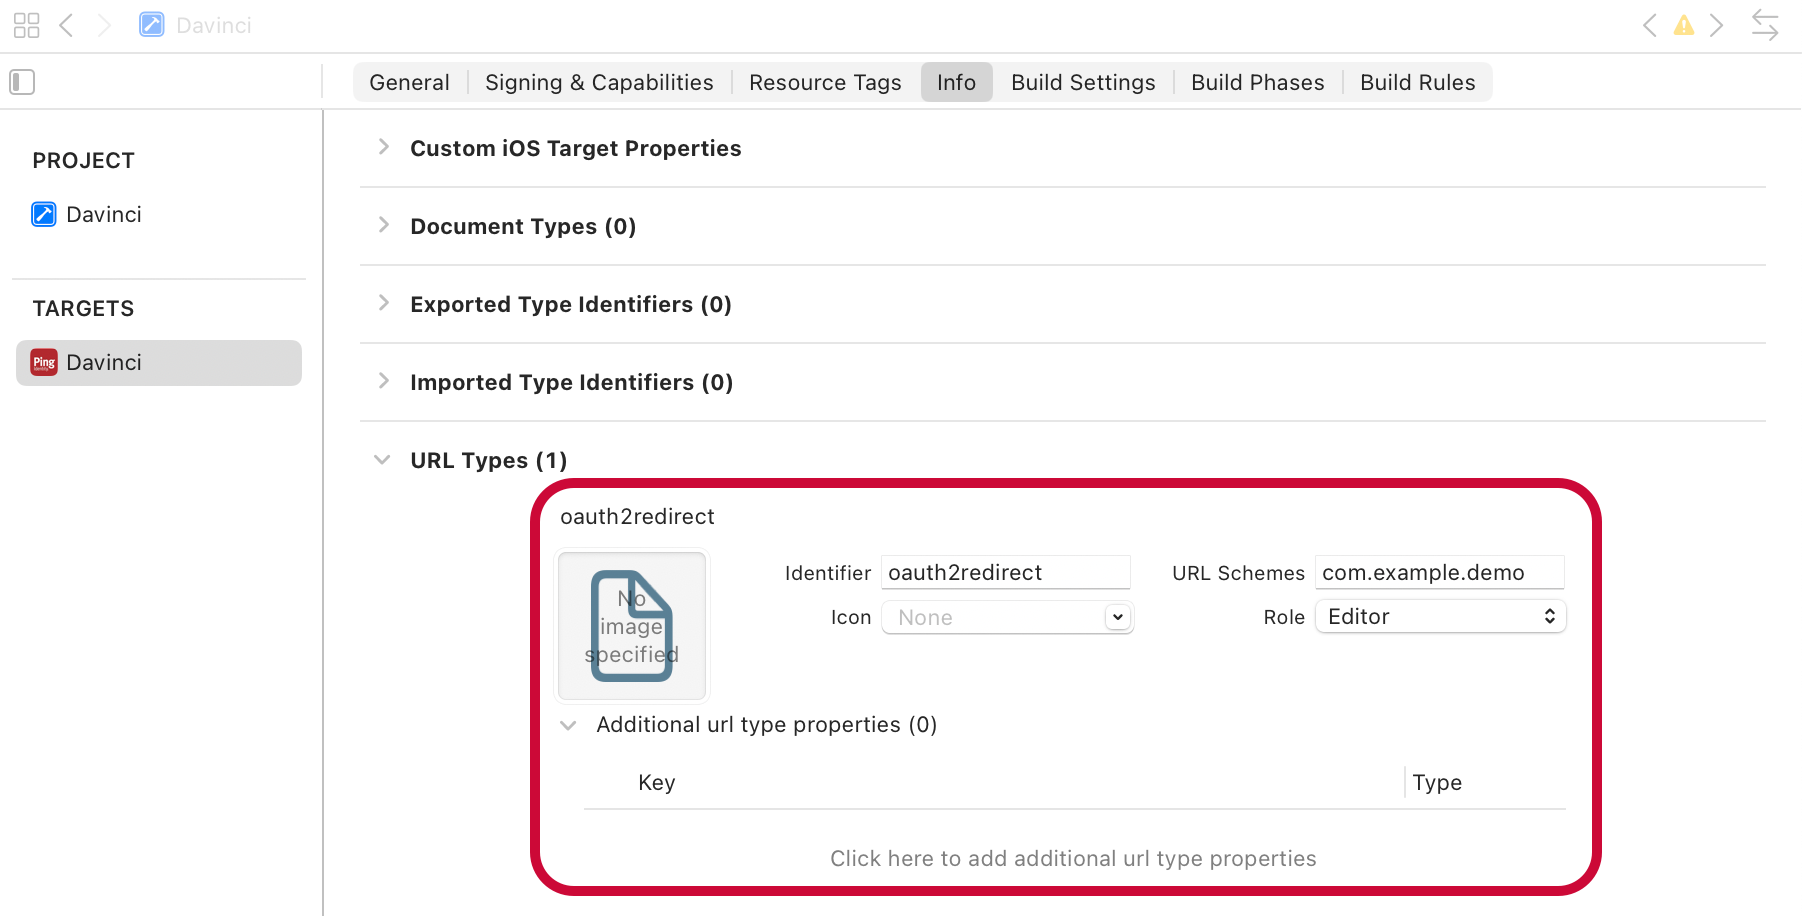
Alternatively, add the entry directly to `ios/PingSampleApp/Info.plist`:
```xml
CFBundleURLTypes
CFBundleTypeRole
Editor
CFBundleURLName
oauth2redirect
CFBundleURLSchemes
org.forgerock.oidc
```
Add the custom URL scheme to the **Redirect URIs** property of your OAuth 2.0 client.
| | |
| - | -------------------------------------------------------------------------------------------------------------------------- |
| | In an Advanced Identity Cloud tenant, enter redirect URIs in the **Sign-in URLs** field, in the **General Settings** pane. |
## Step 2. Installing modules
For OIDC sign-on, install the **OIDC** module for React Native, and its dependency, the **Core** module:
* yarn
* npm
```shell
yarn add @ping-identity/rn-core
yarn add @ping-identity/rn-oidc
```
```shell
npm install @ping-identity/rn-core
npm install @ping-identity/rn-oidc
```
After installation, run `pod install` in your `ios/` directory to link the native dependencies on iOS:
```shell
cd ios && pod install
```
Optionally, install the **Storage**, **Logger**, and **Browser** modules to customize token storage, logging, and browser behavior:
* yarn
* npm
```shell
yarn add @ping-identity/rn-storage
yarn add @ping-identity/rn-logger
yarn add @ping-identity/rn-browser
```
```shell
npm install @ping-identity/rn-storage
npm install @ping-identity/rn-logger
npm install @ping-identity/rn-browser
```
| | |
| - | ------------------------------------------------------------------------------------------------------------------------------------------------------------------------------------------------------------------------------------------------------------------------------------ |
| | The **OIDC** module already bundles the browser components it needs to perform the authorize and logout flows.Install **rn-browser** only when you want to explicitly customize Custom Tabs or Auth Tabs behavior, as described in [Customizing browser behavior](#rn_oidc_browser). |
## Step 3. Configuring connection properties
Configure the `oidc` module to connect to your OpenID Connect 1.0-compliant authorization server, by calling `createOidcClient()`:
Required parameters to configure the OIDC client
```typescript
import { createOidcClient } from '@ping-identity/rn-oidc';
const oidcClient = createOidcClient({
clientId: '6c7eb89a-66e9-ab12-cd34-eeaf795650b2',
discoveryEndpoint: 'https://auth.pingone.com/3072206d-c6ce-ch15-m0nd-f87e972c7cc3/as/.well-known/openid-configuration',
redirectUri: 'org.forgerock.oidc://oauth2redirect',
scopes: ['openid', 'email', 'address', 'profile'],
});
```
Update the following properties with values that match your environment:
* *clientId*
The client ID from your OAuth 2.0 application.
For example, `6c7eb89a-66e9-ab12-cd34-eeaf795650b2`
* *discoveryEndpoint*
The `.well-known` endpoint from your OAuth 2.0 application.
> **Collapse: How do I find my PingOne .well-known URL?**
>
> To find the `.well-known` endpoint for an OAuth 2.0 client in PingOne:
>
> 1. Log in to your PingOne administration console.
>
> 2. Go to **Applications > Applications**, and then select your OAuth 2.0 client.
>
> For example, sdkPublicClient.
>
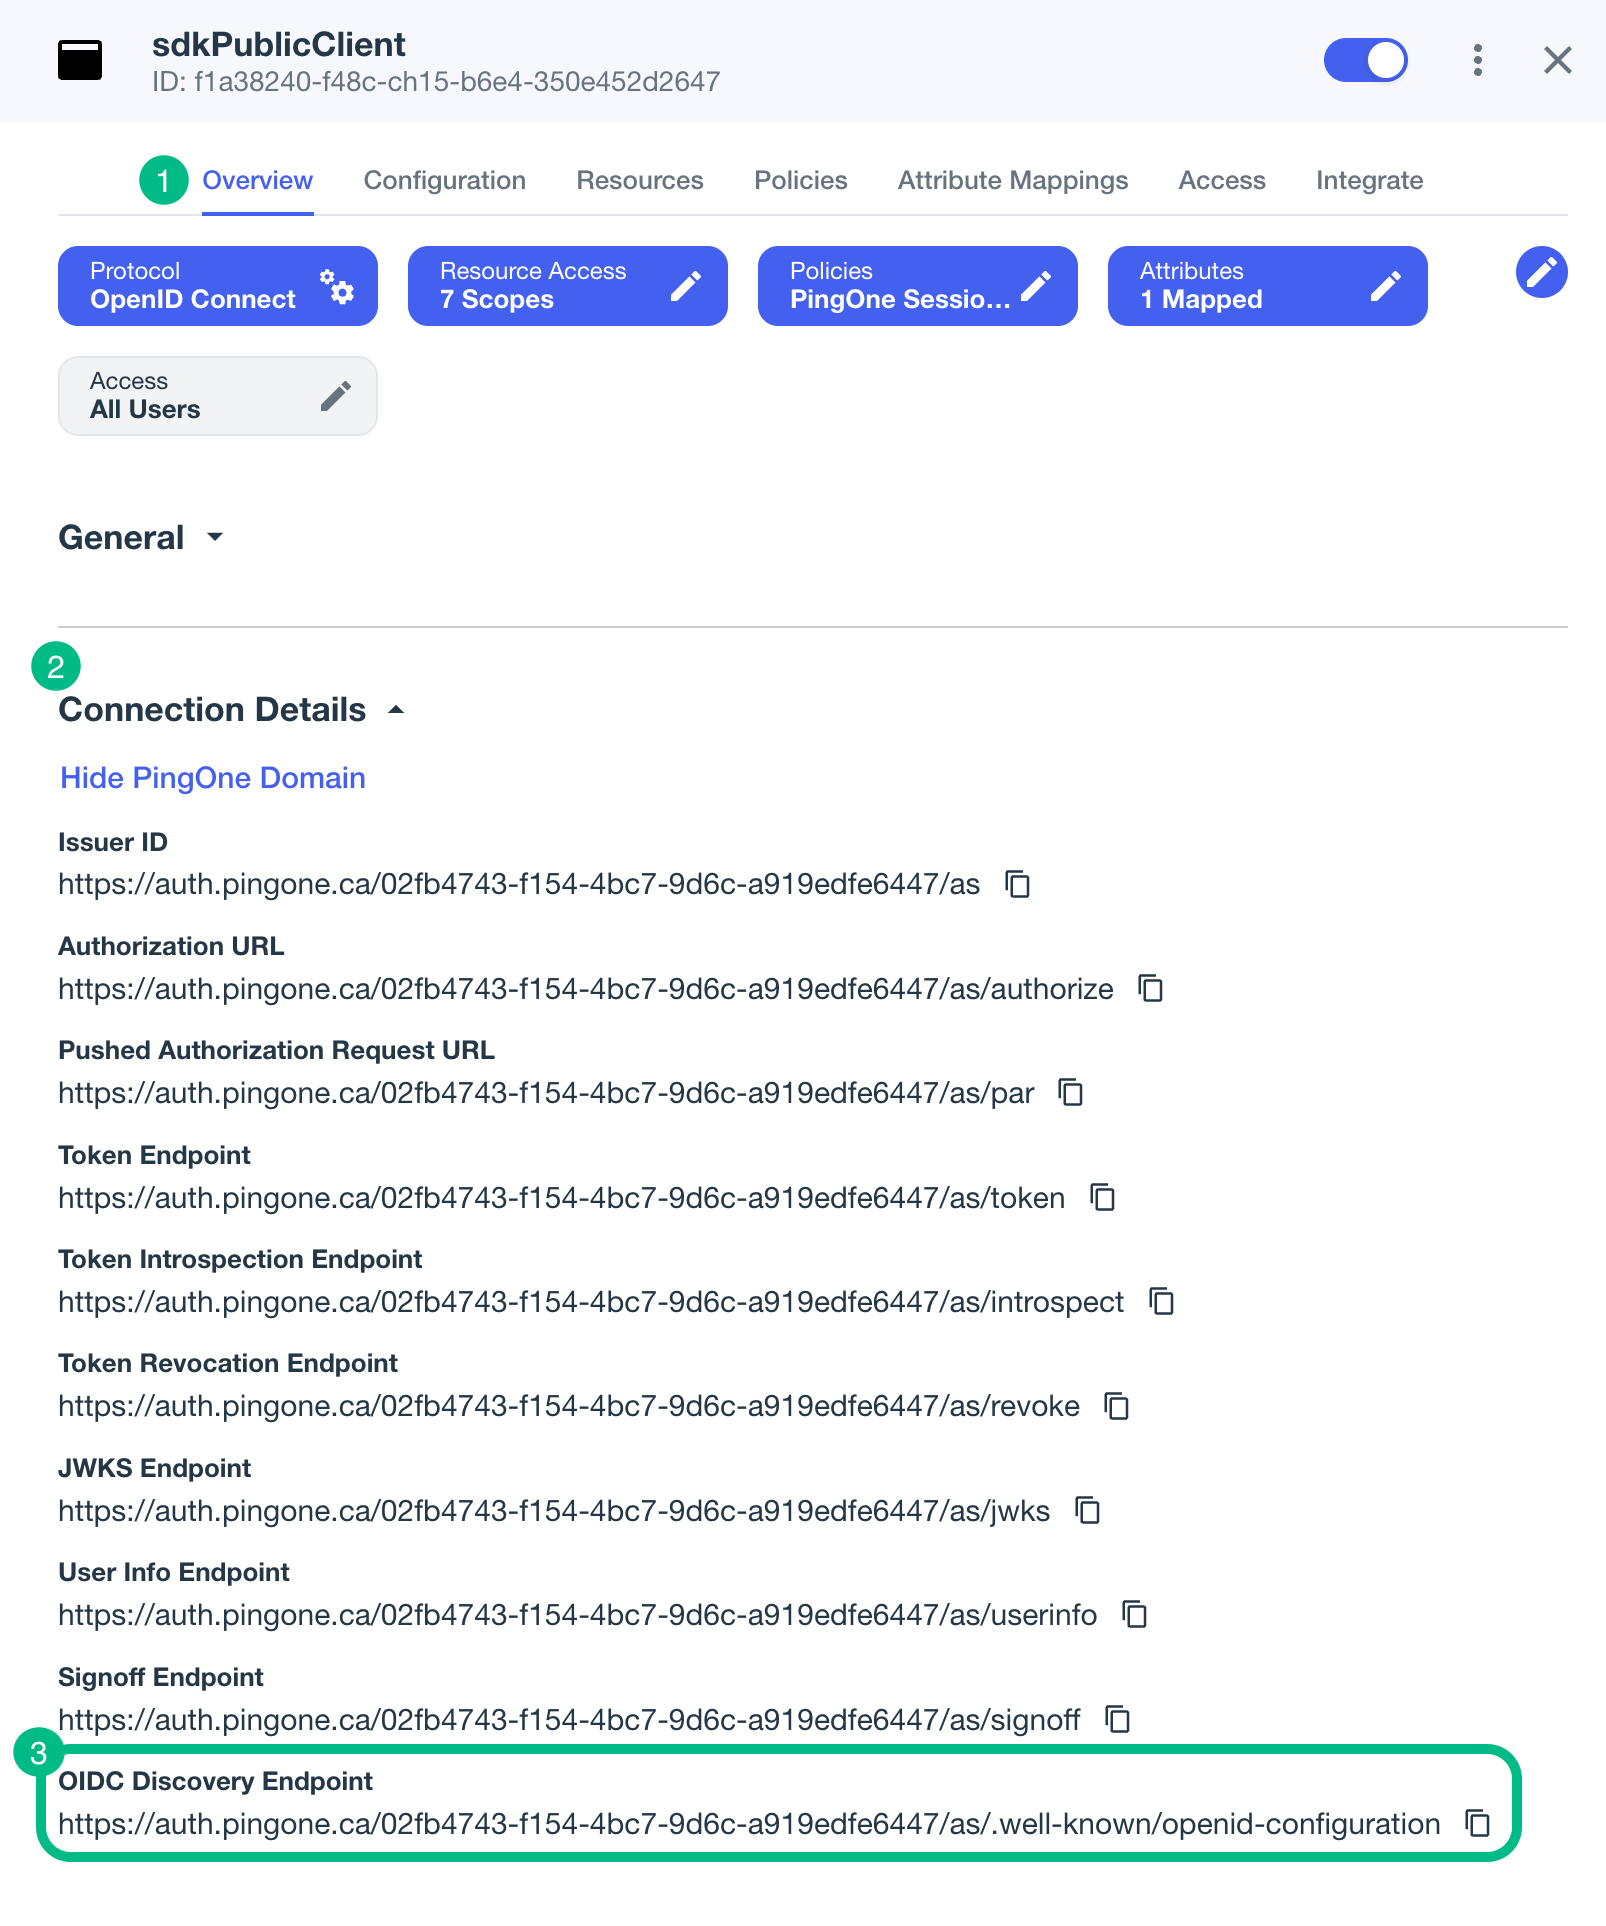
> 3. On the **Overview** tab, expand the **Connection Details** section, and then copy the **OIDC Discovery Endpoint** value.
>
> 
> **Collapse: How do I find my PingOne Advanced Identity Cloud URL?**
>
> You can view the `.well-known` endpoint for an OAuth 2.0 client in the PingOne Advanced Identity Cloud admin console:
>
> 1. Log in to your PingOne Advanced Identity Cloud administration console.
>
> 2. Click Applications, and then select the OAuth 2.0 client you created earlier. For example, sdkPublicClient.
>
> 3. On the Sign On tab, in the Client Credentials section, copy the Discovery URI value.
>
> For example, `https://openam-forgerock-sdks.forgeblocks.com/am/oauth2/alpha/.well-known/openid-configuration`
>
> | | |
> | - | ------------------------------------------------------------------------------------------------------------------------------------------------------------------------------------------------------------------------------------------------------------------------------------------------------------------------------- |
> | | If you are using a custom domain, your `.well-known` is formed as follows:`https:///.well-known/openid-configuration`Learn more in [Access OIDC configuration discovery endpoint](https://docs.pingidentity.com/pingoneaic/latest/realms/custom-domains.html#access-oidc-configuration-discovery-endpoint). |
> **Collapse: How do I find my PingAM URL?**
>
> To form the `.well-known` URL for an PingAM server, concatenate the following information into a single URL:
>
> 1. The base URL of the PingAM component of your deployment, including the port number and deployment path.
>
> For example, `https://openam.example.com:8443/openam`
>
> 2. The string `/oauth2`
>
> 3. The hierarchy of the realm that contains the OAuth 2.0 client.
>
> You must specify the entire hierarchy of the realm, starting at the Top Level Realm. Prefix each realm in the hierarchy with the `realms/` keyword.
>
> For example, `/realms/root/realms/customers`
>
> | | |
> | - | ------------------------------------------------------------------------------- |
> | | If you omit the realm hierarchy, the top level `ROOT` realm is used by default. |
>
> 4. The string `/.well-known/openid-configuration`
>
> For example, `https://openam.example.com:8443/openam/oauth2/realms/root/.well-known/openid-configuration`
For example, `https://auth.pingone.com/3072206d-c6ce-ch15-m0nd-f87e972c7cc3/as/.well-known/openid-configuration`
* *redirectUri*
The redirect URI as configured in the OAuth 2.0 client profile.
This value must exactly match one of the values configured in your OAuth 2.0 client.
For example, `org.forgerock.oidc://oauth2redirect`
* *scopes*
The scopes you added to your OAuth 2.0 application.
For example, `'openid', 'email', 'address', 'profile'`
You can pass optional OAuth 2.0 parameters into the configuration to affect the OAuth 2.0 flow on the server.
Adding optional parameters when configuring the OIDC client
```typescript
const oidcClient = createOidcClient({
clientId: '6c7eb89a-66e9-ab12-cd34-eeaf795650b2',
discoveryEndpoint: 'https://auth.pingone.com/3072206d-c6ce-ch15-m0nd-f87e972c7cc3/as/.well-known/openid-configuration',
redirectUri: 'org.forgerock.oidc://oauth2redirect',
scopes: ['openid', 'email', 'address', 'profile'],
acrValues: 'Single_Factor%20Multi_Factor',
loginHint: 'demo.user@example.com',
additionalParameters: { myCustomParam: 'myCustomValue' },
});
```
For example, you can add the following parameters:
* *acrValues*
An optional space-separated list of Authentication Context Class Reference (`acr`) values, in order of preference.
The server can use these values to help determine how the user should be authenticated.
For example, you can specify a DaVinci flow policy ID, or PingOne policy names to request that PingOne follows a particular path to authenticate the user.
* *loginHint*
An optional string that lets the server know what identifier the user might use to authenticate with.
The server can use this to pre-populate a sign-on form, or to customize the UI to match a particular brand or organization.
* *additionalParameters*
Add any additional key-value query parameters your environment might require to complete an OAuth 2.0 flow.
Learn more about OAuth 2.0 authentication request parameters in [Authentication Request](https://openid.net/specs/openid-connect-core-1_0.html#AuthRequest), in the *OpenID Connect Core 1.0* specification.
### Configuring token storage
Optionally, customize how the module stores tokens on the device by configuring the **Storage** module, and passing the resulting handle into the OIDC client configuration:
Customizing OIDC token storage
```typescript
import { CacheStrategy, configureOidcStorage } from '@ping-identity/rn-storage';
import { createOidcClient } from '@ping-identity/rn-oidc';
const oidcStorage = configureOidcStorage({
android: {
fileName: 'ping-oidc',
keyAlias: 'ping-oidc',
strongBoxPreferred: true,
cacheStrategy: CacheStrategy.CACHE_ON_FAILURE,
},
ios: {
account: 'com.example.app.oidc',
encryptor: true,
cacheable: true,
},
});
const oidcClient = createOidcClient({
clientId: '6c7eb89a-66e9-ab12-cd34-eeaf795650b2',
discoveryEndpoint: 'https://auth.pingone.com/3072206d-c6ce-ch15-m0nd-f87e972c7cc3/as/.well-known/openid-configuration',
redirectUri: 'org.forgerock.oidc://oauth2redirect',
scopes: ['openid', 'email', 'address', 'profile'],
storage: oidcStorage,
});
```
If you don't provide a `storage` configuration, the module uses its default native storage settings.
### Configuring logging
Optionally, pass a logger instance, created with the **Logger** module, into the `logger` property to capture diagnostic output from the OIDC client:
Adding a logger to the OIDC client
```typescript
import { logger } from '@ping-identity/rn-logger';
import { createOidcClient } from '@ping-identity/rn-oidc';
const log = logger({ level: 'debug' });
const oidcClient = createOidcClient({
clientId: '6c7eb89a-66e9-ab12-cd34-eeaf795650b2',
discoveryEndpoint: 'https://auth.pingone.com/3072206d-c6ce-ch15-m0nd-f87e972c7cc3/as/.well-known/openid-configuration',
redirectUri: 'org.forgerock.oidc://oauth2redirect',
scopes: ['openid', 'email', 'address', 'profile'],
logger: log,
});
```
Learn more in [Configuring logging in React Native](../customization/logging/react-native-custom-logging.html).
## Step 4. Starting the OAuth 2.0 flow
Create a web-capable client by passing your OIDC client into `createOidcWebClient()`, then call `authorize()` to launch the browser and start the OAuth 2.0 flow:
Start the OAuth 2.0 flow by using authorize()
```typescript
import { createOidcWebClient } from '@ping-identity/rn-oidc';
const oidcWebClient = createOidcWebClient(oidcClient);
const result = await oidcWebClient.authorize();
// result: { type: 'success' } | { type: 'cancel' }
```
| | |
| - | ---------------------------------------------------------------------------------------------------------------------------------------------------------------------------------------------------------------------------------------------------------------------------------------------------------------------------------------------------------------------- |
| | You can inject or override OAuth 2.0 parameters when starting the OAuth 2.0 flow, by passing options to `authorize()`:Adding parameters when using authorize()```typescript
const result = await oidcWebClient.authorize({
acrValues: 'Social_Signon',
loginHint: '+1 303 555 0100',
additionalParameters: { customParameter: 'my_custom_value' },
});
``` |
### Using the React provider and hook
If you're using React components, you can use `OidcProvider` and `useOidc()` instead of calling the client methods directly. `OidcProvider` shares authentication state, such as the authenticated user and any errors, across every screen that calls `useOidc()`, so you don't need to duplicate state management in each screen.
Using OidcProvider and useOidc to start the OAuth 2.0 flow
```typescript
import { OidcProvider, useOidc } from '@ping-identity/rn-oidc';
function App(): React.ReactElement {
return (
);
}
function OidcScreen(): React.ReactElement {
const [state, actions] = useOidc();
const onLogin = async (): Promise ⇒ {
await actions.authorize();
};
return <>;
}
```
`state` exposes `isAuthenticated`, `user`, `isLoading`, and `error`.
`actions` exposes `authorize()`, `token()`, `refresh()`, `userinfo()`, `revoke()`, `logout()`, and `clear()`.
If you only need OIDC sign-on in a single screen, you can skip the provider and pass the client directly to the hook: `useOidc(oidcWebClient)`.
## Step 5. Obtaining an Access Token
After successfully starting the OAuth 2.0 flow and authenticating the user, the module exchanges the authorization `code` for tokens automatically.
To obtain those tokens, retrieve the authenticated user object by calling `user()`, and then call `token()` on the returned object:
Create a user object and obtain tokens
```typescript
const user = await oidcWebClient.user();
if (user) {
const tokens = await user.token();
console.log('Access token:', tokens?.accessToken);
}
```
`user()` returns `null` if no active session exists.
You can also call `token()` directly on the base client (without launching a browser), which is useful for headless token operations:
Calling token() on the base client
```typescript
const tokens = await oidcClient.token();
```
To exchange the current refresh token for a new set of tokens, call `refresh()`:
Refreshing tokens
```typescript
const tokens = await user.refresh();
```
## Step 6. Obtaining user info
To fetch current user claims from the OIDC `/userinfo` endpoint, call `userinfo()` on the user object:
Fetching user info
```typescript
const profile = await user.userinfo(false);
```
Pass `false` to force a fresh network request, or `true`, the default, to return a cached value, if one is available.
## Step 7. Revoking tokens and signing out
You can call the following methods on your `user` object to revoke OAuth 2.0 tokens, and sign the user out from the server:
* `user.revoke()`
Revokes the OAuth 2.0 tokens on the server, and deletes them from storage.
* `user.logout()`
Removes any session tokens the user may have, and contacts the server to end the user's session.
## Customizing browser behavior
The **OIDC** module uses Auth Tabs on Android where possible, and falls back to Custom Tabs if not supported by the device. On iOS, the module uses an `ASWebAuthenticationSession` by default.
Each platform ignores the other's browser configuration. The `android` options in `configureBrowser()` have no effect on iOS, and the `ios` property has no effect on Android.
### Android
To customize Android Custom Tabs and Auth Tabs globally, install the **Browser** module and call `configureBrowser()` once, before calling `authorize()`:
Customizing Android Custom Tabs and Auth Tabs
```typescript
import { configureBrowser } from '@ping-identity/rn-browser';
configureBrowser({
android: {
customTabs: {
showTitle: false,
urlBarHidingEnabled: true,
colorScheme: 'system',
},
authTabs: {
ephemeral: true,
colorScheme: 'dark',
toolbarColor: '#0B3D91',
},
},
});
```
* `customTabs`
Configuration used when the module falls back to Custom Tabs.
* `showTitle`
Show or hide the page title. Defaults to showing the title.
* `urlBarHidingEnabled`
Allow the URL bar to hide while scrolling.
* `toolbarColor`
Override the toolbar color.
* `colorScheme`
One of `system`, `light`, or `dark`.
* `authTabs`
Configuration used when the module uses Auth Tabs.
* `ephemeral`
Prefer ephemeral browsing, where supported.
* `colorScheme`
One of `system`, `light`, or `dark`.
* `toolbarColor`
Override the toolbar color.
* `navigationBarColor`
Override the navigation bar color.
### iOS
Customize the browser iOS uses for the OIDC sign-on flow by adding an `ios` property to the client configuration:
Configuring the iOS browser type
```typescript
const oidcClient = createOidcClient({
clientId: '6c7eb89a-66e9-ab12-cd34-eeaf795650b2',
discoveryEndpoint: 'https://auth.pingone.com/3072206d-c6ce-ch15-m0nd-f87e972c7cc3/as/.well-known/openid-configuration',
redirectUri: 'org.forgerock.oidc://oauth2redirect',
scopes: ['openid', 'email', 'address', 'profile'],
ios: {
browserType: 'authSession',
},
});
```
Each browser type has different characteristics, which make them suitable to different scenarios, as outlined in this table:
| Browser type | Characteristics |
| ---------------------- | ----------------------------------------------------------------------------------------------------------------------------------------------------------------------------------------------------------------------------------------------------------------------------------------------------------------------------------------------------------------------------------------------------------------------------------------------------------------------------------------------------------------------------------------------------------------------------------------------------------------------------------------------------------------------------------------------------------------------------------------------------------------------------------------------------------------------------------------------------------------------------------------------------------------------------------------------------------------------------------------------------------------------------------------------------------------------------------------------------------------------------------------------------------------------------------------------------------------------------------------------------- |
| `authSession` | Opens a [web authentication session](https://developer.apple.com/documentation/authenticationservices/aswebauthenticationsession) browser.Designed specifically for authentication sessions, however it prompts the user before opening the browser with a modal that asks them to confirm the domain is allowed to authenticate them.This is the default option in the Orchestration SDK for iOS. |
| `ephemeralAuthSession` | Opens a [web authentication session](https://developer.apple.com/documentation/authenticationservices/aswebauthenticationsession) browser, but enables the [`prefersEphemeralWebBrowserSession`](https://developer.apple.com/documentation/authenticationservices/aswebauthenticationsession/prefersephemeralwebbrowsersession) parameter.This browser type *does not* prompt the user before opening the browser with a modal.The difference between this and `authSession` is that the browser does not include any existing data such as cookies in the request, and also discards any data obtained during the browser session, including any session tokens.When is `ephemeralAuthSession` suitable:- [icon: times, set=fa]`ephemeralAuthSession` is *not* suitable when you require single sign-on (SSO) between your iOS apps, as the browser will not maintain session tokens.
- [icon: times, set=fa]`ephemeralAuthSession` is *not* suitable when you require a session token to log a user out of the server, for example for logging out of PingOne, as the browser will not maintain session tokens.
- [icon: check, set=fa]Use `ephemeralAuthSession` when you do not want the user's existing sessions to affect the authentication. |
| `nativeBrowserApp` | Opens the installed browser that is marked as the default by the user. Often Safari.The browser opens without any interaction from the user. However, the browser does display a modal when returning to your application. |
| `sfViewController` | Opens a [Safari view controller](https://developer.apple.com/documentation/safariservices/sfsafariviewcontroller) browser.Your client app is ***not*** able to interact with the pages in the `sfViewController` or access the data or browsing history.The view controller opens within your app without any interaction from the user. As the user does not leave your app, the view controller does not need to display a warning modal when authentication is complete and control returns to your application. |